Share:

Saturday, September 29, 2012

New Entry-level Full-frame Cameras Lower the Cost for High ISO Night Photography

Delicate Arch by Florian Schultz ~ taken with the Nikon D600 @ ISO 3200
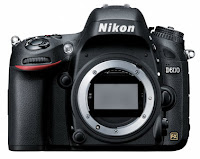
Nikon D600
Canon EOS 6D
Nikon and Canon recently announced two new entry-level, full-frame DSLR cameras that will significantly lower the cost for photographers wanting to enter into the field of doing quality, high ISO night photography. Both the Nikon D600 (released on September 13, 2012) and the Canon EOS 6D (to be released in December 2012) are priced in the U.S.A. at about $2,100. This makes the Nikon D600 about $900 less than the popular D800, and the Canon EOS 6D about $1,400 less than the 5D Mark III. Full-frame image sensors typically produce less image noise than smaller sensors because each pixel in the sensor array is larger and can capture more light, producing a lower signal-to-noise ratio.

Nikon D600 Sensor is Comparable to the D800: The Nikon D600 has a new 24.3-megapixel FX-format CMOS sensor. Nikon says the camera's 14-bit A/D conversion and excellent signal-to-noise ratio enable it to produce images with low noise and wide dynamic range even at high ISO sensitivities. The D600 offers an ISO range of 100–6400, extendable up to 25,600. Recent tests by DXO Labs rate the Nikon D600's sensor higher than the Nikon D3X, Nikon D4, Canon EOS 5D Mark III, and only slightly less than the Nikon D800! It will be interesting to see how well the Canon EOS 6D performs in these same tests after its release in December. (I agree with DxO's conclusion about the D600's sensor performing just slightly below the D800, but I'm not sure I agree that both sensors perform better than the Canon 5D Mark III. This leads me to the belief that the Canon 6D sensor may actually perform better than the Nikon D600 when all the tests are in (see below)).

This shows cropped detail of the top photo (click for an enlargement at 100%)
Examine the Results for Yourself: This Nikon D600 photo was taken using a AF-S NIKKOR 14-24mm f/2.8G ED lens (zoomed to 15mm). The exposure was for 25 seconds @ f/2.8, ISO 3200, with the white balance color temperature set at 3,030 K. This image was taken in RAW and converted to JPEG with Capture NX 2 (you can download the 11.5 MB JPEG here). Note: the arch may appear soft (lacking in texture and detail), and that's probably because it is slightly out of focus, since the focus is set on infinity for the stars, and the f/2.8 aperture setting allows for very little depth of focus. Still, the sky has relatively little noise for an ISO of 3200! (Click here to see other sample images from the Nikon D600.)

Nikon D600 VIDEO: Photographer, Florian Schultz, and his brother, Salomon, share their experiences of testing the new Nikon D600 in a video called, "Chasing the Light" --shot entirely with the D600. Be sure to also see, "The Making of Chasing the Light" --two brothers on a road trip, in an old pick-up truck! (I was intrigued to learn that the D600 has a built-in intervalometer, and also has the ability to preview time lapse shots as a video sequence!)

Nikon D600 Preview: For the best hands-on preview go to this Digital Photograpy Review.

Canon EOS 6D Preview: Because the 6D will not be released until December, there is little information available about it at the moment. For the best hands-on preview of the Canon EOS 6D, with key specs compared to the Canon EOS 5D Mark III and Nikon D600, go to this Digital Photograpy Review.

Lens Compatibility: If you are currently using a Canon camera with an APS-C size sensor and LF-S lenses, you'll also have to upgrade to LF lenses, since the LF-S lenses do not provide full-frame sensor coverage. However, the Nikon D600 FX-format camera does offers support for the complete DX NIKKOR lens lineup (with DX lenses, the camera automatically switches to a 10.5MP DX-format crop mode). One must use FX NIKKOR lenses to take advantage of the camera's full 24.3-million pixels.

My Opinion: Overall, there are several specification on the Nikon side that out-weigh the Canon specs. However, this blog is about night photography and the benefits of low noise at high ISO's.  I think either camera is going to be a smash hit for photographers wanting the higher dynamic range and lower noise of a full-frame sensor. Although the Nikon is the first entry-level full-frame camera out of the gate and with a lot of hype, I think time may show that the image quality of the Canon EOS 6D to be superior at higher ISO's. There are at least two factors that lead me to this belief:
Number One: The default standard ISO range on the Nikon D600 is 100 to 6400, whereas the Canon EOS 6D has a standard ISO range of 100 to 25600, which is two stops greater. This would indicate that the Canon has superior noise control and a higher real life dynamic range.
Number Two: Tests from other sources lead me to believe that the DxOMark Sensor Scores may not be totally reliable (as several others have commented on the DxO website). For instance, they give an overall sensor score of 94 to the Nikon D600, just one point below the Nikon D800's score of 95; and they give the Canon EOS 5D Mark III a dismal score of 81, just two points above the older Mark II's score of 79.
Test pattern at Digital Photography Review (I choose the "BA" area from the bottle of Baileys liquor)
The best comparison test I've found comes from Digital Photography Review. When you take their test chart and compare the original Nikon D600 image file @ ISO 100 with three other images taken at ISO 6400, you'll notice that the Canon EOS 5D Mark III is closer to the ISO 100 image than the other two, followed by the Nikon D800, with the Nikon D600 coming in last. Both the chroma and the luminance noise are higher in the Nikon images, especially in the shadow areas (some would say the D800 chroma noise is worse than the D600). Yet DxO rates both camera sensors considerably higher than the Mark III. It is my opinion that the Canon EOS 6D sensor will be close to the same quality as the Mark III sensor (just as the D600 is close the quality of the D800), and will therefore surpass the sensor quality of the Nikon D600. (Click to enlarge the image below.)
Choose any 3 cameras you want to compare. I chose these and an ISO of 6400 (top left is the ISO 100 control)
Another Indicator To My Above Conclusion: The size of the above JPEG files also indicate the noise quality of the images. We all know that noisier files do not compress as well (lower compression rates). For instance, the Nikon D600 JPEG control image (at ISO 100) is 11.0MB, compared to 14.5MB for the ISO 6400 JPEG file. If you do the numbers below, you can see that the Mark III has the least noise, (because its JPEG file has the highest compression rate), followed by the D800, with the D600 trailing dead last:

   CAMERA FILE        PIXEL SIZE       UNCOMPRESSED / COMPRESSED      COMPRESSION RATIO
   Canon 5D Mk3 file: 5760 x 3840 pixels =  63.28MB /  8.4MB JPEG  =  7.53:1 compression
   Nikon D800 file:   7360 x 4912 pixels = 103.43MB / 18.8MB JPEG  =  5.50:1 compression
   Nikon D600 file:   6016 x 4016 pixels =  69.12MB / 14.5MB JPEG  =  4.77:1 compression

Friday, September 21, 2012

My Unpaid Night Photography Assistant: The Intervalometer

Stars over the Teton Range, from the Cascade Canyon Overlook, Grand Teton, N.P. ~ © Royce Bair
 An intervalometer is a remote, electronic cable or shutter release with a programmable timer. It is "remote" because the length of the cord prevents you from disturbing or jarring the the camera when you push its shutter release button; and it is "remote" because you, or an assistant, do not have to be there to press that release button if it is properly programmed.

How I did it: In the above photo of the Milky Way over the Teton Range, I programmed my Canon intervalometer to give me a 3-minute head start (called a "delay"), so that I had time to walk 800 feet to the right (about 500 feet past the view of the camera). It then remotely opened the shutter for a 30-second exposure, during which time I paint the foreground with a 2-million candlepower spotlight. The remote waited 30 seconds for me regroup myself (called an "interval"), and then it opened the shutter again for another 30-second exposure. I had programmed it to do this five times so that I had a chance to get the light painting just right in at least one of those shots! That's because I had to light the trees and bushes on the left side much longer than the trees on the right side (closest to me) in order to give all the foliage an even exposure. During all of this, I kept an eye on my iPhone stopwatch display, which had been started at the same time as the intervalometer.
I used a Canon EOS 5D Mark II, with a 15mm f/2.8 Fisheye lens @ f/2.8, with a 30-second exposure, ISO 6400. The photo was taken at midnight. The orange glow to the left of the Milky Way is light pollution from the town of Jackson, WY, about 20 miles away. The orange glow in the notch of the Teton Range is from the Idaho Falls metro area, about 75 miles away.)
 Time Lapse and Star Trails: Intervalometers can also be used to do time lapse photography where you program the length of each exposure, the interval or time between each exposure, and the number of exposures you want to make. Software, i.e. QuickTime, will chain these exposures together into a video. Similarly, these remotes can be used to produce star trails, where the exposures are "stacked" together, thus reducing the need for one long exposure, where noise build-up would degrade the final image.

My Intervalometer is the Canon Timer Remote Controller TC-80N3 (about $129 - $210, depending on where you buy it). I've had it for over a year now, it is solidly built, and has proven itself to be dependable and accurate. I also have a 2nd intervalometer that I use as a back up, or to operate a second camera. It's called the Digital Timer Remote For Canon EOS by Neewer (about $14). This is my second purchase of this product. After about four months, I dropped it and broke the plastic battery door on the back. This remote seems to work well, but is not built as solidly as the Canon product. Still, at this price it's a great timer remote for the occasional user, or if you're only going to use it as a remote shutter release (which requires no programming --you just push the button). It also uses two standard AAA batteries that go dead after about six months, because it has no on/off switch, and just stays on all the time (of course, neither does the Canon, but its flat CR 2032 battery last about twice as long).

If you're a Nikon DSLR user, you may want to get the Nikon MC-36 Multifunction Remote Cord (about $155 to $180, depending on where you buy it). It is compatible with the D2 series, D1 series, D100, D200, D300, D700, D3, F6, F5, F100, and the MC-26 Adapter Cord. This Nikon support page shows a variety of remote connections that can be used to trigger your camera. The Neewer brand Digital Timer Remote for Nikon is available for under $10 --a good option for the occasional user, or someone just wanting to use it as a remote shutter trigger (no programming required, and even works if the batteries are dead).

Royce Bair is the editor of this blog and the photographer of the above image. Here is my gallery of NightScape images. My schedule of workshops, tutorials, and other events is available here.

Wednesday, September 19, 2012

Our Night Photography Audience

"Colors of Autumn" © David Cartier, Sr. - Yukon, Canada
 A recent poll shows that 70% of my subscribers are "Serious amateur" photographers, and that the balance (30%) are "Part-time professional" photographers. The other choices were "Occasional hobbyist" photographers, and "Professional" photographers (earning 50% or more of their income from photography). You can take the poll yourself (until October 18, 2012).
David Cartier, our featured photographer, claims to be an "Unemployed Bum", so I don't know where he'd fit if he took that survey ;-). David lives in Whitehorse, Yukon, Canada. He has some of the best Northern Lights photos I've ever seen, and many of them were shot on film. A considerable number were taken with an old Russian Kiev-19 35mm SLR. David adds, "This camera , which I still use for night sky photos, NEVER freezes up or has any shutter problems in the cold, even at minus 60!! The more expensive Japanese and German cameras which I own always, or at least often, stop functioning in the deep cold."
I decided to invite the subscribers of my Your Photo Vision blog and newsletter to take this poll (and another poll about their interests) after discovering that a large percentage had interest in doing night photography. Even though that blog covers a wide variety of photo-related subjects, it appears that night photography is of considerable interest to my subscribers (80% wanted to learn and improve on their night photography techniques). Of course, we all wonder about the accuracy of polls, because most of us like to hear the results of a poll, but few of want to participate in taking the poll!

New Poll: What areas of night photography interest you the most? (Multiple answers are allowed.) This poll takes about 40 seconds, and will help drive the direction of my future posts. You can view the results of the poll immediately, and come back later for an update until October 19, 2012.

Monday, September 17, 2012

James Neeley: Capturing a Glimpse of the Divine

"Starry Night" near Arco, Idaho ~ © James Neeley
James Neeley likes all types of night photography including cityscapes, light painting, fireworks, and stars; however, high ISO Milky Way photography is foremost on his list. "I love the natural world. Add to that the fact that there are 100 billion stars in our galaxy and 100 billion galaxies out there, photographing just a small part of this amazing universe we live in gives me a glimpse of the divine."

"San Francisco Nights" ~ © James Neeley

 James is a serious-amateur photographer who lives in Idaho Falls, Idaho, and supports his family as a physician. He is best known to many for his HDR landscape photography and his Mountain High Workshops.

"Light Show" - Light painting Delicate Arch during the "Blue Hour" ~ © James Neeley
Neeley enjoys light painting some of his night landscapes. In the above photo, he found it a real balancing act between the ambient light which was decreasing rapidly and the artificial light he and the members of his photo group brought. Fortunately, one of the participants brought a powerful light which became affectionately known as "Big Bertha" and had enough output to light the arch against the twilight sky. (Note: this exact product seem to no longer be available, however a similar 18 million candle power, rechargable halogen spotlight is made by Cyclops.)

High ISO Milky Way Photography is a passion for James. "I [had] done some long exposure astrophotography with a dedicated, cooled CCD camera through a telescope. When the Nikon D3/D700 came out with the ability to shoot fairly low noise pictures at 6400 ISO, I jumped at the chance to try capturing the Milky Way."

However, the latest and the greatest isn't always the best for this style of night work. Neeley still prefers the Nikon D3s camera. "In my opinion this camera has the best high ISO performance, even just edging out the [new] D4."

"Going Deep" - Arches National Park ~ © James Neely
 One of the biggest challenges he faces is ambient light or light pollution. "When you shoot at ISO 6400, f2.8, for 30 sec. even the darkest sites show some ambient light. Only the true 'dark sites' have the quality of sky to not show much extraneous light."

Unprocessed version of "Going Deep" (compare with above image) ~ © James Neeley
Image Enhancing: James doesn't do anything special except Photoshop CS6 for processing. The above photo is an unprocessed image. Processing consisted only of increasing the contrast of the sky (which also darkens the sky and intensifies the color) and increasing the brightness of the foreground just a bit.

Noise Reduction: Here's some advice from James: "A low noise full frame sensor is important. The critical camera setting is to turn on long exposure noise reduction. The camera will then take a dark frame following the exposure for the same time as the exposure itself and then subtract the images to greatly reduce the noise and hot pixels.

Remember, I'm not only shooting a long exposure but high ISO (6400 or 12800). If you want a real shock turn off long exposure noise reduction and shoot a 30 sec. exposure at ISO 6400 in a dark room at a blank wall. Your camera, or any camera for that matter will show multiple hot pixels. For this type of photography you must use long exposure noise reduction or take a dark frame and do the subtraction later on in post."

For additional post-production noise reduction, James likes Neat Image.

More of James Neeley's photography is available at his blog and his Flickr photostream.

Wednesday, September 12, 2012

Searching for Darkness - Using 'Dark Sky Finder' to locate the Darkest Skies for Night Photography

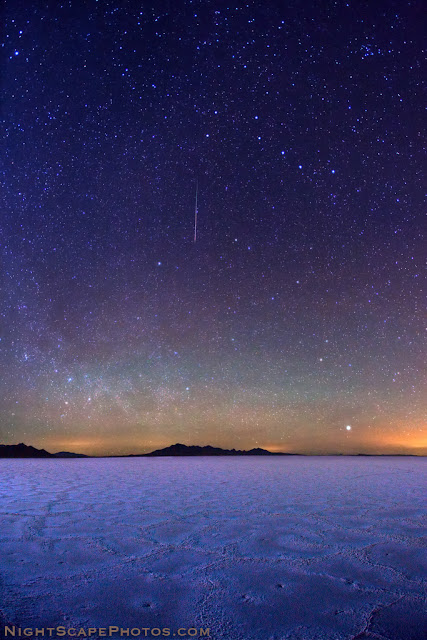
Big Dipper stars and meteor over Bonneville Salt Flats, Utah ~ © Royce Bair
Trying to find a sky dark enough to reveal the stars in the night sky can be challenging when you live near a large city. The high light pollution from the city lights overpowers all but the brightest stars. For this reason, I often drive west of Salt Lake City, where I live, and into to the west desert. The famous Bonneville Salt Flats are located about 90 miles west of SLC, just off of I-80, about 10 miles before you reach the border town of Wendover, Nevada. In the above photo, I was able to capture a meteor during the Quadrantid meteor shower, as it streaked between the Big Dipper and Polaris.

How far away from the city lights does one have to travel to find skies dark enough to photograph the stars? Typically, I tell people that you must be about 50 to 75 miles (80 to 120 km) from a large city (over 100,000 population), and 5 to 10 miles (8 to 16 km) from a smaller town (under 10,000). That can be difficult in many of the populated areas of the world.

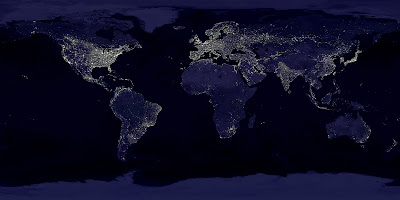
The Earth at Night - "Earth's Lights" - a composite satellite image from NASA
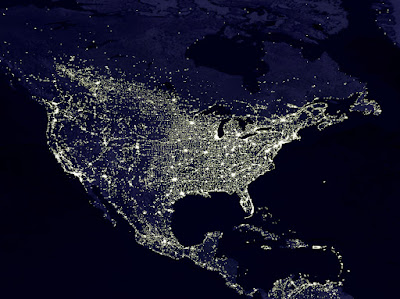
Here's a closer view of just North and Central America
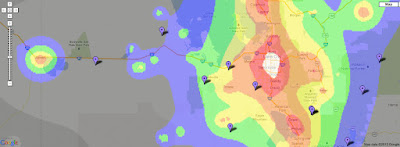
A Useful Tool: A more scientific approach is to use a website I found recently called, "Dark Sky Finder". Jonathan Tomshine has incorporated light pollution information from the NOAA National Geophysical Data Center and layered it over Google Maps! Here a screenshot of the Salt Lake City metro area and the desert area, west to Wendover, NV. (If you click and enlarge the map, you can see the Bonneville Salt Flats along I-80, just before you get to Wendover.):

Dark Sky Finder screenshot of SLC metro and west desert to Wendover, Nevada
The color coding indicates the sky darkness of area: the white and red layers over the city center are pretty much "white-out" areas! The orange areas over the city suburbs aren't much better. These areas allow one to barely see only the brightest stars. The yellow areas have somewhat acceptable viewing conditions. The green areas are acceptable for star photography, but the blue and dark grey areas are best. As with all Google maps, you can toggle between this "Map" view and the "Satellite" and "Hybrid" view. Unfortunately, the NOAA light pollution data is only available for the USA.

Technical data for the top photo: The NightScape of the stars over the Bonneville Salt Flats was taken on January 4, 2011 at 3:45 A.M with a Canon EOS 5D Mark II camera, using a Canon EF 15mm f2.8 Fisheye lens @ f3.5, 30 seconds, ISO 2500.

Find Darkness in a High Population Area: Check out this article about photographer, Jack Fusco, and how he overcame the challenges of light pollution in New Jersey!

Royce Bair is the editor of this blog and the photographer of the top image. Here is my gallery of NightScape images. My schedule of workshops, tutorials, and other events is available here.

Two Worlds in One Night Photo - The Close Encounters of Masahiro Miyasaka

"Frosted Leaf Galaxy" by Masahiro Miyasaka
Masahiro Miyasaka, of Suwa-city Nagano, Japan, has shown us how to take close-ups of our natural world and focus on the night sky, all in one unique photo! This amazing photograph was featured in NASA's "Astronomy Picture of the Day" (APOD) for November 17, 2010.

The incredible depth-of-focus in this photo was accomplished by focusing on the stars (at infinity) with an exposure of f/2.8 for 48 seconds (ISO 4000), THEN stopping down the aperture to f/22 and shifting the focus to the leaf--with the shutter is still open! While in this macro focus position, he lighted the leaf with an LED for a predetermined amount of time, and then closed the shutter. Masahiro used a Sigma 15mm F2.8 EX DG Fisheye lens (Nikon mount, with a conversion to Canon) on his Canon EOS 5D Mark II camera body. A more complete description is found on this Flickr page. A similar technique was used in this photo:

"Galactic lily" by Masahiro Miyasaka
A more complete description is found on this Flickr page. For more of Masahiro's nightscape photos, visit his Flickr photostream.

Advertisement: Hot Weekly Photography Deals - Amazing discounts (updated twice a week).

Tuesday, September 11, 2012

Two Nightscape Lenses for the Price of One

The Watchman and the Milky Way, Zion National Park ~ © Royce Bair
The Canon EF 15mm f/2.8 Fisheye lens is one of my favorite night photography lenses because it allows me to include more than twice the sky as my 24mm lens (180º vs. 84º), and because it's really two lenses in one. Let me explain...

Although the heavy barrel distortion from this lens creates a special effect that is liked by many people, I can remove that distortion with software if I choose. The software-corrected image gives me a view somewhat similar to the Canon EF 14mm f/2.8L II USM Ultra-Wide Angle lens, which has a fairly undistorted 114º angle of view (but costs about three times as much as the Canon fisheye).

Here's an example of what I mean. Above, is a shot of The Watchman and the Milky Way, taken from the foothills west of Springdale, Utah at 2:00 in the morning (light pollution from the city is lighting The Watchman). This is the fisheye view without any distortion correction.

In the next image, I left the barrel distortion alone on the left side, but did a partial correction on the right side using Photoshop's "Edit > Transform > Warp" function:

Same image as above, with partial distortion correction on right side ~ © Royce Bair
Although a more complete distortion correction could have been accomplished with software, i.e. DxO Optics Pro, I've found this is not always as aesthetically pleasing as being more selective via Photoshop. I should point out that this lens has fairly acceptable coma at its wide-open aperture of F/2.8; it is about 65% corrected at F/3.5, and it is about 75% corrected at F/4.0.

Both of these photos were taken with the 15mm mounted to the Canon EOS 5D Mark III camera body, which produces amazingly low-noise at the high ISO of 6400 (exposure was 30 seconds @ f/3.5).

My favorite Prime Lens for Starry Night Skies: is the Samyang/Rokinon/Bower 24mm f/1.4 because it can be shot wide open, and it produces very little coma aberration (it also costs about one-third of the Canon and Nikon lenses with equivalent specs)!

Royce Bair is the editor of this blog and the photographer of the above images. Here is my gallery of NightScape images. My schedule of workshops, tutorials, and other events is available here.

Monday, September 10, 2012

Dylan MacMaster: Pining away at the Stars

Anthony Lake, Oregon ~ © Dylan MacMaster


Dylan MacMaster is one of the best self-taught, amateur night photographers I know. Dylan is an engineer and currently lives with his wife and three children in Boise, Idaho.

Virtually all of MacMaster's nightscapes are single exposures. He rarely, if ever, produces a night scene where he's combined two or more images in post production. He works hard to get everything in one shot. The above photo is a good example of his technique.

The star trails were produced with one 30-minute time exposure, using a 17mm lens @ f/4.0 (ISO 200) on a Canon EOS 5D Mark II. During this exposure he did light-painting (for 45 seconds) on the little rocky island of pine trees with his LED headlamp.

Dylan ran a test beforehand to determine the light-painting exposure. Here's the 66-second version, which has a interesting, minimalist nature of its own:

66-second, light-painted test exposure for the rock island ~ © Dylan MacMaster
After this test, MacMaster decided to reduce the final light-painting time to 45 seconds (during the 30-minute time exposure that recorded the star trails). While waiting for the time exposure to record the trails, he sat down and wrote these words:
"The beauty of this night is almost impossible to put onto words. The stars shine above and the brightest wink their reflections in the glass-like water below. The sound of rushing water comes to me across the lake as the winter's snow-melt cascades down the mountain. A chorus of frogs creates a symphony in the night and there is just enough breeze so you can feel it, but not enough to disturb the pristine mirror that is Anthony Lake. This will likely be one of my most memorable nights out shooting."
 ...and it was...

Like Dylan, I've come to appreciate another wonderful world that awaits us under these starry night canopies.  It seems like our senses are heightened by the cool night air and the majesty of the infinite universe overhead.

Epilogue: Dylan entered the top photo into the Western Idaho State Fair last year and won 1st place in "Night Scenes" category.

Overcoming Coma in Starry Night Photography


A night photographer must learn how to control lens aberrations, like coma, in order to produce great photos of a star-filled sky that includes landscape features. (Click on above image for more information and a larger view.)

Those who are familiar with my recent style of NightScape work know that I'm photographing the stars as points of light, rather than as star trials. To do this, I must keep my exposures under 30 seconds, and often as short as eight seconds, depending on the focal length of the lens. In order to get the proper sky exposure, I must use high ISO's (typically above 6400), and large lens apertures, such as f/2.8 or wider.

The problem with shooting a lens wide open is that stars can really show off the faults or aberrations of a lens, especially coma. Comatic aberration causes point sources, such as stars, to appear distorted --appearing to have a tail (coma) like a comet. These coma "tails" are most apparent near the edges of a photo. The good news is that 50% of the distortion goes away when a well-designed lens is stopped down by one stop, and about 80% goes away by two stops. Unfortunately, with my night photography, I can't afford the light loss that comes with stopping down from f/2.8 to f/4.0 or f/5.6!

This is the reason I purchased the Canon EF 24mm f/1.4 L USM II Wide Angle Lens. This lens was used to photographed the above photo of the Milky Way over the Watchman, in Zion National Park. As you can (below) from my own tests on point sources of light, this lens is fairly well-corrected by f/2.8 (click on the image for a larger view):


You'll notice that by closing down two more stops, to f/5.6, does not produce as significant of an improvement! If I get in a pinch, and need more light, I can get acceptable results at f/2.0. But the real beauty of this lens is the bright image it gives you in the viewfinder. You can imagine that composing in near pitch black is made so much easier with this brilliant, f/1.4 lens!

I get similar results with my Canon EF 50mm f/1.4 USM Standard Lens. By stopping down to f/2.8, I've been able to make print enlargements up to 24x36 inches (and 30x40) with very pleasing results. Stopping down to f/2.0 reduces my print quality to about 18x24 inches (or 16x20). Shooting wide open (f/1.4) means I cannot enlarge my prints much beyond 8x10 or 11x14 inches (unless I don't want my name associated with them)!

Royce Bair is the editor of this blog and the photographer of the above images. Here is my gallery of NightScape images. My schedule of workshops, tutorials, and other events is available here

UPDATE - Inexpensive prime lenses with almost NO coma: Check out part II about the Samyang / Rokinon lenses. These lenses can be used wide open (at f/1.4), and have very little coma!

Saturday, September 8, 2012

Nightscapes on a Budget

NightScapes by my definition are "starry night skies that include a landscape feature."

"Milky Way over Jackson Lake and Teton Range" in Grand Teton N.P. ~ © Royce Bair
Many photographers look at my NightScapes, like this photo of the Milky Way over Jackson Lake and the Teton Range, and say, "These are awesome photos, but I don't have the equipment to produce this kind of work." That's somewhat true, because starry night skies are about 130 times darker than even a sky lit with a quarter moon!

For the very best nightscape work, expensive, full-frame sensor DSLR cameras such as the Nikon D3, D4, or the Canon 5D Mark III (like I have) are helpful in producing low-noise images of star-filled skies (as points of light) with nighttime landscapes. However, good nightscapes can still be taken with almost any DSLR or point-and-shoot camera that is capable of an ISO setting of 1600 and above. Here are some examples (click on the image to see the full gallery):


The purpose of this gallery is to show that one doesn't have to have the latest and greatest equipment in order to get good Nightscapes. These photographers have spent 1/2 to 1/5 the money and have much to show for their smaller investment. Camera, lens, and exposure information are provided with each image. ENJOY! Now, go out and start taking your own nightscapes --they've proved it can be on done on a budget!

Friday, September 7, 2012

Purpose and Scope of this Night Photography Blog

This blog was created for three reasons:
  1. To show the wonders and beauty of the night sky.
  2. To share as many varieties of night photography as possible.
  3. To share techniques and equipment for nocturnal photography.
Many of my posts will be how-to tutorials on the art of night photography, and I plan to provide many links and references.

To accomplish this goal, I will share not only my images and knowledge of nocturnal photography, but I will bring to this blog the vision and skills of scores of other photographers.

My definition of night photography is fairly broad. They are dusk to twilight photos that require a long exposure, or that require high ISO's for short exposures. They are photos of the the stars, planets, and/or the moon lit sky, with a land feature (i.e. "nightscapes"). They include light-painted objects and cityscapes at night.

I hope you will join me and share this blog with your friends. You can see additional night images on my Flickr group with the same name as this blog: Into the Night Photography.

"Milky Way Dawn over Grand Teton Range" ~ © Royce Bair MMXII
This photo was taken about two hours and 45 minutes before sunrise, from the Elk Ranch Flats Turnout, in Grand Teton National Park. I had several things happening in my favor this night: prismatic colors due to recent wildfire smoke and a considerable amount of airglow in the sky above the smoke. The photo was taken with a Canon 5D Mark III • EF 24mm f1.4L II lens • 15 seconds @ f2.8 • ISO 8,000. This image is part of my NightScape series. You can also watch a video tour of my NightScapes, set to music.

Royce Bair is the editor of this blog and the photographer of the above image. Here is my gallery of NightScape images. My schedule of workshops, tutorials, and other events is available here

Advertisement: Hot Weekly Photography Deals - Amazing discounts (updated twice a week).