 |
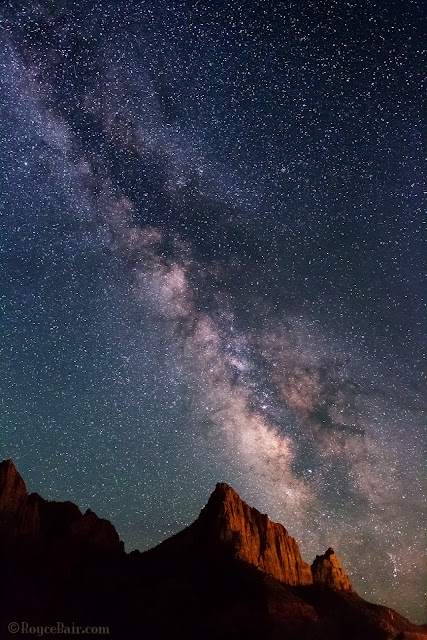
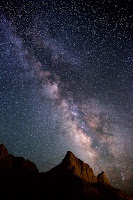
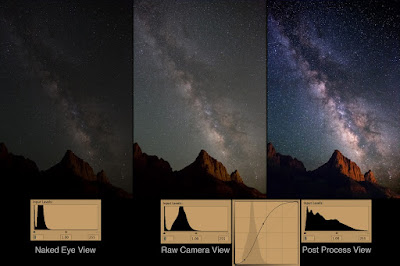
| Milky Way over The Watchman - Zion National Park, Utah. Light on mountain is light pollution from nearby Springdale city street lights ~ © Royce Bair |
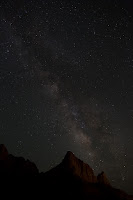 |
| Simulated naked eye view |
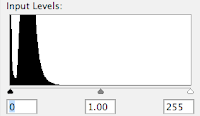 |
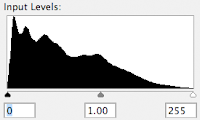
| Histogram of a "naked eye" exposure |
What the eye sees vs. what the camera sees. When people see my NightScapes for the first time the most common question is,
"Is that what the Milky Way really looks like with your naked eye? Can you really see that many stars in the night sky?" The answer is, "Yes and no." You really can see it quite clearly with your naked eye (if you are in an area with very little light pollution), it's just not as bright as I can see with my camera.
The reason is because my camera is manually controlled to take the images at a longer exposure (typically 8 to 30 seconds, depending on the lens I'm using), so it gathers more light for its sensor than my eyes can. Also, the human eye has an iris aperture that is rated at about f/4.0, whereas my typical night photography lens is rated at f/2.8 or wider (letting in twice as much light to the sensor).
 |
| Histogram of raw camera exposure |
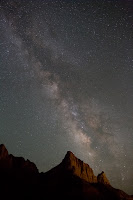 |
| Raw camera exposure |
Above, is a simulated view of what my eye saw of the Milky Way over The Watchman in Zion National Park — this is about two stops darker than what my camera recorded (to the right), using an f/2.8 aperture setting, an exposure time of 15 seconds, and an ISO of 6400 or 8000.
(Notice that the "toe" of the exposure histogram is just passing the midway point, whereas the toe of the simulated "naked eye" exposure histogram doesn't even come close to the midway point. This exposure is two stops less than what it should be —post production corrections can correct a 1-stop underexposure, but not a 2-stop underexposure. This means that if you only have an f/3.5 or f/4.0 lens; or your camera only goes to ISO 3200, you're still going to get an acceptable exposure, that's within the range of post production correction —provided you shoot in the camera "raw" mode, which typically has 16-bits of information, rather than the camera JPEG mode which carries only 8-bits of information per color channel. Here's a tutorial I created on the
benefits of 16-bits raw images vs. 8-bits images.)
Post Production: The raw camera image has all the brightness and detail needed for a great photo, but it is flat or lacking in contrast. My final NightScape images are created in post production with very simple steps in Photoshop. All the stars are there in the camera's raw image, but a contrast gain in the sky is necessary to make them more apparent. My goal is give the same clarity you expect to see in an astronomical observatory (taken with a huge telescope) image, but with a wide-field view, coupled with an interesting landscape feature in the foreground — something the big telescopes cannot do!
 |
| After adding curve adj. |
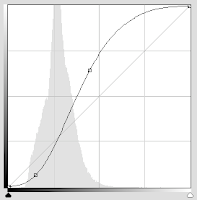 |
| "S" shaped adjustment curve |
The powerful "S" Curve. Here's the main Photoshop post production step I use to increase the contrast in the sky: I first select the sky, using the Magic Wand tool (I usually have to do a little Laso tool work to get all the bright stars into the selection). I then create a channel of the selection that I can use later. The second and main step is to turn that saved selection into a "Curves" Adjustment Layer that I can add a contrast-increasing "S" shaped adjustment curve.
(The shape of this curve is controlled by the two anchor points so that the curve pinches or brightens the large highlight area to the right of the histogram "mountain", and darkens the shadow area to its left.) The more vertical the line becomes between the two anchor points, the more your contrast gain.
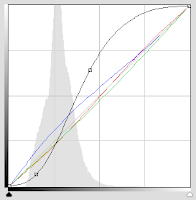 |
| Slight color changes via Curves |
Sky Color Balance. Every evening sky has a difference color to it, depending on the atmospheric conditions for that night. Some photographers shoot in the "AWB" Auto White Balance mode, which produces somewhat of a neutral coloration to the sky. Some will use a daylight White Balance (about 5250º K), giving a much warmer tone to the sky. Others will use the "Tungsten" (or incandescent) setting (about 3200º K) for a deep blue look. Although all of these settings can later be adjusted in Adobe Photoshop's RAW Converter, I prefer to set my Kelvin to 3800º. This setting usually give me the most natural look to my night sky.
Final, minor color changes can be made in Photoshop's Curves to the the red, green, and blue channels (represented by the three diagonal colored lines). Be careful to not over do this — as a little color goes a long way. The final coloration depends on what you remember seeing in the sky that night.
Adjusting the landscape. The final step is to use the same saved sky selection (channel) and inverse it so that it is now selecting the mountains, instead of the sky. Once this is done, another Adjustment Layer (you can use "Levels", or "Curves", but Curves is more powerful) is created from that selection in order to change the color of the sodium vapor lights (coming about a mile away from Springdale city) —so that The Watchman mountain is a more pleasing "red rock" sandstone color.
 |
| Histogram after all adjustments |
Extended tonal range. The purpose of all these adjustments is to not only increase the contrast of the sky, but to extend the tonal range of the final image. Compare the histogram on the right to the histogram of the raw camera exposure, above.
Note: The "S" curve contrast adjustment naturally increases color saturation and vibrance. In most cases you will not have to artificially add more.
Compare: In the image below you can quickly compare the differences between the "naked eye" simulation, the "raw camera" exposure, the "S"-curve adjustment, and the final image —with the extended tonal range of its histogram.
 |
| Click to enlarge. |
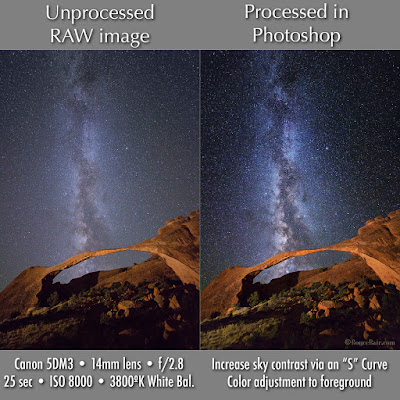
Here is another comparison of the camera RAW exposure vs. simple post processing via the "S" curve in a Photoshop "Curves" Adjustment Layer:
 |
| Click to enlarge |
My eBook,
Milky Way NightScapes, provides additional post processing instruction in its 4th chapter.


Very interesting, thanks for sharing.
ReplyDeleteMAGNIFICENT PHOTOS!!!
DeleteAre you able to do a similar adjustment using the tone curve in Lightroom 4 or is there a way to do this adjustment in Photoshop Elements? Thanks.
ReplyDeleteYou should be able to do something similar in Lightroom's tone curve (although I'm not as proficient in LR as I am in PS. You can also do curve adjustments in Elements via the Enhance menu, although you cannot set custom points on the curve as you can in the full PS --you can only move their preset highlight and shadow points up and down. Although Elements has adjustment layers (allowing for editing of an adjustment or enhancement), I don't believe "Curves" is one of their options, only levels, Hue/Sat, and a few others. This is why the full PS cost about $700, and elements under $100 :(
DeleteThanks Royce. I will play with the Lightroom Tone Curve settings. I think the main difference will be that the adjustments will be made to the entire photograph whereas in PS you are adjusting just the relevant part of the photograph.
ReplyDeleteGreat post! I was out this last weekend shooting some night sky. I typically use Picasa 3 to post process my photos, therefore shooting in RAW is not very beneficial to me. I do have Photoshop, but I don't know it very well. This is a great explanation on how to process these kind of photos. I've got a couple photos that I really didn't like because they were RAW that I will process using this method. Thanks Royce!
ReplyDeleteI love how your post title is "View of the Milky Way with Your Naked Eye" but the biggest, most noticeable picture right under the title is a camera/software-enhanced one. You have to scroll farther down and find the tiny one that actually says "Simulated naked eye view." The reason I clicked this post is because I expected the main picture to be what the title says.
ReplyDeleteGreat blogging. I give you 0 points.
Wow. This guy must have it rough in life. Must have been confused by all the words.
DeleteI just discovered this blog and I love it!
ReplyDeleteHi Royce,
ReplyDeleteThe best site on starscapes I have ever come across. is there anyway you can go into more details on some of your other post processing steps? I have found after taking nightscapes for the last two years that the easy part is the picture taking- the settings are actually relatively straightforward. However if you look at work of yourself, Lincoln Harrison's, David Kinghams, Ted Gore etc, it would be very interesting and very educational for them to write an article on step by step post production as that is ultimately the determining factor. Please do this! thanks. T, London, UK
Thanks for an interesting & informative article.
ReplyDeleteJust found this site and I am very impressed! It truly is cool that you are willing to share your talents, I really appreciate it!
ReplyDeleteDoes the portion of the Milky Way that's visible differ much as you move farther south? All I seem able to see here is about the top half of what you captured over the Watchman... am I just stuck at the wrong latitude? Time of year?
ReplyDeleteI don't know why these curve controlling go above my head! I have tried many time to understand the curves in Photoshop but every time I failed. Do you have any tips?
ReplyDeleteWoah this looks so amazing. Very beautiful view. Thanks very much for sharing this with us.
ReplyDeleteRegards,
Clipping Path Service
Fantastic view you have got there. It is very amazing. Absolutely great job.
ReplyDeleteReally amazing view of the night sky. I really loved it. Thanks for sharing with us.
ReplyDeleteClipping Path Service Provider
I really loved that night sky. So much beauty in one frame. Loved it.
ReplyDeleteThanks for sharing your information
ReplyDeleteGuest Posting Service
Link Building
Guest Posting Site List
Guest Posting Service
ReplyDeleteLink Building
Guest Posting Site List
Reply
headshot-photo-retouching-service, models, performing artists, and the like.
ReplyDeleteYou have done a great job on this article. It’s very readable and highly intelligent.
ReplyDeleteツ온라인카지노
바카라사이트탑 ツ
✓ 온라인카지노
ReplyDelete✓ 바카라사이트비즈
An fascinating discussion is value comment. I think that it is best to write extra on this matter, it won’t be a taboo topic however generally people are not enough to talk on such topics. To the next. Cheers
Great article with excellent idea! 〤 온라인카지노
ReplyDelete카지노 〤 Thank you for such a valuable article. I really appreciate for this great information..
Yes i am totally agreed with this article and i just want say that this article is very nice and very informative article. ❝ 바카라 ❞
ReplyDelete❝ 카지노 ❞
Nice post. I was checking constantly this blog and I’m impressed! Extremely useful info specially the last part I care for such information a lot. I was seeking this certain info for a long time. Thank you and good luck.Leyes Violencia Doméstica Nueva Jersey
ReplyDeleteVery good article, I enjoyed reading your post
ReplyDeletethanks for sharing this beautiful blog
ReplyDeletetruly appreciate this post.
ReplyDeleteI’ve been looking everywhere for this!
ReplyDeleteIt’s very nice. Congratulations.
ReplyDelete
ReplyDeleteThank you for a great article.
I appreciate you providing this lovely blog.criminal defense attorney prince william county
ReplyDeleteTo observe the Milky Way with your naked eye, follow these steps are Choose the right time: The Milky Way is most visible during the summer months in the Northern Hemisphere and between midnight and dawn in the Southern Hemisphere. Find a dark location with minimal light pollution, such as a designated Dark Sky Park or Reserve, or remote areas like countryside, mountains, and rural areas Fairfax Domestic Violence Lawyer.
ReplyDeleteBrussels is such a vibrant city with a rich history and diverse culture. I recently visited and was blown away by the stunning architecture and delicious cuisine. I left a blog comment on a local travel blog recommending my favorite spots like the Grand Place, Atomium, and the delicious waffles from street vendors. The people were so friendly and welcoming, making my stay in Brussels truly memorable. I can't wait to go back and explore more of this charming city.
ReplyDeletepersonal injury lawyer maryland
I am actually happy to read this website posts, thanks for providing one.
ReplyDeleteThank you for some other informative blog. Keep on writing man, you're awesome!
ReplyDeleteThanks for taking the time to post such valuable information. Quality content is good.
ReplyDeleteI am beginner to blogs and I enjoyed you’re web page. Want to bookmark this site.
ReplyDeleteDealing with an insurance dispute in Weston? Darryl Davis & Associates is the most trusted public adjuster Weston has to offer. Their personalized approach makes all the difference!
ReplyDeleteDiscover the cost of microneedling treatments and whether they are worth the investment. Learn about the benefits, results, and factors influencing pricing at Rejuvenation Med Spa in Boynton Beach, FL.
ReplyDeleteThis post is truly inspiring! I especially appreciate your point which you found valuable. It's clear you put a lot of effort into this, and I'm glad I found it.
ReplyDeleteInformative article with us. You got a nice post as you always do. Greatjob!!
ReplyDeleteSuch an amazing post, enjoy to read this article, I like the way you write
ReplyDeleteExactly where are your contact details though?
ReplyDeleteWay cool! Some very valid points!
ReplyDeleteI appreciate you writing this write-up and also the rest of the site is very good.
ReplyDelete
ReplyDeleteWow! Great Article , keep posting 🙂 D.
This information awesome guide for us.Good work! D.
ReplyDeleteI might want to thank you for the efforts you have made in composing this post. D.
ReplyDelete"Some will use a daylight White Balance (about 5250º K), giving a much warmer tone to the sky. Others will use the "Tungsten" (or incandescent) setting (about 3200º K) for a deep blue look. Although all of these settings can later be adjusted in Adobe Photoshop's RAW Converter, I prefer to set my Kelvin to 3800º. This setting usually give me the most natural look to my night sky."
ReplyDeleteThis is the beneficial information. We found the exact information about this. thanks for sharing. We want to tell you, that we are the leading provider of Namkeen Packing Machine. That is why we keep getting our machines photographed from time to time. Now we will be able to take the best photos according to this information.
This comment has been removed by the author.
ReplyDeleteThis was a fascinating read! Viewing the Milky Way with the naked eye is truly a breathtaking experience, and your insights on how to locate and appreciate it are incredibly helpful. Stargazing and astrophotography require patience and the right techniques to capture the beauty of the night sky. In the realm of photography, editing plays a crucial role in refining images, and a professional image cutout service can help enhance subject isolation and composition. Looking forward to more of your expert tips on night photography!
ReplyDeleteI really delighted to find this internet site on bing, just what I was searching for
ReplyDeleteThanks for another wonderful post.
ReplyDeleteThank you for the update, very nice site.
ReplyDeleteMake your appearance sneaky yet elegant with this black hoodie women. It is well-made with ultimate perfection to give your style a classy change that you have always desired. It strikes a perfect balance of style and comfort, making your daily hangouts luxurious and hassle-free. Snap up now!
ReplyDeleteCool
ReplyDeleteHeel informatief artikel! Tegenwoordig is het gelukkig makkelijker om ED-pillen online te kopen in Nederland via betrouwbare webshops. Het is belangrijk om te letten op kwaliteit, veiligheid en discrete levering. Goede klantenservice en duidelijke productinformatie maken echt het verschil bij het kiezen van de juiste aanbieder.
ReplyDeleteExcellent article on sleep and relaxation tips! For anyone struggling with insomnia, buying Zopiclone online in Australia is a convenient and reliable option. It helps you get quality sleep safely, with quick delivery and discreet service for your peace of mind.
ReplyDeleteChoosing construction company uniforms in Martin County helps your crew stay safe, professional, and easily identifiable on the job site. Quality uniforms also strengthen your brand image and ensure your team looks coordinated while handling tough, everyday tasks.
ReplyDeleteI’ve been watching out for your content. If ever you have some more updates please do notify me.안전놀이터
ReplyDeleteIt’s hard to find knowledgeable people on this topic, but you sound like you know what you’re talking about! Thanks.
ReplyDeleteTerrific post Thank you for this kind of article!
ReplyDeleteThis is the best way to share the great article with everyone one, so that everyone can able to utilize this information.
ReplyDeletethat is the finish of this article. Here you will locate some web pages that we believe you’ll enjoy, just click the links ove
ReplyDeleteVery significant Information for us, I have think the representation of this Information is actually superb one
ReplyDeleteIt is in reality a great and useful piece of info. Thanks for sharing. 🙂
ReplyDeleteSome truly quality articles on this website , bookmarked .
ReplyDeleteGreat post you are written ... I love this post..
ReplyDelete