Share:

Showing posts with label light painting. Show all posts

Friday, August 4, 2023

Setting Up Low Level Landscape Lighting

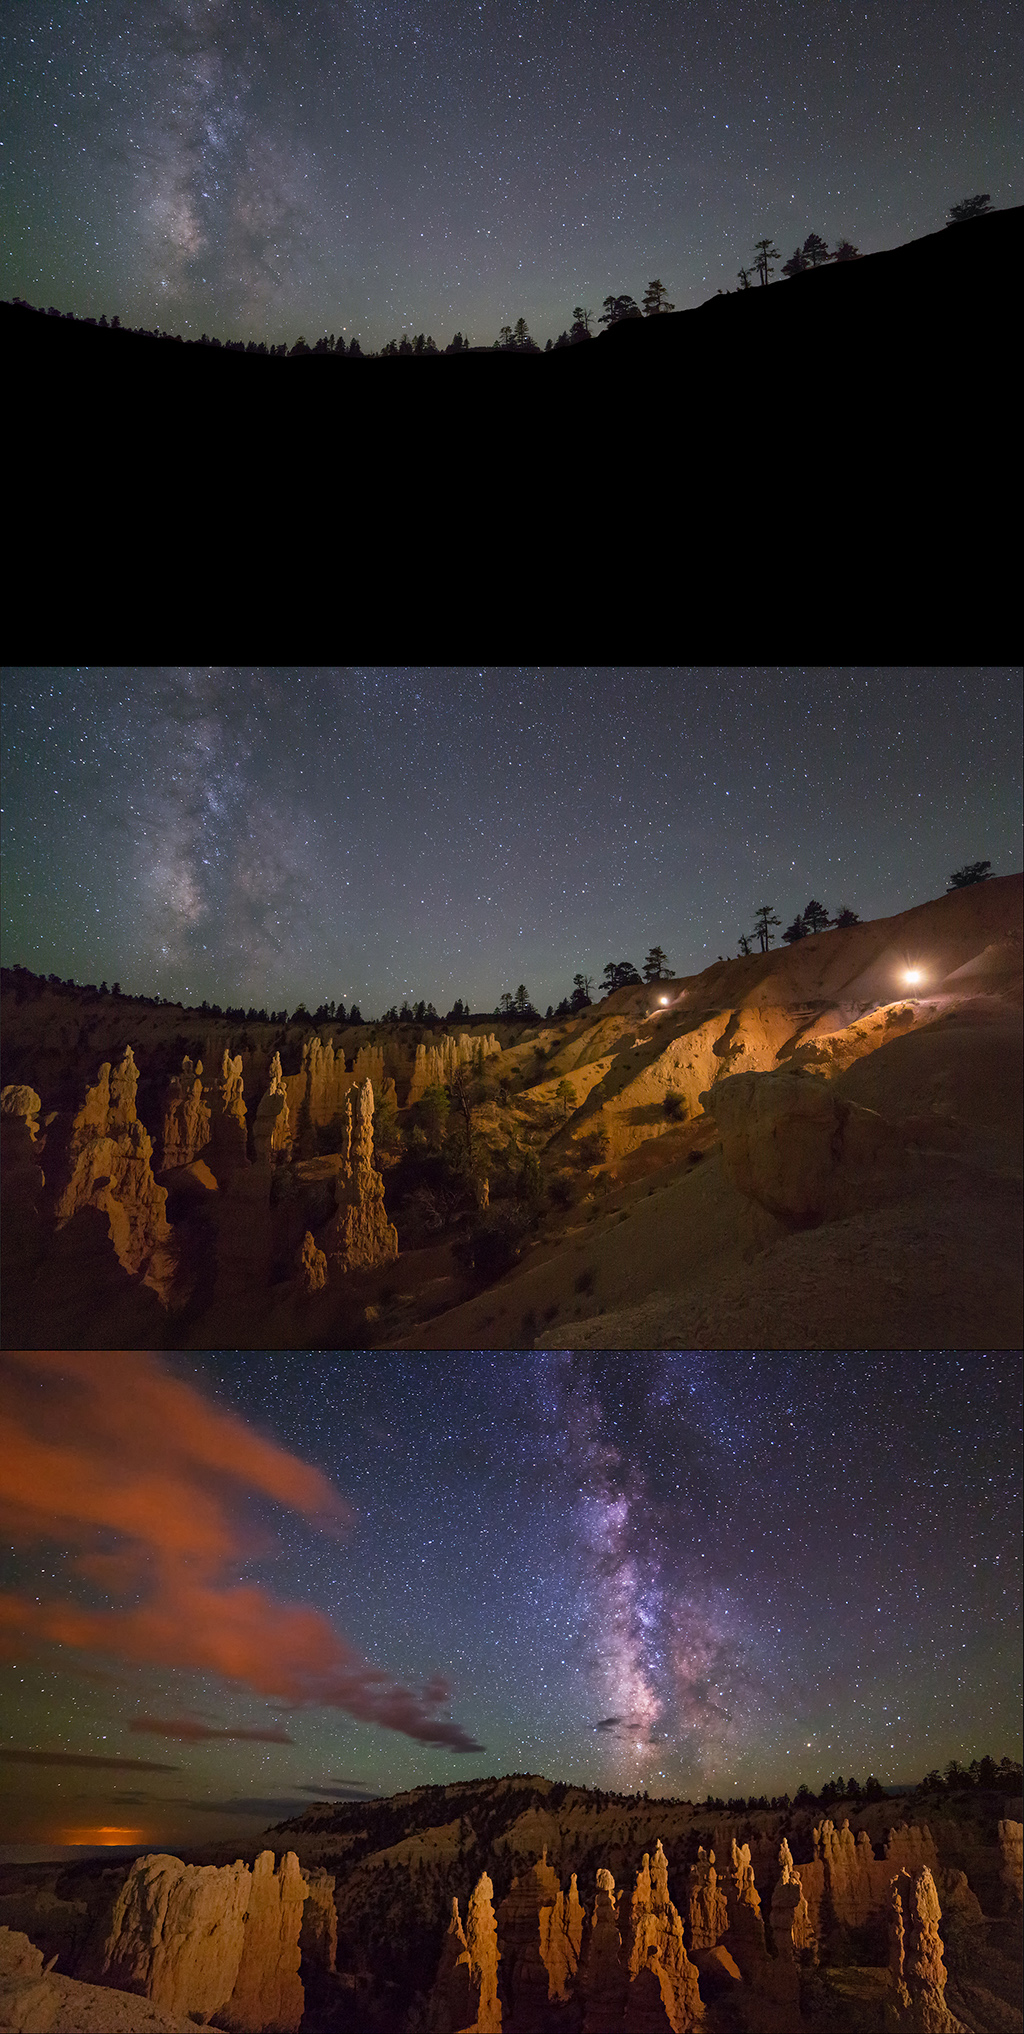
Low Level Landscape Lighting (LLL) at Fairyland Point, Bryce Canyon Nat'l Park • Lights off in top photo • Two LED panel lights turned on (each at about 5%) in middle photo • Camera moved to left in bottom photo, and pointed up to show more sky. Post processing contrast added to sky (orange light pollution reflecting on clouds from nearby town) • © Royce Bair • Click on image to enlarge

 How I Set Up My Low Level Landscape Lighting (LLL)
for Nightscape Photography

Return to LLL BASICS Home Page


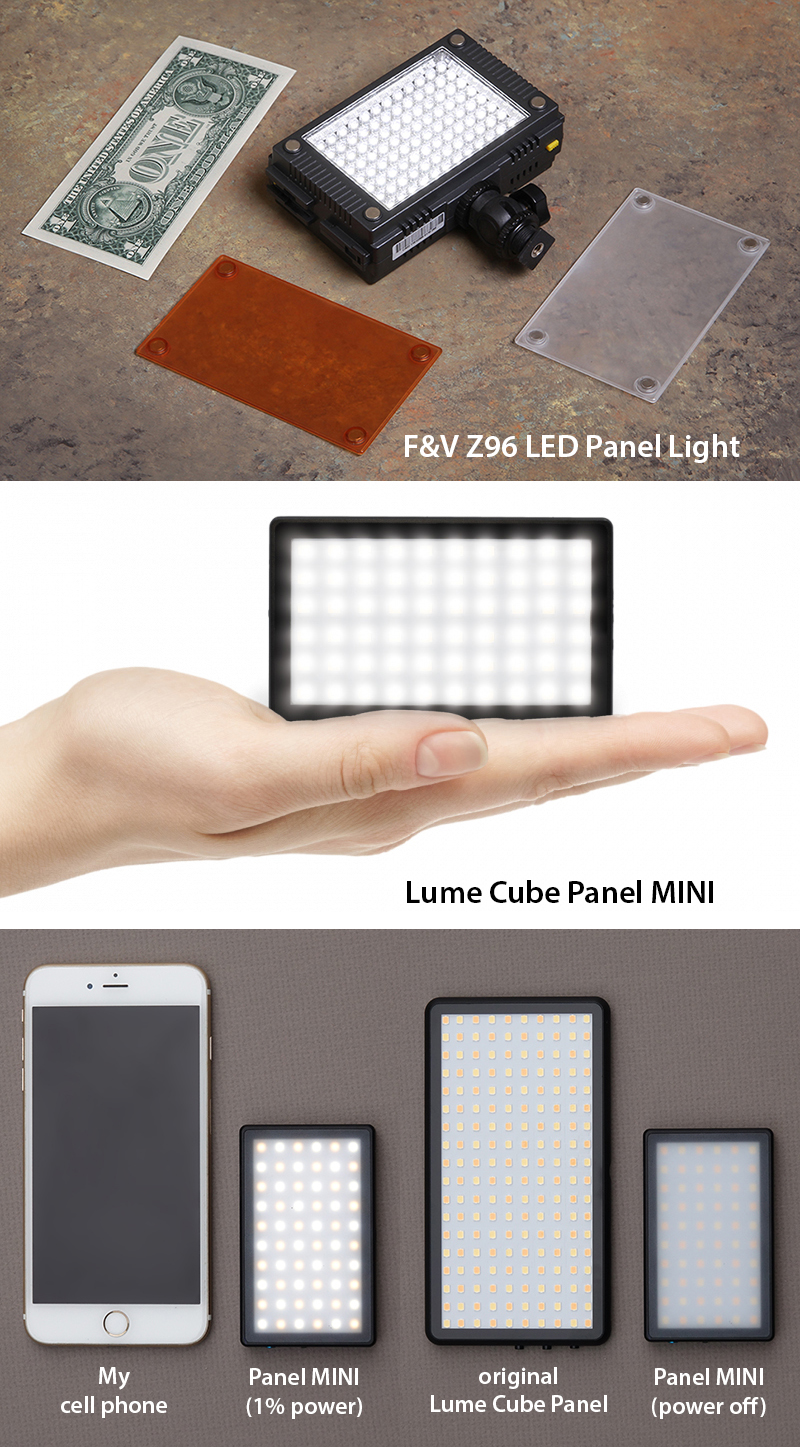
I've been using the F&V Z96 LED Panel Lights for about a decade in my Low Level Lighting. They use five AA batteries, come with magnetic diffusion and warming filters, and have an analog off/on dimmer switch on the back. The Lume Cube LED panel lights are smaller, lighter, have built in Li-on rechargeable batteries, and have digital dimmer switches that show the exact light intensity output (1% to 100%) and the amount of power that is left in the battery. The light color is also digitally controlled from 5600ºK to 3200ºK. You can read my reviews on all three of these lights via the above links.

I use the Lume Cube Panel MINI as the main (base) light source in most of my LLL set ups where the foreground landscape that I'm lighting is less than 300 feet (91 meters) away. Even at this distance, I'm typically using a light intensity of less than 40% power. For distances greater than 300 feet (91 meters), I use the larger Lume Cube RGB Panel Go (which replaced the original Lume Cube Panel).


Omni-directional "camp" lanterns compared

Camp lanterns put out an omni-directional light that are great for use as "accent" lights — putting a warm glow behind a landscape feature, or under an arch. The top photo shows six different digital LED lanterns I have used over the years. Number 1 has the digital likeness and size of a Coleman gas lantern. Number 6 is the one I now use the most. It is the Goal Zero Lighthouse Micro. Its On/Off/Dimmer Button can control whether two LED lights are used (180º light coverage) or four LED lights are used (360º light coverage). It can also control the intensity of those lights. Wrapping semi-translucent cloth (or tissue paper) and colored filters around the lanterns can added additional controls for diffusion and warming the color of the lights.

© Royce Bair • Click image to enlarge

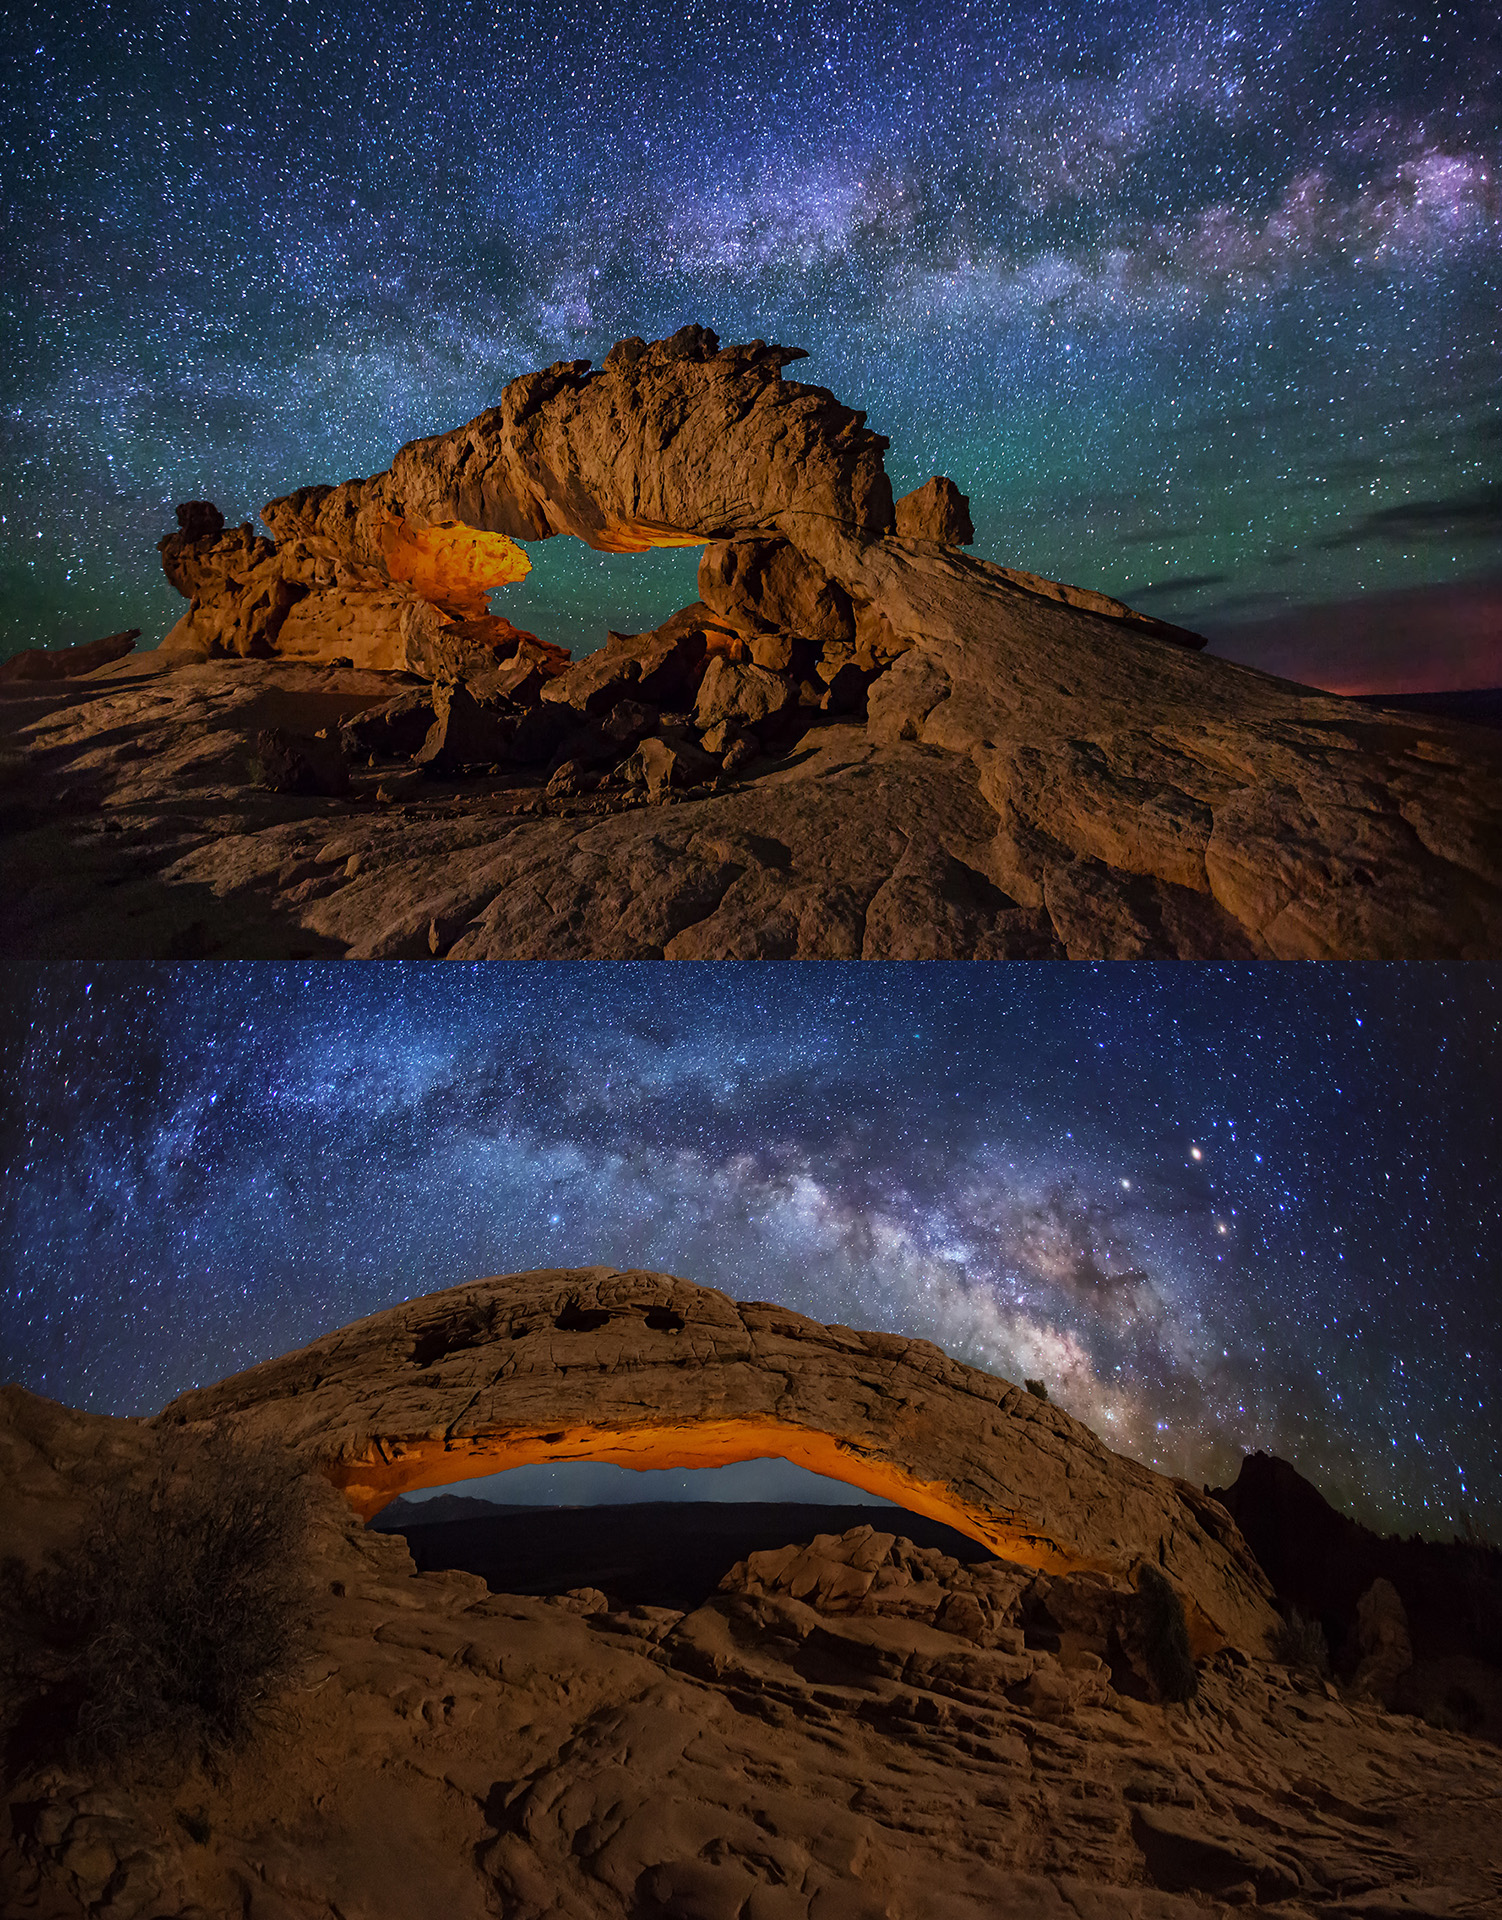
Two filtered camp lanterns were placed under Sunset Arch, in the top photo. A single panel light from the left side provided the dramatic "base" or main illumination. A single filtered camp lantern lighted the underside of Mesa Arch in the bottom photo. The lantern is hanging from a string about 50 feet (15 meters) below the arch (the string is tied to a rock). The intensity of the lantern is easily controlled by raising or lowering the lantern. Two panel lights provided the "base" or main illumination — one on either side of the arch. The panel light on the right side was set at twice the intensity as the panel on the left side, in order to provide shading on the rocks, but with some shadow detail.


LIGHTING TUTORIAL ~ 5 Ways to Produce More Even Lighting

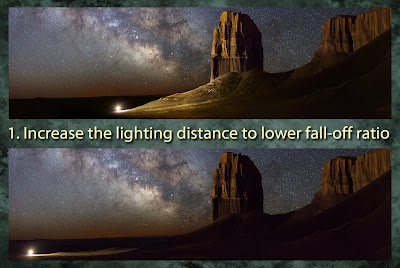
    1. Increase lighting distance
    2. Scrim the foreground
    3. Place the light higher
    4. Feather the light
    5. Use a 2nd light for "fill"

CLICK for a 4-minute video tutorial


LIGHT STANDS

The Impact brand is one of my inexpensive favorites because they are so sturdy and tall (they can rise to a height of 9.5 feet, which makes them great for item #3, above), and they have a wide footprint (52") for greater stability—you'll appreciate that on windy nights. Disadvantages: They are all aluminum, so they are a little heavier than the carbon stands, which are better for backpacking into a location. They are also not as compact (42" when folded), which makes them more suitable for locations close to your vehicle.


The Manfrotto MS0490C Carbon Fiber Nanopole light stand costs about four times as much as the Impact light stands, but your back will appreciate the weight difference, if you have to backpack into your location. Although the stand only goes to 6.5 feet (77.5" / 196.8 cm) height, I can usually make up for that by finding higher ground (and it comes with a leveling leg, so that you can keep your stand vertical on uneven surfaces). For backpacking, you'll like the weight of only 1.65 lb / 0.75 kg and a compact folded length of only 20" / 50.8 cm.

Here's a list of other light-weight stand options.


MINI BALL HEADS


Mini Ball Heads are placed between your panel lights and your light stands. The mini ball heads allow you better lighting control (to "4. Feather the light"). The top ball head is a Lube Cube product ($24.99). It's well made, but a little overpriced for your needs, in my opinion. The DSLR shoe mount at the bottom (which also has a female 1/4"-20 thread for tripod or light stand mounting) is not need for our stationary type of lighting. I think the Oben BD-0 Mini Ball Head (via B&H for $12.71) is just as well built, and accepts both 1/4"-20 and 3/8"-16 studs at the bottom, but without the DSLR shoe mount. The bottom mini ball head is a ripoff of the Terra Firma design that you can get from B&H for $15 — or you can get this cheap mini ball head on Amazon for only $3.50! (This product is more than adequate for holding and positioning a light weight LED panel on top of a light stand.) Note: If this product link disappears, just search on Amazon for "Swivel Mini Ball Head 1/4 Screw Tripod Mount" and you should find several similar products.

NOTE: This page is currently under construction. Until it is finished, please refer to this webpage about additional lighting equipment from my friend, Wayne Pinkston.


Monday, April 23, 2018

Night Photography Restrictions in Arches National Park

An April Milk Way rises behind Delicate Arch, Arches National Park, Utah - foreground illuminated by Low Level Landscape (LLL) lighting.  This very dim, filtered light panel was set up on a tripod down in the bowl. It was dimmed down until it matches starlight. You cannot even see it until your eyes dark-adapt. The dim light was left on for about an hour, while over 30 visitors from several nations were able to take similar photos, even though they were not part of my workshop group. (EXIF: Canon 5DM3, Rokinon 24mm f/1.4, 13 sec, f/2.0, ISO 5000) © Royce Bair

April 23, 2018 UPDATE: In 2017, three national parks (Arches, Canyonlands and Grand Teton) banned light painting, and there was even talk of banning all night photography. However, due to the lobbying and educational efforts of myself, Wayne Pinkston and many others, Arches, Canyonlands and Natural Bridges have now adopted the Low Level Lighting techniques that we pioneered as an approved standard for commercial Still Photography Instruction (workshops) within these parks! Standard light painting (described below in #16) is still banned, but LLL is allowed:
20. Light Panel - Using a low level light panel that emits extremely dim constant lighting during a nighttime photographic exposure is an approved method for lighting the landscape at night.
Thank You! Wayne and I would like to thank all who have adopted our less obtrusive LLL techniques and promoted these methods to others. This thanks also goes to the great people at the National Park Service, who were willing to consider and modify their regulations. Together, we have made a difference that will help thousands to better enjoy the landscape and the night sky!

Grand Teton continues to ban all uses of artificial lighting at night, no matter the type (light painting or Low Level Lighting). The purpose of this restriction, claims the park superintendent, is to protect the wildlife. Night photography is still allowed, and headlamps are permitted by night photographers to help them get to and from their shooting locations (albeit, headlamps can be over 100 times brighter than LLL). It should be noted that unlike Arches, Canyonlands and Natural Bridges, Grand Teton's ban on artificial lighting applies to all photographers, whereas the aforementioned parks only placed their lighting restrictions on commercial workshops.

- - -

ORIGINAL POST ~ Dateline: January 12, 2017
Will All Night Photography Be Banned in Arches and Canyonlands National Parks? Beginning this year, no light painting will be allowed to take place within Arches and Canyonlands by commercial photo workshop groups; and starting in 2018, it is very possible that no night photography will be allowed by participants of these photo workshops within the two parks. Currently, this ruling applies only to Commercial Use Authorization (CUA) permit holders and their photography workshop groups. It does not (yet) apply to private individuals and amateur photographers.
16. Light painting – Light painting activities are not authorized under this authorization. Light painting, or light drawing, is a photographic technique in which exposures are made by moving a hand-held light source while taking a long exposure photograph, either to illuminate a subject or to shine a point of light directly at the camera, or by moving the camera itself during exposure. [APPENDIX SPECIAL PARK CONDITIONS - ARCHES NATIONAL PARK & CANYONLANDS NATIONAL PARK - Still Photography Instruction
Earlier this month, all night photography had been banned within the two parks for CUA permit holders and their photo workshop groups. However, after numerous protests from operators, who already had scheduled workshops in place, Concessions Management Specialist, Michael Hill, lifted the ban for the current 2017 season, but not the ban on light painting. In an email to all Still Photography Instruction CUA permit holders, Michael wrote on January 5, 2017:
Some folks have voiced no concern about the change, while a few others stated that all they do is night photography and that change would be devastating. ...For 2017 we will continue to allow night use in the Still Photography Instruction CUA for Canyonlands and Arches, as we have done in the past. Light painting, however has been an issue with our park nighttime visitors, and we still feel that does not have a commercial place in the park. …For 2018 I am open for dialogue if that night use will continue. Feel free to email me your comments.
Balance Rock stands only a few hundred feet from a busy park road. It is a very difficult formation to photograph at night because of all the car headlights that rake across it. However, at about about 2:00am on some Spring mornings, the traffic does diminish and one can capture the Milky Way rising above the horizon. (EXIF: Canon 5DM3, Rokinon 24mm f/1.4, 13 sec, f/2.0, ISO 5000, using LLL lighting.) © Royce Bair

Could a future ban affect ALL photographers? It is not clear if a possible ban on all night photography will begin in 2018 just for Still Photography Instruction CUA permit holders, or if this ban will be for all photographers. Currently, Guided Interpretive Day Hiking within the two parks is already restricted to daylight and twilight hours:
36. Area Use – This authorization is applicable only for the use of the area, term, and conditions designated herein. The area(s) authorized for use under this authorization must be left in substantially the same condition as it was prior to the activities authorized herein. Only 2wd roads are authorized for use.
**Approved use starts 1/2 hours before sunrise and ends 1/2 hours after sunset. This does not include travel time.**
Increasing Park Visitation and undesirable activities in the park. Michael Hill, explained park managements reasons for the changes in the same email letter to CUA permit holders:
Managing the parks here are complex, and have ever changing issues to manage.
If you have followed the news you would understand the explosive use of this area has changed a lot in and out side of the parks here. Technology as well has impacted how we manage the parks. In those 8 years we have gone from 24 to 260 CUAs. Our park visitation has increased to where we need to change how we manage the visitors, as well as commercial services. 
It is our mandate to balance protecting the park resource and providing the enjoyment for park visitors. We have to balance the commercial use of a park in regards to services that are appropriate and/or necessary, in regards to the above statement. Commercial use in a park is a privilege.  
Regarding night photography instruction, you don't need Arches to teach night photography. Teaching night photography can be accomplished in many areas outside of the National Parks here.
Regarding light painting in Arches National Park. We have determined that as not a desired activity in the park when, we have visitors (not photographers) complain about it, and some of those visitors just leave the park as they don't know what is going on. 
Are Additional Night Photography Bans Coming? As park visitation increases in all the national parks, we may expect to see similar bans on night photography in other parks. Fox News recently reported that Utah's Zion National Park is now experiencing too many visitors, even in the winter off-season.

Is "Light Painting" Getting a Bad Rap?
That depends on how one defines "light Painting." If it is defined the way park regulations are written above as, "...moving a hand-held light source while taking a long exposure photograph," then maybe it deserves the bad publicity. Usually, these lights are powerful flashlights, headlamps or even spotlights that are being waved around natural formations to illuminate them. The lights are so bright, they can only be left on for a few seconds during the long camera time exposure that is necessary to record the starry night sky. The on and off flashing of these bright lights is ruining to one's night vision, and is very annoying to visitors (especially non-photographers) who are there to enjoy the night sky at a unique dark sky location. Most of these lights also have a very bluish color rendition, which also adversely effects night vision. Remember, many of the national parks have been promoting the slogan, "Half the park is after dark," and most of these nocturnal visitors are coming to see the stars, not your light painting!

The better way to light: More responsible photographers are beginning to use stationary, Low Level Landscape lighting (LLL). These very dim, filtered light panel care set up on a tripods and dimmed down until they matches starlight. They are so dim one cannot even see their effect until ones eyes dark-adapt.

"Headlamp Intrusion" at Mesa Arch - Canyonlands National Park. The top photo shows headlamp intrusion from a hiker about 100 yards behind me, through the trees and brush. The bottom photo has the same LLL (low level landscape) lighting as the top photo, but did not have the headlamp intrusion from behind. This should give one an idea of how dim and subtle LLL lighting is. Because this type of lighting is on for the whole astronomical exposure, it must match or be just slightly brighter than the intensity of starlight! In the top photo, the hiker's headlamp was only on for a few seconds of the whole 25-second time exposure, yet its estimated 150 lumens brightness (even from 300 feet away) completely overpowers my LLL lighting. (EXIF: Canon 5DM3, Tokina 15-30mm @ 15mm, 25 sec, f/2.8, ISO 6400) © Royce Bair

Share and share alike. In the top image, I was never able to get a decent photo because a bus tour of about 30 foreign photographers came and they would not shut off their headlamps and flashlights, even for 30 seconds. They wanted it all to themselves. “You Americans think you own the national parks,” said the tour leader. I checked the next day, and the park had no record of a permit for them. In the bottom photo (2 years later), dozens of photographers shared my lighting set up and even my shooting position. One of those was a talented photographer from India, Manish Mamtani.

"Arch over an Arch" - Mesa Arch, Canyonlands Nattional Park, Utah. “This is a Milky Way panorama created by stacking and stitching about 56 images. I wanted to take this shot at Mesa Arch in Utah [for over] 4 years, and finally this year I was successful. I ran into Royce Bair …and he had set up some lights to light the foreground,” says Manish. © Manish Mamtani

Continuing the Discussion...
To see what others are saying about the light painting restrictions and the possibility of a complete ban on all night photography, beginning in 2018, check out this post on Ben Coffman's Facebook page.

Fellow photo workshop instructor, Brad Goldpaint, had this to say in that Facebook post, after a lengthy telephone conversation with park Concessions Management Specialist, Michael Hill...

Mike mentioned the issues he’s been facing in the park(s): Too many crowds/busses, too many CUAs, not enough staff, and too many complaints from nighttime photographic activity. He mentioned a number of examples which led to this abrupt change. A couple of these examples stood out to me that I’m sure some of you can relate to:

  1. “Someone set up a tent under a popular arch, put a light inside of it, and then turned on three other flashlights in the area. A visitor approached the scene, thought there was a search and rescue underway, and decided to leave the area. We’ve had people sleeping under the arches, hiking off trail, vandalism, and it’s getting to the point where we have no way of controlling the massive amount of crowds.” Mike has a lot of experience and history with Arches. He told me back in the 80’s he could ride a bike throughout the entire park during a full moon and not see a single headlight throughout the entire night. Nowadays, he gets more and more complaints about people in the park at night, “doing things they shouldn’t be doing.” I couldn’t help but mention ‘the CUA holders I know are actually the ones who are protecting, teaching, and leading by example to help keep a close eye on what transpires at night. If you remove the CUA holders, then it really is free reign on the park.’
  2. “Some things have gotten so bad I’ve had my sanitation crew threaten to quit. We have busloads of visitors coming from the other side of the ocean who have never used a pit toilet. Therefore, visitors and my crew have to pick up human feces. We’re actually installing visual diagrams to show visitors how to use pit toilets in hopes of preventing this issue from continuing to happen.”   
  3. “We’ve had busses follow night photography workshops around and we don’t have the staff to keep them out of the area so the students can enjoy. The instructor will complain, but I don’t have the staff to control the massive amount of people.”
  4. “We were actually going to get rid of the entire ‘Still Photography CUA,’ but I fought to keep it. I did my best in trying to limit use during times we cannot monitor the park.”

Listening to Mike, I began to understand the issues he and the park are facing. It’s not what I wanted to hear, nor was this unexpected change handled in a reasonable manner, but something has to give and change is inevitable. Remember, “Commercial use in a park is a privilege and no one is guaranteed a CUA the following year.” 

I’m happy to see we are allowed to teach an additional year in Arches & Canyonlands, but I believe it is critical for all current and future CUA holders to voice their opinions and ideas to formulate a sustainable solution for all parties affected so future generations can enjoy similar experiences we’ve been fortunate enough to have. As Mike H. said in his latest email, "For 2018 I am open for dialogue if that night use will continue. Feel free to email me your comments. I look forward to receiving them."

Followup: After I had a chance to discuss these issues with Brad, we both agree that Mike is in a tough situation and trying to do whatever he can to alleviate the problems of night use in the park. The problem, we believe, is park administration is blaming it on the “good guys.”

If only the CUA holders are banned from doing night photography in the parks, who is going to be there to report the non-permitted tour bus groups that lurk the parks at night?

Despite this, no light painting in Arches and Canyonlands is a restriction we can live with, if it will help reduce tension and heighten the dark sky experience for all visitors to these two parks.

Teaching Night Photography Ethics:
In an effort to educate the public on proper night photography ethics and Low Level Lighting (LLL) techniques, I have scheduled an entertaining and educational mini-seminar for March 14, 2014, called “Creating Natural NightScape Photographs.” This free event is sponsored by Adobe Systems, and will include socializing at the Viridian Event Center in West Jordan, Utah.

- - -


Tuesday, March 7, 2017

Artificial Lighting Banned in Grand Teton

The Thomas A. Moulton Barn illuminated with Low Level Lighting at about 2:00am, in order to align it with a mid-July Milky Way. The lights are left on during the full 25-seconds exposure, and were dimmed to output less light than a Quarter Phase Moon. In fact, the light is so dim it takes about 20 minutes for your eyes to see the effect on the barn —until then, you have to rely on the greater sensitivity of your camera to see what is happening. At the time, I did not know that artificial lighting was not allowed in the park! © Royce Bair

Night photography that uses artificial lighting is not allowed in Grand Teton National Park. This policy applies to all Grand Teton National Park visitors, including commercial operators.  Any operator found using artificial lighting outside of a headlamp for walking safety and red lights inherent on camera equipment may be subject to a written citation.

The ban on artificial lighting is not new. This policy has been around for many years. The park’s compendium language states, "The Superintendent has determined that prohibiting the use of such devices is necessary for the protection of wildlife." This restriction, in section 2.2(e), is found on page 19 of the 38-page Grand Teton National Park Superintendent's Compendium.

Since most of us don't take the time to fully read such lengthy documents, it's not surprising that I've overlooked this restriction in years past. However, during this year's CUA application process for a photo workshop permit, this restriction was brought to my attention. Instead of taking the normal few weeks to get a permit, it took several months. In the end, I and all other commercial operators are being made aware of this ban on artificial lighting. (I know of about a dozen photo workshop operators in the park who show artificially lit Teton features on their websites. This change may come as a surprise to many photographers!)


Both of these photos of the John Mouton Barn and homestead were taken in June and illuminated with Low Level Lighting. At the time, I did not know that artificial lighting was not allowed in the park! Click images to enlarge. © Royce Bair 

Alternatives to artificial lighting in Grand Teton: The Moulton Barns are popular and historic man-made structures in the park. They and the Chapel of the Transfiguration are the only features I've ever lit within the park. There are over a dozen other natural park features that I regularly photograph at night without the use of any artificial light, so this restriction will have little impact on my NightScape style photo workshops within the Tetons!

Even the man-made structures can easily be photographed without artificial light, using additional longer exposures for the foreground and blending those exposures with the sky exposure(s).

Manish Mamtani took this photo of the Thomas A. Moulton Barn without the use of any artificial lighting. © Manish Mamtani

Teton wildlife and artificial lighting: Section 2.2(e) of the Superintendent's Compendium states, "Viewing of wildlife with any type of artificial light is prohibited in the park and the parkway. This prohibition conforms to Wyoming State Law (W.S. 23-3-306). The Superintendent has determined that prohibiting the use of such devices is necessary for the protection of wildlife."

A closer look at section W.S. 23-3-306 of the Wyoming State Law reveals that it prohibits the... “Use of aircraft, automobiles, motorized and snow vehicles and artificial light for hunting or fishing…” and that “(b) No person shall take any wildlife with the aid of or by using any artificial light or lighting device...”

This law is all about the use of artificial light to take (kill) wildlife. The state restriction is only against the hunting and taking of wildlife via the use of artificial light and motorized vehicles. I would have to have a firearm and dead animals in my possession to be in violation of the state law.

So, does the park Superintendent's ban on the use of any artificial light (other than the use of headlamps to get safely to our night photo locations) within the park help protect the wildlife and eliminate the disturbance of their natural habits? That's certainly debatable, especially compared to the havoc automobile headlights have within the park. And, Low Level Landscape Lighting is about 40 times less powerful than most headlamps.

Still, I believe we should be grateful that all night photography was not banned from the Tetons. This restriction on artificial lighting is only a minor inconvenience compared to not being able to photograph the stars over such a magnificent setting!


Tuesday, February 21, 2017

Low Level Landscape Lighting Tutorial

Low Level Landscape Lighting (LLL) illumination levels compared with light from the stars and the moon. Click to enlarge. Photography by Royce Bair at Chimney Rock, Capitol Reef Nat'l Park, Utah.

LowLevelLighting.org is a new public service website that Wayne Pinkston and I have created to educated photographers of the benefits of this less evasive and low-polluting form of artificial lighting for starry night landscape photography.

A quick illustration of how LLL lighting compares with traditional hand-held light painting, using a focused flashlight. Click to enlarge. Graphics by Royce Bair

We hope you'll visit the website, look at this style of NightScape photography, compare, and see where your night photography might benefit from using these low level lighting techniques.

Traditional light painting is convenient and portable, but produces much higher light pollution and is very inconsistent compared to LLL lighting. Click to enlarge. Graphics by Royce Bair

Equipment resources for LLL lighting are also given near the end of the webpage. Neither Wayne or I are financially benefiting from this public service website.

LLL Lighting Tutorials can be found on this website and in my Milky Way NightScapes eBook. Below, is just one example taken from page 85 of that eBook:

In this example, I used two F&V Z96 LED panel lights (on tripods), filtered, dimmed (see above) and left on during the whole 30 seconds camera exposure. Click to enlarge. © Royce Bair
Final image after some post processing contrast was added to the night sky. Another advantage of constant LLL Lighting is that you can use this lighting for hours while you do time lapses or star trails. Click to enlarge. © Royce Bair

Please help us spread the word about this website. Why? At least two USA national parks have banned light painting in commercial photo workshops, and we have heard rumors of more bans coming in other parks. Of course, some of you may say that artificial lighting has no reason to be in the parks in the first place. And yes, there are plenty of beautiful techniques for producing wide-field astro-landscape photographs that do not use artificial light. Still, we believe there are benefits to using responsible, LLL lighting.

1) A single 25 sec exposure @ f/2.8, ISO 6400. 2) A 100 sec exposure to increase foreground detail, blended (via Photoshop layers) with the previous exposure of the sky. This is the “natural” method preferred by many, but because starlight comes from overhead and all around, it is like photographing with an overcast day (very flat, with little character). 3) A single exposure @ f/2.8, 25 sec, ISO 6400, with LLL lighting strategically placed. Click to enlarge. Photography by Royce Bair at Chimney Rock, Capitol Reef Nat'l Park, Utah.

Why artificial lighting is sometimes helpful: Compare the above photos. Photo number 2 is the "natural" double exposure blending method for enhancing foreground recognition. We believe there are artistic and foreground recognition benefits to #3.

Please note that #2 could have been done using low angle moonlight (to give an effect similar to #3), but the star and moonlight exposures would have been many hours apart, and there are only 2 days a month where the angle is even somewhat correct at this location. Mixing a twilight exposure would have been a fairly worthless option here because we are facing southeast and a northwestern twilight would have also given flat lighting.

Another reason for allowing responsible LLL lighting in the national parks is that it is much less invasive than the headlamps use to help photographers or stargazers get safely to their night viewing destinations. Compare these two images, below, as proof:

Typical headlamp illumination can be 20-40 times brighter than LLL lighting. Click to enlarge. Photography by Royce Bair at Sunset Arch, Grand Staircase-Escalante Nat'l Monument


- - -


Friday, November 25, 2016

Omni-directional Light Painting with Mini LED Camp Lanterns

Lighting the underneath side of natural arches like Mesa Arch (Canyonlands Nat'l Park, Utah) is the perfect application for omni-directional mini LED camp lanterns. © Royce Bair
Wayne Pinkston photographed the Milky Way with this cottonwood tree at the bottom of a sandstone pothole, during a workshop I was conducting in Grand Staircase-Escalante Nat'l Monument. Once again, I used an omni-directional mini LED camp lantern, placed near the bottom of this 60 feet (18 m.) deep pothole. (Wayne has a new version of this photo, you may like even better.) See the pre-dusk lighting preparations, below. © Wayne Pinkston
Preparing a string of tied-together mini LED camp lanterns and lowering them into the 60 feet (18 m.) deep pothole, just before dusk. The last few feet of orange nylon rope is traded for transparent monofilament (the kind used for fishing) and tied to a large rock, and placed behind the photographers so it cannot be seen in our photos. Photographers then prepare to shoot during the "blue hour" twilight. Once this is done, two of the three lights are turned off, as only one is need for full Astronomical Dusk photography with the stars. Click photos to enlarge. Photos by Eugene Louie and Royce Bair

Camp lanterns cast light in all directions (omni-directional, or almost 360 degrees). They are one of the three types of lights I discuss and demonstrate in my Milky Way NightScapes eBook. The other two are LED panel lights and spotlights. Spotlights have very narrow beams with high intensity, and must be kept moving during the camera exposure process. Panel lights and camp lantern lights are wide-angle coverage lights that can be stationary during the camera's exposure.

Problems with most LED camp lanterns. There are two major problems I have with most LED camp lanterns when using them for NightScape style photography: 1.) Most LED lights are too cold or bluish. To make them usable, I usually have to wrap an orange conversion filter around the lantern. Without the filter, their output is typically between 5600º Kelvin (a little bluer than daylight) to 8000º Kelvin (very blue). This does not match the camera White Balance I like to use for starry night photography, which is between 3800º to 4400º Kelvin. By the way, scientists have also proven that the bluish LED lights cause more eye fatigue—something to consider if you plan to do a lot of night reading in your tent.  2.) Most LED lanterns are too bright. When you are working with high ISO's between 3200 and 6400, you do not need a lot of light to exposure your foreground features. (Wayne Pinkston and I like to call this Low Level Landscape Lighting or LLL. In most cases, we are only trying to match the brightness of the stars.) Most LED camp lanterns only have two brightness settings. Even at the lower setting, I typically have to wrap several layers of translucent, white cloth around the lantern in order to make these older lanterns dim enough for NightScape style photography.

Sunset Arch, in Grand Staircase-Escalante Nat'l Monument was lit underneath with two older style mini LED camp lanterns that had to be filtered to 3200º K and wrapped with several layers of white, translucent fabric in order to dim their bright light output. © Royce Bair
The "Shane Cabin" near Kelly, Wyoming (used in the 1953 movie, "Shane") was also lit inside with three older style mini LED camp lanterns that had to be filtered to 3200º K and wrapped with several layers of white, translucent fabric in order to dim their bright light output. © Royce Bair 


LED Camp Lanterns Compared 2011 - 2016: 1.) GE Chromalit 3D lantern, circa 2011. 300 lumens output, powered by eight D-cell batteries (very heavy), but could last for up to 200 hours in its low setting. All of the following are considered "mini" lanterns, except for #6, which is a "micro" lantern.  2.) Life Gear Glow lantern, circa 2012, white (very blue) and red LEDs, 25 lumens.  3.) CREE XLamp Warm White LED Camping Lantern, circa 2013. Output 110 lumens on high. The low setting is capable of 48 hours run time, using 3 AA batteries. It's light usually warm enough to not require filtration, but even at low power it often required several layers of white fabric to dim it enough for starry night photography.  4.) Ozark Trail LED Lantern, circa 2014. This original Walmart product produced 50 lumens on high (the current model produces 75 lumens). Its 25 lumens low setting allowed it to run for 28 hours on 3 AA batteries. It is show here with an orange conversion filter that I’ve wrapped around it. Even with it’s low setting, the lantern usually requires 2 to 4 layers of white fabric for dimming. This lamp was used in the top photo of Mesa Arch—hung from a 20-40 feet of rope until the underneath glow of the arch look right.  5.) Goal Zero Lighthouse Mini Lantern, 2015. (See full description below.)  6.) Goal Zero Lighthouse Micro Lantern, 2016. (See full description below.) Click image to enlarge.

My two favorite LED camp lanterns. Recently, I have begun to use some of the newer miniature camp lantern lights that have been appearing on the market. Two of my favorites are both made by the incredibly innovative Goal Zero, the "Power-Anything-Anywhere" company. These preferences are the Lighthouse Mini Lantern and the recently introduced Lighthouse Micro USB Rechargeable Lantern.


Goal Zero Lighthouse Mini Lantern: The key features for photographers are its warm, 3500ºK light output and its infinite number of dimmable selections. Although it will put out a bright 210 lumens, it can be dimmed to about 7 lumens! You can also choose to operate only one side of the lantern (180 degree coverage), or choose to use both sides of the lantern (360 degrees). With these options, and the dimmer, the battery can last from 4 to 500+ hours (about 26 days)! The powerful (3000 mAh) and rechargeable Li-ion battery (via a built-in USB cord) is also capable of recharging your mobile phone or a GoPro camera via a USB outlet. Four power indicator lights let you know the charge status of its replaceable battery. Watch this video for more unique engineering features. View the complete PDF user guide. Price: $59.99 - ORDER direct from Goal Zero

FREE SHIPPING Alert: Receive Free Shipping for a limited time only on orders of $49+ at Goal Zero. Offer Valid 3/27/17 12AM MT - 3/29/17 11:59PM MT.

Click image to ENLARGE


Goal Zero Lighthouse Micro USB Rechargeable Lantern: The key photography features for this lantern are similar to the mini — a warm, 3800ºK light output that is completely dimmable. It's maximum brightness is 150 lumens and it can be dimmed to about 7 lumens! You can choose to operate only two of it's four LEDs or all four, and infinitely dim them. The Li-ion battery can last from 7 to 170 hours, depending on the number of LEDs you choose and how much you decide to dim them. Although the battery is not replaceable (like the mini) it can be recharged hundreds of times via a built-in USB charging tip (that folds inside when not in use). Four  blue indicator lights let you know the charge status of the battery. The lantern is also waterproof, with an IPX7 rating. Although the Micro is not as versatile as the Mini, its benefits include lower price and a remarkably small size. View the complete PDF user guide. Price: $19.99 - ORDER direct from Goal Zero

(You can also order the Lighthouse Micro Flash model, which includes a built-in flashlight, for only $5 more.)


Monday, May 16, 2016

Mars Over Metate Arch

A thin cloud layer near the horizon causes Saturn, Mars and Antares to glow just above Metate Arch. (One exposure with a Canon 5DM3, Tamron 15-30mm @ 15mm, f/2.8, 25 sec, ISO 6400, WB 3800ºK, 3 stationary lights filtered to 3200ºK.) ~ © Royce Bair (click to enlarge)
Mars over Metate Arch, Devil’s Garden, Grand Staircase-Escalante National Monument, Utah. I took this 11 days ago (on May 5, 2016) from the “back” side of the arch (compare with the “front” side image at the bottom of this post). This is such a unique and extremely dark, Bortle-1 Class area.

This cropped enlargement of the top image shows the alignment of Mars, Saturn and Antares. A thin cloud layer near the horizon causes the stars and planets to glow more than normal. ~ © Royce Bair 
Look this month for Mars and Saturn near Antares, the brightest star in the constellation Scorpius the Scorpion. They make a noticeable triangle on the sky’s dome.

This illustration by Mikhail Chubarets shows how large Mars will be this month, with its largest and brightest on May 22 (click to enlarge).
By the time Mars reaches its crest of brightness in late May, it will have quadrupled in brilliance since the beginning of April. Currently, Mars is nearly as brilliant as Jupiter! Mars has greater swings in brilliance than any other solar system planet, except for Mercury. At is brightest, Mars shines some 80 times more brilliantly than at its faintest. This is Mars’ month, the best month in two years to watch the red planet!

Why is Mars getting so bright? For most of the past two years, Earth has been fleeing ahead of Mars in orbit. Mars orbits just one step outward from us, and we move slightly faster in orbit, and – about every two years – we catch up to Mars again and pass between it and the sun. That’ll happen next in late May, 2016. Astronomers will say that Mars is in opposition to the sun around that time.

Opposition of Mars and Saturn for 2016 in the Constellations of Libra and Scorpius from LarryKoehn on Vimeo.

Opposition occurs when a planet is in line with the earth and the Sun. This year, Mars will be at opposition on May 22nd followed by Saturn on June 3rd. Opposition of a planet also means the planet can be seen all night long from sunset to sunrise. Mars this year will come as close as 47 million miles to Earth in May.

The "Front" side of Metate Arch, or the side that most people see first, when walking through Devil's Garden. This side faces north, where the stars are stunning, but the Milky Way's Central Bulge never appears ~ © Royce Bair


Monday, March 14, 2016

Lighting the historic Enola Gay Hangar

A night photo of the Enola Gay Hangar at the historic Wendover Airfield, Utah. This hangar is 200 x 200 feet, plus offices on the left and right sides. Exposure: f/4.0 • 10 seconds • ISO 1600 • White Balance = 4000º K. (Click image to enlarge)
Last week's NightScapeWalk was supposed to include two free photo walks shooting the Milky Way. We tried, but cloudy conditions prevailed. Light painting the historic Enola Gay Hangar was our backup plan in case of cloudy weather, and on this shoot we were in total control.

During WWII this airfield had over 600 buildings with barracks that housed almost 20,000 servicemen and civilian workers. This 200 x 200 feet hangar was built in 1943 to house and maintain two B-29 Superfortress bombers at a time, one of which (the Enola Gay) went on to drop the first atomic bomb. Although the hangar has deteriorated over time, restoration work has refurbish the west side of the hanger and the side offices.

A cropped enlargement of the top photo shows our airport security man, Ed Nelson, standing at the partially open hangar door with a Grumman HU-16 Albatross in the background. The HU-16 is currently in temporary storage in the hangar. It is an amphibious flying boat, introduced in 1947: 63 ft length. 97 ft wingspan, with two 1,425 hp Wright engines.

Lighting set up for the Enola Gay Hangar - click image to enlarge
Lighting set up for the Enola Gay Hangar is shown above. The L1 key light was an AlienBees B1600 flash unit, using a special Long-Throw (28º) reflector. That flash unit was fired once (at 1/2 power) during the 10-seconds time exposure. The telephoto reflector is not only to increase the efficiency of the flash, but it enabled us to NOT hit the Albatross plane with any stray light. L2 was a Snap-on brand LED Worklight. This lit the Albatross and the inside of the hangar. It's 46 LED's produce 2,000 lumens of light, using only 25 watts! Both the AlienBees flash unit and the Snap-on Worklight were powered by a Vagabond Mini Lithium portable power source. L3, L4 and L5 are Z96 LED Panel Lights that I have demonstrated here many times in the past.

Daytime view inside the hangar: The Grumman HU-16 Albatross looks pretty small inside this huge hangar that was built to house and service two B-29's at the same time.  (The Grumman has a wingspan of 97 ft vs. the 141 ft of the B-29. The amphibious is powered by two 1,425 hp Wright radial engines vs. the B-29's four 2,200 hp Wright radial engines.) You can see the restoration work that has been done to the back one-fifth (west side) of the hangar along with the north and south offices (the north offices are behind the Albatross). Click image to enlarge.