Share:

Showing posts with label Milky Way photography. Show all posts

Saturday, December 14, 2024

Free Milky Way NightScapes Photography Lectures


 Free Milky Way NightScapes Photography Lectures for Camera Clubs and Local Photography Groups.


Next presentation at:

Sedona Camera Club

Christ Lutheran Church, 25 Chapel Road, Sedona, AZ 86336

Feb 23, 2026 • 6:00pm • In-person

(One-time visitor's fee of $5.00 if you're not a club member)


Although I've been paid handsomely to give dozens of presentations over the years at photography conferences throughout the world, I often "give back" to our photography community with free lectures to local photography groups and camera clubs.

A typical astro-landscape photography presentation, with PowerPoint slides, runs about 45 minutes to an hour, followed by up to 30 minutes of Questions and Answers from the audience. My only pay-back is that the hosting organization allow me a 2-minute advertisement about my Milky Way NightScapes eBook, which can be purchased online (often with a special discount code for members of the hosting organization).

Typical Presentation Methods to Your Group. Your Choice Between:

  • Zoom option 1: You provide the live Zoom connection. You are free to record the presentation and share it later to members who could not attend. Cost: No charge from me.
  • Zoom option 2: I provide the live Zoom connection. I will also record it and post it to YouTube, where your member can access it after the live Zoom meeting. Cost: No charge for my presentation; however, there is a fee of fifty dollars to help pay for Zoom and uploading costs.
  • In-person: I will come to your club or organization and make my presentation. Cost: No charge for my presentation; however, you must pay for my round trip transportation costs from Salt Lake City, UT USA; and lodging costs in your city.

Email to inquire about my available dates or to ask questions: orida70@gmail.com 


Here are a few recorded examples of presentations I've given:


Promoting Your Camera Club

Royce promoting a camera club lecture via a local TV show in Florida

When I come to your area, I often help promote your local organization or camera club. Here, I'm on a local TV program in Florida promoting a presentation I'm going to give that weekend at a local camera club. My lecture was free to camera club members. The club charged a nominal fee to the general public—helping to bring in money to support the club's future programs. I also use my domain name "NightScapeEvents.com" to link up to the club's website or any other local astrophotography event I'm trying to help promote (that domain name goes to this blog page when there is not a current event scheduled).

Royce promoting a local event in Seattle, WA via a KING5 TV interview


Image Critiques - Portfolio Reviews - Judging

When I do photography lectures I’m often asked to do image critiques as well. This is where each of the club or group members can submit a few digital images beforehand and have me critique the images in front of the whole group. The group usually benefits just as much as the photographers being critiqued.

More than nightscapes: In some gatherings I’m asked to do competition judging or portfolio reviews. In all cases, these images cover a wide variety of subjects and genres. That’s because I’ve not only had experience in nightscape photography, but I’ve spoken and judged multiple times for the Professional Photographers of America (and Canada), the PSA, and for the American Society of Media Photographers (ASMP).

My professional photography career has spanned over three decades in magazine, commercial, industrial, portrait and fine art photography. Besides being a full-time photographer, over the years, I've also been the CEO of a stock photo agency, a fine art printing company and an art gallery.


Royce has been doing magazine and commercial photography for over three decades.


Here are some of the places where where I'm already scheduled to appear:

  • Mar 6 • 7:00pm • via Zoom
  • Albuquerque, NM USA
  • Enchanted Lens Camera Club
  • enchantedlens.org
  • Membership required


  • March 11 • 6:30pm MDT • via Zoom
  • Fort Collins, CO USA
  • Fort Collins Digital Camera Club
  • fcdcc.com
  • Membership required


  • March 27 • 6:30pm PDT • via Zoom
  • Los Angeles, CA USA
  • Professional Photographers of Los Angeles County
  • pplac.org
  • Membership required


  • April 8 • time to be announced • via Zoom
  • Paso Robles, CA USA
  • North Country Camera Club
  • Facebook group page
  • Membership required


  • May 6 • 7:00pm • In-person
  • West Jordan, UT USA
  • SL County Library - Viridian
  • thecountylibrary.org < register here
  • FREE to the public


  • June 4 • 7:00pm PDT • via Zoom
  • Scotts Valley, CA USA
  • Community of Digital Artists
  • CODAsantacruz.com
  • Membership required

  • August 11 • 7:00pm EDT • via Zoom
  • Statesville, NC USA
  • Iredell Photography Club
  • Facebook group page
  • Membership required

  • Feb 23, 2026 • 6:00pm MST • In-person
  • Sedona, AZ USA
  • Sedona Camera Club
  • sedonacamera.club
  • Non-members can enter with a $5 visitor's fee


What people are saying about my lectures:

"Wonderful presentation last night. I learned a lot of inside info that I haven't encountered before. Thank you! Could you please pass on the mini flashlight brand and model for that 1-lumen mini light you showed?" - TomM

"Thank you very much for your presentation last night. I and, I'm sure, the rest of the club members appreciated your in-depth information. I'm going to spend some serious time sorting thru my notes..." - Keith Hill


Tuesday, March 5, 2024

Tips for taking Nightscapes from a drone

A DJI Mavic 3 drone photo, taken above the Outeniqua Pass foothills in South Africa by Agnieszka Taggart

 Written by Agnieszka Taggart

Agnies is a licensed drone pilot and instructor in Johannesburg, South Africa.

Drones are becoming more popular among photographers so it’s no surprise that with the improving specifications, they are also becoming usable in night sky photography.

There are couple things to consider though.

One is the legal side of flying drones at night as some countries only allow drones during the day or with special permissions.

The second one is drone capability to take long exposure photos. Modern drones are quite good at holding the position, but what’s considered good in the world of drones, may not always be good enough in terms of optics and photography.

Typically, the longest exposure from a drone is 8 seconds, but it does not mean that all your exposures taken at 8s will be usable - this is to the fact that even within this rime, the drone will have some movement, usually caused by wind.

Drones typically use the below systems to hold the position:

  • GPS: modern drones use as many satelites as they can detect, 12-15 satelites is needed for good position lock, sometimes even more. Accuracy increases with number of available satellites
  • Compass/ gyroscope: this defines which way the drone is pointing 
  • Visual sensors: many drones are equipped with visual sensors for position hold. The sensors scan the ground and register the image  - the more contrast and illumination, the better the visual position hold. 

In order to get good position lock, hover over something bright and with good contrast - you might want to put a torch on a landing pad.

Accuracy of visual sensors decreases with height, so do not fly high if you don’t have to. In most cases, you only need to clear the height of the roof and trees, so 10-15m above the ground should be enough. Wind is also weaker close to the ground and increases and often changes direction as you mice up.

* Do not take off from a car roof, there is a lot of interference from car electronics that might affect the accuracy of the drone compass. If you chose to hover above a car, take off from a different spot and move over once you reach required height.


Based on the above, you might need to adjust your regular work flow for all types of night time photography.

1) Single exposures

As mentioned, you will be limited to 8 seconds. That’s short, so in order to have usable image, you will need to dial up your ISO. I typically use ISO3200 on my Mavic 3. In case of single exposures, sensor size is the key. You might get away with 1 inch sensor, but 4/3 will produce better results. Take many shots and choose best - they will not all be usable. The types of photos that work well in this situation are naturally contrasty and well illuminating landscapes (snow, sand, water, pale rocks such as sandstone and dolomites), landscape with busy road to capture the trailing lights and non-aggressive light painting

2) Blending and stacking

Typically you would take some shots at “blue hour” and then some night sky shots later. With this technique, it is critical to keep the drone in same position. It is extremely unlikely that you will do this with a single battery, so you will have to record the exact drone position, direction and height. You may want to create a waypoint if your drone app has this function.

3) Composites

Using drone for night time photography is challenging and you may be left with no option than to create composite. If you do, make sure that it is true to nature - check the directions and star positions. It is useful to take a shot with most prominent stars and combine it with shots from the ground. And of course ALWAYS reveal the technique.


Tuesday, August 8, 2023

Updated ''Milky Way NightScape'' eBook Version 2.0


My NEW, updated eBook premiered March 30, 2024


My original "Milky Way NightScapes" version 1.1 ebook, published in 2015, has been an astro-landscape photography standard reference book, worldwide. The late Alyn Wallace called me the "founding father of landscape astrophotography."

This expanded edition has 198 pages and 725 illustrative images and includes tutorials from 33 "Guest Artists" experts that cover the latest tracking, stacking, blending and panorama techniques, and much more. Some are calling this "the Holy Grail of astrophotography" and the "nightscape photography encyclopedia."

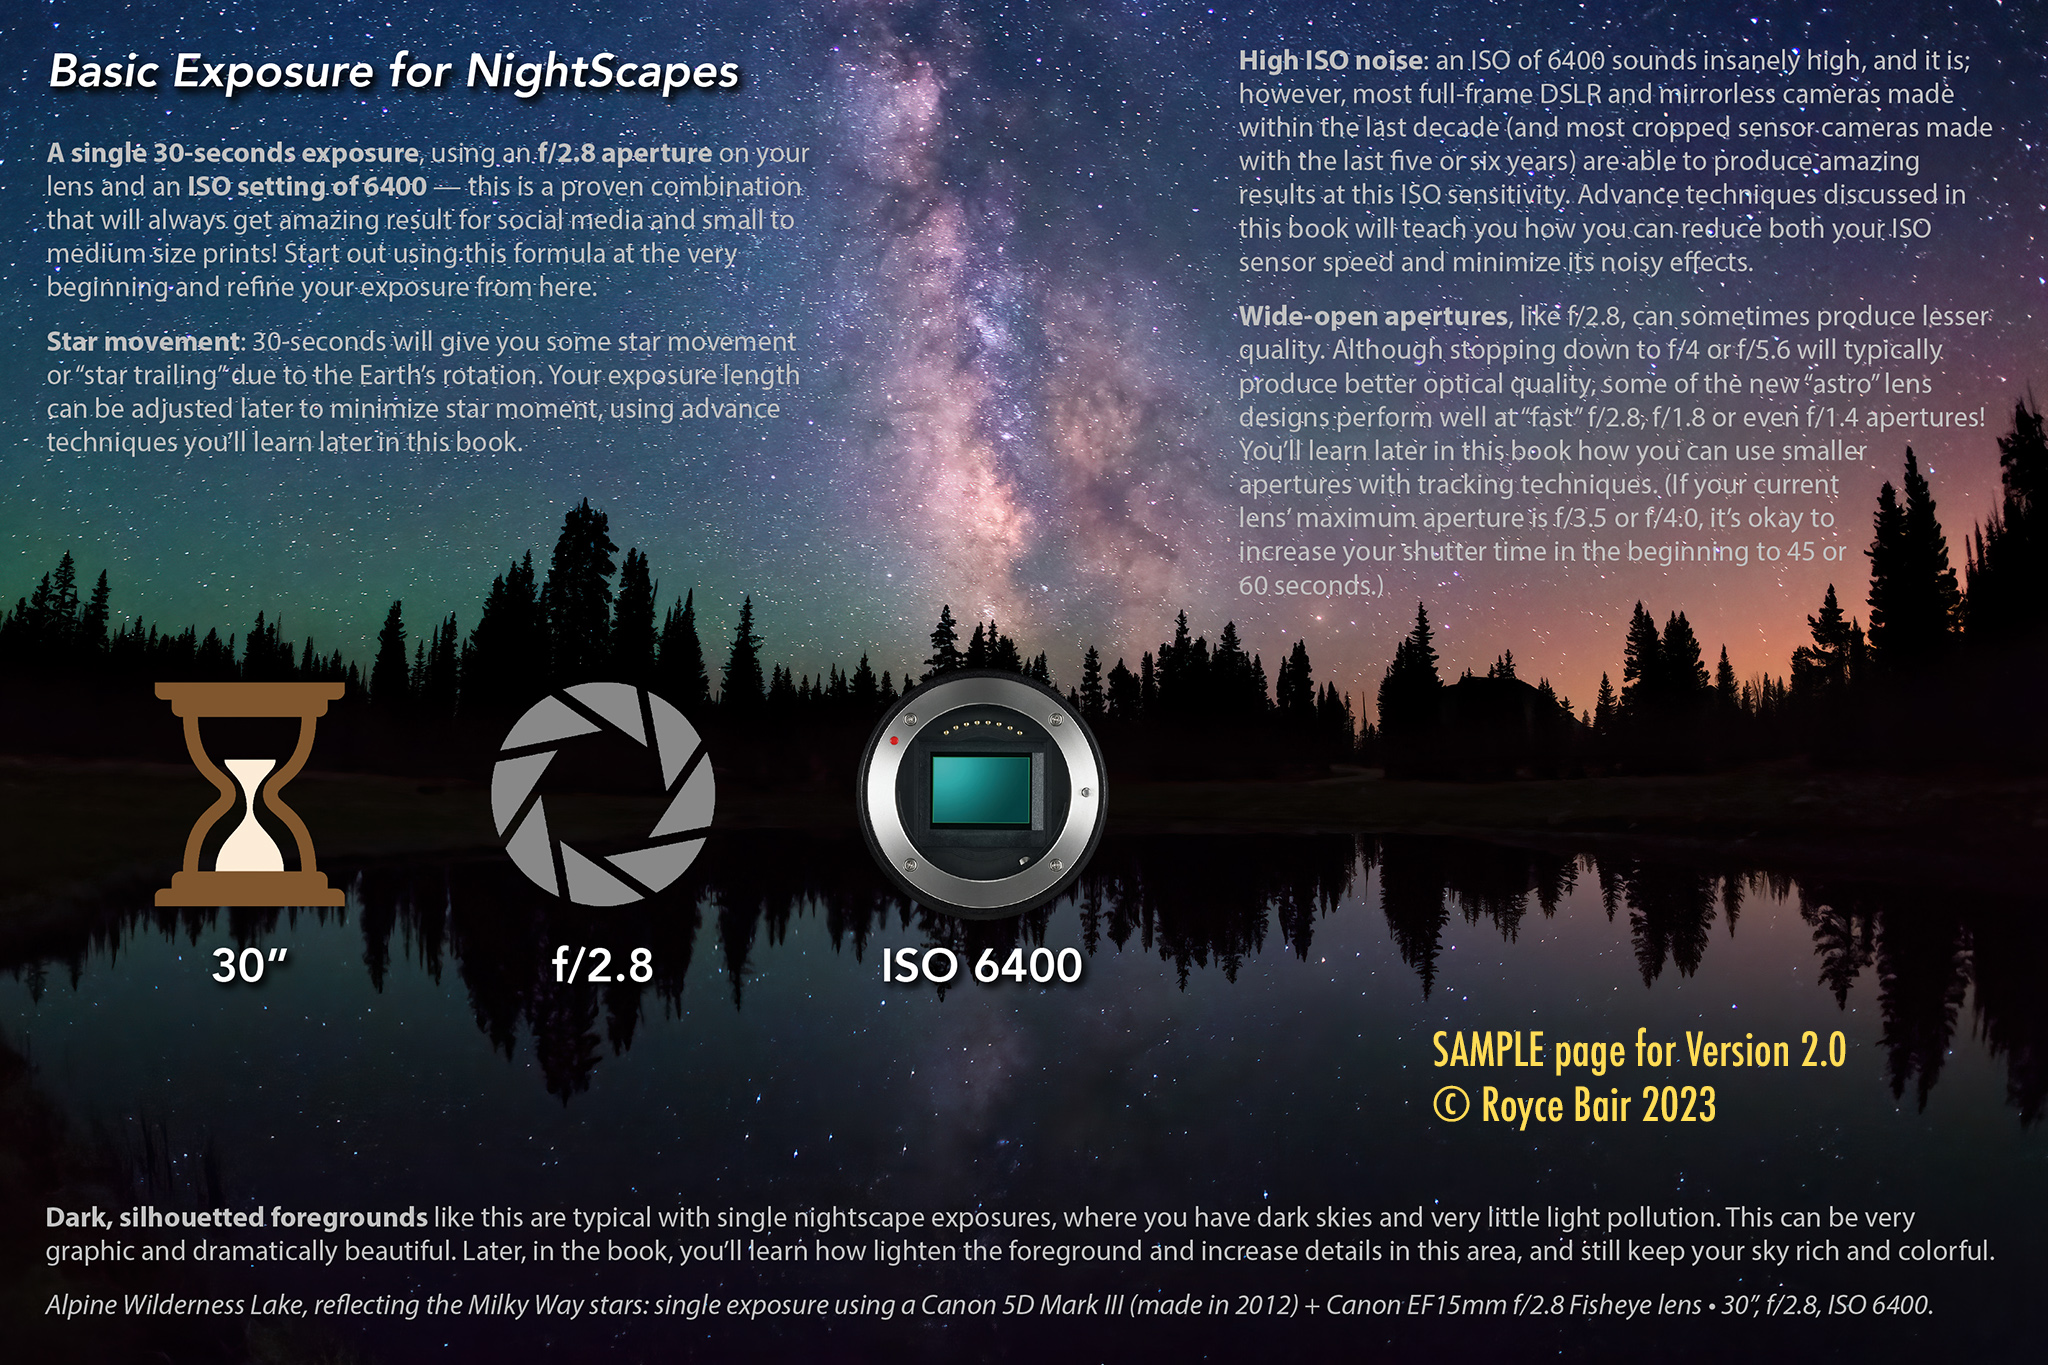
SAMPLE pages. HERE are six (6) sample pages from my new eBook:

Sample pages - Click to view individually

TWO WAYS to GET my NEW eBOOK: You can do a one-time PURCHASE and download for $39.99, or you can become a supporting PATREON for as little as $3/month and get my eBook as one of your benefits of support.


Saturday, June 24, 2023

Focus Stacking Nightscapes with Marybeth Kiczenski


Big Stable Lighthouse by Marybeth Kiczenski • Foreground taken during the blue hour, using several 15 second "focus stacked" exposures at f/8, ISO 800 • Sky is a 90 seconds tracked exposure, ISO 1000, f/2.8 • Sony a7iv  camera, with a Sony 24-70mm lens at 50mm.

Winter blooms at Anza Borrego by Marybeth Kiczenski • Foreground taken during the blue hour, using several 6 second "focus stacked" exposures at f/8, ISO 800 • Sky is five 1-minute tracked exposures (a total data stack of 5 minutes), f/2.8, ISO 800 • Sony a7iv astro modified camera (to visible + H-alpha), with a Sony 12-24mm lens at 14mm.

Step-by-Step Tutorial

A 3-image focus stack taken during the blue hour by Marybeth Kiczenski.

Focus stacking your night images is a great way to improve the overall image quality.  Much of the process is akin to daytime focus stacking – but with a twist.  Depending on if you are blue hour blending, or using true night images, the process may include further post processing.  

One of the most popular case uses for focus stacking involves flowers.  Flowers make beautiful foreground subjects, but with wide-angle images at F/16 – the depth of field rarely is enough for these small, yet mighty, subjects.  

Before we dive in, also note that flowers move.  They move A LOT.  The slightest of breezes can move these delicate subjects.  You may find yourself either giving up, OR doing your focus stack of the flower in blue hour – sometimes VERY early blue hour.  Basically, as soon as the directional light from the sun disappears.  The reason is you’ll need those faster shutter speeds to freeze the blooms.  

Pay attention to the weather considerations and wind.  You don’t want to miss that small window to capture still flowers!  

With that out of the way, let’s get to the task at hand.  You’ll notice here that the flowers here were taken not long after the sunset.  While I had the tripod set up in this spot from sunset to milky way, the sharpest stack was from this early evening time frame.  

Another point to consider:  what is your minimum focus distance of your lens?  As you can see here, the Sigma 14-24mm F/2.8 ART lens failed to catch the focus on the nearest flower to the lens.  But to be fair, it was basically on top of it.  If this is the type of thing that bothers you, then you’ll want to adjust accordingly.  I loved having the flowers frame the scene, so I creatively chose to live with this flaw rather than losing the top anchor flower. 

The yellow dots indicate the approximate focus points the camera chose in each of the three focus stack exposures. The lens aperture was set at f/8. An aperture of f/16 would have given greater depth of focus, but the exposure would have needed to be four times as long, which can cause flower movement, if there is any wind. If focus stacking had been done in total darkness (using an aperture of f/2.8), then a much great number of exposures would be needed to create the focus stack depth of focus (and focus for each would have been done manually).

The actual focus stacking process involves you starting on the nearest subject, and progressively shifting the focus until you reach the infinity point.  You can pick subjects from the scene to focus on, shift your lens step by step, or utilize some camera’s ability to in-camera focus stack.  This image was done with a Nikon D850 – the first camera from Nikon to have this feature built in.  The number of images you’ll need also depends on the aperture you choose. In other words, you’ll need a lot more images to complete the stack  at F/2.8 vs. F/16.  You may have to play around (if your camera doesn’t have the auto feature) to make sure you get everything in focus.  

IMPORTANT NOTE: If you are doing your focus stacking in the dark – you’ll have to manually focus on your different points.  This can be an issue if you are with a group, as the “easy” way to focus on the subject is to shine a light on it, set the focus, then turn it off.  Communication is key!  For this reason, (as well as the aforementioned weather issues), 95% of all my own complex foreground will likely be blue hour foregrounds.  There are times where this just isn’t possible, so you just deal with the parameters dealt!


After you collect all your in-field data (focus stack images and your starry night sky exposure), it’s time to do the process the focus stack:

  1. Open your best sequence in the editing software of your choice.
  2. Apply your basic edits.
  3. Save the edited images.
  4. From here, you can use Adobe Photoshop, or software such as Helicon Focus.  For images that Photoshop has issues with, I will use Helicon.  [Update: recent Photoshop updates drastically improved its built in focus stacking algorithm.]
  5. Open the files as a stack.
  6. Click on “attempt to align layers”
  7. Once the images are loaded into layers, I will then Auto-Align them.  This just insures to me that they are aligned to the best of the computer’s ability to do so.
  8. Select all the aligned layers, then click “Auto-Blend”  The Auto function typically will suffice.

The computer will then apply masking as it sees fit to make a seamless blend.  Photoshop uses depth mapping for this type of stacking.  When that doesn’t work correctly, that’s where Helicon Focus comes into play.  This program features different algorithms to figure out the focus shifting beyond the scope of Photoshop.  You can pick between these algorithms and see how it changes the stack.  

Once you are happy with your focus stacked image, save that file out.  From here we will now go into adding in the sky, and color matching the two assets to make a final composition!


PUTTING IT ALTOGETHER

At this point, you should have two main images to work with:

  1. Focus stacked foreground image
  2. Single exposure / a Stacked exposure / or a Tracked sky image

Open the focus stacked image.  From here you’ll want to apply a mask to remove the sky.  This can be a number of ways.  The easiest of which is using Photoshop’s new “Select Sky” function.  This works remarkably well for well defined horizons.  I find that it starts to struggle with trees.  Sometimes it will remove too much detail in these complex areas.  It’s always worth a try, though!  As it's the easiest method! 

If this fails, you can deploy the very powerful color-channel masking method.  This is a bit advanced, but it's remarkable – especially when dealing with trees.  Here’s the simplified process:

  1. In the layers panel, navigate to the color channels tab.
  2. Click on each channel until you find the one that separates the foreground from the sky the best. Usually this ends up being the blue channel, but not always.
  3. Copy that color channel into its own new layer.  This step is IMPORTANT, as if you don’t copy it, any changes you make will affect the master image.
  4. Use brightness/contrast to create more separation.  You want a black and white image.
  5. Use the dodge and burn tool to define the edges.
  6. Once happy, then select one of the colors – either black or white.
  7. Click back to the full color image – and click on “apply mask”.


Masked Focus-stacked foreground — ready to be blended with starry night sky image


Once the sky is masked out, then you can open your sky image.  Copy that image over to the foreground image into its own layer.  I always put the sky under the foreground.  


Now save this master file out as a new file.  This way you still have an unaltered focus stacked image, in case things go drastically wrong. 

Initial blend of foreground focus-stack and sky exposure

COLOR BLENDING

Here’s where your creativity begins to take flight!  Using the Hue/Saturation, Color Balance, and Selective color under Adjustments, start working the colors until the foreground begins to match the sky, or vice versa.  This is really a personal preference.  Blue hour images – as the name implies – are heavy in the blue/magenta tones.  Some will choose to keep with this theme, and make the night sky match the blue tones.  However, the colors of the natural night sky are not blue.  So you have to make this creative choice.

The magic is really in the color matching for creating convincing compositions.  It can take a lot of small finessing and adjustments, and practice.  

Once you are happy with the color matching, then you can take the editing further with curves, brightness, contrast, using the Nik collection, and more! 

Final post-processed blend


Tuesday, March 7, 2023

Sample Pages from my New eBook

 Here are six (6) random sample pages from my new Milky Way NightScapes Version 2.0 eBook:

Click on image to enlarge

Click on image to enlage

Click on image to enlarge

Click on image to enlarge

Click on image to enlarge

Click on image to enlarge

MORE SAMPLE PAGES: Here are eight (8) more sample pages from the eBook (double-click on each PDF to view).

Update 2.0 covers the NEW ADVANCES in:

  • Astro-modification to Camera Sensors
  • Filters to increase nebulosity (giving that "deep space" look)
  • New Tracking options
  • Stacking for noise reduction & reduced star movement
  • Software for Noise Reduction
  • Deepscapes (a new nightscape genre)
  • Low Level Lighting techniques & equipment
  • Mixing Moonlight with the Milky Way
  • Twilight Blends vs. Starlight Blends
  • Obtaining High Quality Single Exposure NightScapes

TWO WAYS to GET my NEW eBOOK: You can do a one-time PURCHASE and download for $39.99 (act now for a limited-time $5 off), or you can become a supporting PATREON for as little as $3/month and get my eBook as one of your benefits of support.


Saturday, February 4, 2023

Winter Milky Way by Ralf Rohner


Winter Milky Way at a "Secret Beach" on the Oregon Coast © Ralf Rohner (click to enlarge) 

Nightscape photographers in the Northern Hemisphere often talk about the "Milky Way season", and bemoan that the season is "over" when winter comes. Actually, this is a misnomer. The Milky Way is always with us—summer or winter, as you can see in Ralf Rohner's beautiful panoramic view of the winter night sky.

What some less informed photographers are referring to is the absence of the "core" or galactic center of the Milky Way during the winter months. A better term might be: The "Milky Way core season" is over during the winter months. (The opposite is true in the Southern Hemisphere, when the core disappears below the horizon during some of their summer months).


"The Astrophotographer's Yin and Yang" at Mobius Arch © Ralf Rohner (click to enlarge)

This panoramic photo blend is a wonderful example of how our view of the Milky Way changes during the seasons. The photo is a blend of both Milky Way seasons, taken from the same location (Mobius Arch, in the Alabama Hills of eastern California). Ralf had this to say about the image:

Do you prefer winter or summer? Cold or warm? Dark or bright? Yin or Yang?

Yin is the dark side of our Milky Way, dominated by Orion, the hunter. As northern hemisphere dwellers, we associate this dimmer part of our galaxy with long, cold nights, but it also contains some of the most beautiful gems in the night sky, as the light fights its way back in the form of stunning red hydrogen emission nebulae, dotting the whole Milky Way band.

 For bright Yang, you have to look for Sagittarius, the steaming teapot, which points towards the galactic center, the brightest part of the Milky Way. In the northern hemisphere, this is associated with warmer but shorter spring and summer nights. Adjacent to the Milky Way core, in the border area of Scorpius and Ophiuchi, lies one of the most colorful parts of the night sky, the Rho Ophichui region. Despite all this light, one can not ignore the looming dark cloud of the Great Rift, blocking the starlight and colors in the constellations Serpens, Aquila and part of Cygnus. Ironically, this seemingly star-eating molecular cloud is home to some of the most active regions of star formation. The light once again gains the upper hand in the bright hydrogen emission nebulae of Cygnus, around the stars Sadr and Deneb.

 Thereafter, we enter the transition zone between the bright and the dark side, which is ruled by King Cepheus and his vain wife Cassiopeia.

 During a short period in spring and autumn, it is possible to see both sides in a single night. I had the privilege to be able to capture this at Mobius Arch in California.

The Yin-panorama was captured after nightfall, facing westward, and showing the winter Milky Way with setting Orion. The east facing Yang-panorama shows the rising galactic core and Cygnus, shortly before dawn. Both were merged to create this 'Yin-Yang' image, showing the entire Milky Way visible from mid northern latitudes. [The bright area in the sky, just to the right of the arch is Zodiacal Light.]

Ralf's technical information for the top photo of the "Secret Beach" will give you an idea of how he creates his nightscape panoramas:

  • Camera: Canon EOS-R, astro-modified 
  • Lens: Tamron 15-30mm f/2.8
  • Narrowband filter: IDAS NBZ filter
  • Tracker: iOptron SkyTracker Pro 
  • Sky: 6 panel panorama, each a stack of 6x 60s @ ISO1600 & 3 x 150s @ ISO6400 
  • Foreground: 6 panel panorama of 5s @ ISO400 during blue hour

Check out Ralf's informative blog on how to do landscape astrophotography.


Tuesday, November 16, 2021

Get my eBook for only $3


Limited Time Offer: Get my $19.99 Milky Way NightScapes eBook for only $3.00* by becoming a Patreon NightScaper Supporting Member!

The eBook that has taught thousands how to photograph Milky Way nightscapes. "Your eBook is the 'Bible' of NightScape photography!" - Ralf Rohner 

*Although this a monthly patron membership subscription, you can cancel at anytime. But, I don't think you'll want to because of these added patron BENEFITS:

  • "Finding Your Photo Vision" Video

    Access to the 49-minute "Finding Your Photo Vision" presentation I gave at the 2021 NightScaper Conference (the content in this video has helped to redirected and change many photographer's lives).
  • Access to the 29-minute "6 Ways to Improve Your Nightscapes" presentation (also from the conference).
  • Access to 2 other NightScaper Conference videos of YOUR choice (choose from 65 other video tutorials).
  • Exclusive chapter updates: Each week I reveal new pages to my NEW 2.0 eBook version, that is coming out the end of this year (2023). HERE's a SAMPLE of what those updates look like.
  • When the version 2.0 eBook is finished, my dedicated patron supporters will receive the edited and compiled edition for FREE.
  • Even if you already have my original (version 1.1) eBook, you can be a hero by gifting it to a friend, and retain the above benefits for yourself!
  • You'll be supporting my efforts to showcase the some of the world's best nightscape photographs and photographers on my 480,000 Instagram following, and our 97,000 member NightScaper Facebook group — both of which strive to teach good how-to techniques.


Become a NightScaper Supporting Patron Member

for only $3/month - JOIN NOW!

...and I'll send you a download for my eBook

and a link to the "Finding Your Photo Vision" video.

Receive a 16% discount from Patreon when you join for 1-year ($30.24 annual).

- - -

$5.00 DISCOUNT. If you don't like subscription memberships (even with all the added benefits listed above), and you just want to pay a one-time $14.99 price for my eBook, then click the banner below and place your order for an immediate download of my eBook. Use the Promo Code TWAN at checkout to reduce your final cost from the regular $19.99 price to $14.99:


Wednesday, April 14, 2021

2021 NightScaper Conference goes virtual


The 2nd annual 2021 NightScaper Conference is now virtual. After having been postponed for almost a year due to the covid pandemic, 150 held-over registrants from the 2020 conference will meet in the Kanab Center and be joined virtually by hundreds more on May 10-12. Join us by registering today. For a limited time, save $200 by using the VIRTUAL200 discount coupon code at checkout (net ticket cost of $399).

BREAKING NEWS (April 26, 2021): Several in-person tickets are now available due to recent cancellations. If you'd like one of these spots in the Kanab Center, just register now and pay the regular $599 registration price. Once you place your order, you will receive a confirmation, and you can then book your travel and lodging.

IN-PERSON TICKETS NOW AVAILABLE


Over 40 night photography speakers will be presenting at the conference. Most will be presenting live and in-person. All speakers programs will also appear virtually and be video archived (up to one year) for your review. Additional international nightscape legends will be joining us virtually, i.e.:


Over 70 night photography programs and panel discussions — something for every interest and learning level, from beginner to advanced. "Deepscapes" is just one example — a new genre of night photography that combines deep space objects and an earthly landscape foreground, all taken from the same tripod position! This program will be taught by the trio of Paul Schmit, Ralf Rohner and Dheera Venkatraman. Below this are 5 more program examples...


Miles Morgan - “Twilight Photography
and Photoshop Techniques”

Wayne Pinkston - “Low Level Lighting
Step-by-Step”

Michael Zayne - aka blntpencil
"Milky Way Seasons"

Brad Goldpaint - "Photographing
the Milky Way with Moonlight”

Mike Shaw - "Astronomy 101 for Nightscapers:
Navigating the Night Sky" (this is a pre-conference
interview video interview with Mike)


Your Virtual Conference Ticket Registration includes:
  • 3 days of LIVE, virtual "NightScape" photography seminar instruction
  • LIVE, virtual access to 40 speakers ~ over 70 programs
  • LIVE, virtual round table and panel discussions
  • Networking with like-minded photographers
  • Video recorded access to ALL programsarchived in the "cloud" for one year
  • Ability to review all archived programs, including the ones you missed LIVE, because they were scheduled during the same time slot
REGISTER TODAY ~ For a limited time, save $200 by using the VIRTUAL200 discount coupon code at checkout (net ticket cost of $399).