Share:

Showing posts with label moon. Show all posts

Wednesday, August 26, 2015

How to make Saturday’s Supermoon shine in your photos

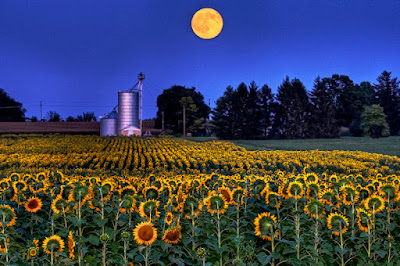
Nikon D7100 • 500mm • f/5.0 • 1s • ISO 400 • 5400K • 6/13/14 09:41pm
Sun elevation: -5.1° (Blue Hour) • Moon elevation: 1.3°
Antoni Cladera has written an article (All You Need To Make This Saturday’s Supermoon Shine In Your Photos) on the PhotoPills blog to help you take advantage of this Saturday’s Supermoon event.

“This Saturday, August 29th 2015, the full moon will be at 'only' 358,981km from Earth. This gives us the opportunity to enjoy and shoot what is commonly known as a Supermoon.

"Note that in Asia and Australia the full moon is happening on Sunday, August 30th, because of the different time zone. Then, check the day of the full moon in your local time. It should be on the 29th or the 30th.

"With an angular diameter of 0.556°, the full moon will look slightly larger in our photos. Get ready to take advantage of it!

"How? Location power, inspiration, equipment and the following tips are the ingredients you need to have in the mix in order to come up with the best cocktail for the Supermoon.

"It all begins by deciding how big you want the moon in your photos. Let’s decide the focal length we are going to use.”

Antoni lays out the the following ideas and suggestions, complete with illustrated, step-by-step instructions:
  1. Focal length defines how big the moon will appear in the photo
  2. Go to a location with an interesting subject, a beautiful landscape and space to move
  3. The shooting spot determines the size of the moon relative to your subject
  4. The idea, your imagination makes the difference
  5. The plan: finding the right shooting time and the right shooting spot
  6. How to shoot the Supermoon
  7. Just do it!
Be sure to view the complete article for all the details.


Wednesday, April 8, 2015

Faking the Moonrise

This moonrise over Kailua Beach, Oahu, Hawaii is actually a sunrise: f/8, 1/400 sec., ISO 100 ~ © Royce Bair MMXI
When to fake a moonrise: It's very important that all my starry night landscape photography ("NightScapes") be as close to my camera raw originals as possible. Other than an increase in sky contrast, I resist heavy Photoshop manipulation. Editorial photography requires a high standard of ethics. Commercial and advertising photography is another matter. Here one is trying only to be illustrative and create an image that sells a product.

Moonrise over Kailua Beach was created purely to be a top stock photo seller, and I have succeeded so well, that it has also become one of the Internet's most often ripped-off images (that can happen, when an image goes viral).

How the illusion was created: To create the above image was ridiculously easy. I started out with a pretty sunrise. That camera raw image was opened within the Adobe Raw Converter (ARC), which is available for Photoshop, Elements, and built into Lightroom (refer to page 115 in my new eBook).

The un-cropped camera raw file opened in the Adobe Raw Converter (ARC)
The next step was to slide the color Temperature to the left —all the way to 2000º Kelvin. Some images may look better at around 2500º, and may need some Tint adjustment as well.

Sliding the color Temperature to the far left (i.e. 2000º) will suddenly give your sunrise a cool "night" look.
Once the image meets your overall tastes for a "night" image, open the image and continue to make adjustments in Photoshop, Lightroom or Elements. That's it!

               Royce's 2015 NightScape Workshop Schedule


Wednesday, May 21, 2014

'Into the Future' by Jeremy Thies

"Into the Future" - Moonbeams through snow covered trees ~ © Jeremy Thies 2014
Canon 6D • Samyang 14mm f/2.8 • 30 seconds, f/4, ISO 4000


Jeremy Thies of Casper, Wyoming, created our Photo of the Day. This photo was taken on Casper Mountain, which is about a 15 minute drive from Casper. The starburst affect from the moon was present straight out of camera, although Jeremy did enhance it and spread it throughout the top section of the image, using luminosity masks and sharpening/brightening in Photoshop CS6.

Jeremy Thies has lived in the scenic state of Wyoming most of his life. He is a 100% self taught photographer, specializing in landscape photography. He has a bachelors degree in Criminal Justice and spends the majority of his time working at a law firm. "Every free chance I get, you can find me out photographing some landscape, storm, or sunset —early mornings aren't my thing," says Jeremy!

More of Jeremy's photography can be seen at his website and on Google Plus.


Royce's 2014 Workshop, Lecture & Video Conference Schedule: NightScapeEvents.com

Thursday, April 17, 2014

Moon over Delicate Arch by Steve Waterman

Moon over light-painted Delicate Arch, Arches National Park ~ © Steven T. Waterman
Steve Waterman took our Photo of the Day with a Nikon D800, using a Nikkor 14-24mm f/2.8 lens (at 24mm) • f/2.8 • 8 sec • ISO 1600. Light painting was done by Chris Bair at a September 2013 NightScape Workshop.

"Storm clouds were a challenge that night," says Steve. "We were waiting for the moon to set, to permit images of the Milky Way.  The challenge was getting sufficient exposure of Delicate Arch without the moon blowing out the picture."

Steve Waterman shares photography for fun and relaxation with his wife, Denise.  To support the photography hobby, he practices law, doing commercial litigation and reorganization with an international law firm. (The above photo was used on the firm's annual Christmas card.)


Royce's 2014 Workshop, Lecture & Video Conference Schedule: NightScapeEvents.com


Monday, March 3, 2014

MoonScapes - Photographing a Full Moon with Landscape Detail

Moonrise with last sun light on Wasatch Range, Salt Lake City, UT ~ © Royce Bair
Little Known Trick to Photographing the Full Moon: Here is how you can get detail on both the landscape and the moon. The above photo of the full moon was taken just as the sun was setting, the day before the full moon, and the next two photos were taken just before sunrise, the day of the full moon.

Big yellow moon as it passes through a cloud, surrounded by a cold, blue winter sky ~ © Royce Bair
Canon EOS 7D with an EF100-400mm f/4.5-5.6L IS USM lens @ 400mm
(35mm equivalent is 12X) f/8 • 1/4 sec • ISO 100
5 minutes later the same moon begins to set behind the Oquirrh Mountains, near SLC, UT ~ © Royce Bair
Canon EOS 7D with an EF100-400mm f/4.5-5.6L IS USM lens @ 400mm
(35mm equivalent is 12X) f/8 • 1/4 sec • ISO 100
Here is my "NightScape" Moon Photography Tip: If you want to record good detail in the clouds and landscape near the moon, you need to know two important re-occurring facts: 1. The night before the full moon, the moon rises just a few minutes before the sun sets; and 2. the morning of the full moon, the moon sets just before the sun is starting to rise. During these two periods, there is just enough ambient light from the setting and rising sun to give detail to the surrounding landscape -- otherwise, it is too dark, and the contrast range is too great to record anything but blackness around the moon -- like you see in these two photos:

Middle of the night: Left image exposed for cloud detail. Right image exposed for moon detail.
You can't have it both ways: either you get a washed out (overexposed moon) in order to see the clouds and surrounding landscape detail -- or you get a correctly exposed moon, and lose all the surrounding detail -- that is, unless you follow my little known trick and these "Nightscape" tips.

Moon Charts: I use the Old Farmer's Almanac moon phase calendar and the USNO moorise/moonset charts to plan my shoots. (All times are based on sea level, so they must be adjusted slightly for mountainous terrain -- the moon will set sooner because of mountains, and the sunrise will be delayed because of mountains, and etc.) Using these charts, I can often get at least one moon rise and one moon set per month (weather permitting) that allow for good, full moon photography.

An example of how I did it: Based on my Zip Code, the full moon was to take place on January 9, 2012 at 12:32 AM. The sun was suppose to rise on this day at 7:51 AM, and the moon was scheduled to set at 7:54 AM. Because the eastern mountains around Salt Lake City are about 6,000 feet higher than the valley floor, I figured (by experience) the sunrise would be delayed about 30 minutes. And because the western mountains are about 3,000 feet higher than the valley floor, I estimated the moon would set about 15 minutes early. I figured right on both accounts. The middle two photos were taken at 7:30 and 7:35 AM, with just enough predawn twilight behind me to add detail to the western sky and western mountains ("blue hour" light).

Mirror Lock-up. One other important thing: Even with a sturdy tripod and a remote release, the vibration from your mirror going up just before your shutter release can blur or degrade your shot. That's because the magnifications are so great (12X in this shot) and the shutter speeds are so slow (about 1/4 second in this case). Read your manual on how to do this for your camera. Once it is set through your menu, the first press of the shutter release will lock up the mirror, and the second press will release the shutter, and return the mirror. Even with a remote release, you should wait about three seconds for the vibrations to dampen before pressing the release the second time. So many things to remember! I also find I have to manually focus, and set all my exposures manually for best results. (For super accurate focus, I switch to Live View through my LCD screen, and magnify it to 10X. Once set, I switch back to regular view to conserve battery power.)

 ~ Take our NightScape Poll ~           
Royce's 2014 Workshop, Lecture & Video Conference Schedule: NightScapeEvents.com
  -  25% OFF savings on select "IMAGE10" workshops booked before April 1, 2014  -

Monday, January 6, 2014

Moon Burst at Sunburst Peak by Mei Xu

"Moon Burst at Sunburst Peak" (Mt. Assiniboine Provincial Park, Canada) ~ © Mei Xu (click to enlarge)
Mei Xu supplied our Photo of the Day. It was taken with a Nikon D700, using a 17-35mm f/2.8 lens. She blended two images. The mountain was photographed using an exposure of f/16, 20 seconds, at ISO 200. The night sky exposure was f/2.8, 6 seconds, at ISO 1600. The images were processed and blended using Lightroom and Photoshop.

Mei currently lives in Colorado. When she is traveling, hiking and skiing, the camera is her third eye to explore the wonder of the world and to capture the beauty of the nature. She finds this type of night photography challenging because it requires one to shoot images at different times in order to reduce noise and compress the contrast ratio into an image that can be seen photographically. "There are tons of beautiful images about Mt. Assiniboine. I think mine is different than others. It is unique with the moon and beautiful texture of the clouds," says Mei.

More of Mei's work can be seen on her website and her 500px 'Mengzhonghua' page.

Royce's 2014 Workshop, Lecture & Video Conference Schedule: NightScapeEvents.com
   -  25% OFF savings on select "IMAGE10" workshops booked before April 1, 2014  -


Wednesday, December 11, 2013

Twilight Road Thru the Alabama Hills by Miles Morgan

"The Polarizer" ~ © Miles Morgan
(click to enlarge - then click large image again, to view on black)
Miles Morgan photographed this scene with a Nikon D800E, using a 35mm focal length lens. Exposure was 60 seconds @ f/13, ISO 100 (the moon was a separate exposure with a 70mm lens —but it was in that position over the Sierras). Miles Morgan is an airline pilot out of Portland, Oregon who doubles as an amateur fine art landscape photographer. More of Miles' work can be seen on his 500px page and his website.

I'll let Miles tell the rest of the story in his own words:

Ask around. I'm Mr. Clear Skies lately. I have more sucking removal power than a Hoover vacuum. This makes me grumpy, so it is no small feat that buddies David "Breezy" Thompson and Paul Rojas have been able to put up with me for several photo trips these past few months. We finally did manage a few clouds, but we spent many days trying to come up with shots that would work in the clear blue, and with the full moon hanging around, even night images were proving to be taxing.

I bombed down from Washington to the Mono Lake the first day, and arrived in time for a... you guessed it.... clear sunset. With the full moon rising, however, I figured that I might be able to sneak out some sort of image. I hustled down to the lakeshore and came to a screeching halt. There must have been 100 photographers scrambling around, over, and through the tufas. My camera stayed in the bag.

The Econo Lodge in Mammoth Lakes seemed like a logical place to crash out for a few hours before sunrise, but around 3am I decided that I simply wasn't going to be able to rest, so I might as well head out and find something to shoot. I popped out into the bitter night air, and turned behind a Suburban to head towards my rig only to discover some families tailgate wide open, and trash strewn all over the parking lot. I now found myself face to face with a bear twice my size, who was getting intimate with a Twinkie. I couldn't think of much to do, so I said "Hello". Luckily, I've lost a few pounds recently, so the Twinkie looked a little creamier, I guess, because he went back to eating and ignored me completely. I continued down the lot to my car, and drove off as if nothing could be more normal.

Arriving at Alabama Hills the next day, I finally had enough time to scout out some compositions that might work while I waited for "the boyz" to arrive. With the Photographers Ephemeris, I knew where the moon would set, and that it would be hanging over the mountains in the blue hour before dawn, so I set about finding a composition that might work for the expected conditions the next morning. You guessed it.... clear. Dawn came, and the three of us hustled out to some spots we had found the evening before to shoot. Nothing was working so I came back to this area that I had considered the day before, and set to work. Getting the exposure right, jumping in Rico, my trusty steed, and driving back and forth trying to make this work before the moon disappeared behind the hills was a right challenge in the nippy morning air, but it finally came together. Only it didn't. The moon looked too small, and to expose for the land areas correctly required the moon to be blown totally. I opted to simply zoom in, fire off a shot at 70mm and exposed for the moon itself in order to present it as it appeared to my eyes. A purist, I ain't.

So the title. No I didn't use a polarizer. It's in response to the reaction that I received regarding this image from my critique group, which consists of several photographers who are WAY better than me, and who do me the solid of giving me their honest impression of what works, what doesn't, and what I can do to improve it. This shot simply didn't work for many of those folks. Ironically, it ended up being my favorite from the trip, proving once again I have questionable taste at best. I love that paradox about photography.

Editor's Note: Here's another great Alabama Hills nightscape by Miles. Unlike the "zoo" of photographers that can form around the Mono Lake area, the Alabama Hills continues to be much less crowded, yet it offers amazing photographic opportunities and clear, dark nights for some of the best astro-landscape photography in the world. I will be conducting a NightScape Workshop in the Alabama Hills, April 22-25, 2014.

Royce's 2014 Workshop, Lecture & Video Conference Schedule: NightScapeEvents.com
Featured Post: Shooting Stars eBook Review — How to Photograph the Stars and the Moon

Monday, September 2, 2013

Sacred Moon by Steven Sharp

Moon over Oquirrh Mountain Utah Temple ~ by Steven Sharp (click to enlarge)
I just returned last week from conducting a very enjoyable NightScape workshop in Bryce Canyon National Park. It's fun to get to know each attendee: how they interpret each location, and to review some of their past work. On the last day of each workshop we typically have a show-n-tell. We not only review some of our favorite shots from the workshop, but each participant is also encouraged to show a few photos from their portfolio. This moonscape by Steven Sharp caught my attention because its high dynamic range.

After talking with Steven, I learned that he had indeed employed HDR techniques to capture this very contrasty night scene. After shooting three exposures in rapid secession (the typical 2 stops under, 2 stops over, and proper exposure), Steve used Photomatix Pro to combine the images. Screen captures, histograms, and metadata for the three images are supplied below (click to enlarge).


When I first looked at the image, I felt the composition could be improved with a vertical crop, but I then discovered Steven had taken the photo for a calendar contest featuring local LDS (Mormon) temples; and I realized the reason for the horizontal composition. This photo was chosen for the month of October 2014.

Steven has only been into serious picture-taking for a little over two years! "I started into photography when my oldest son, who wanted to settle a debt but didn't have cash, gave me a Nikon D80 and three lenses as payment," says Steven. "I knew nothing about photography, especially with a DSLR, but was excited to have a cool camera: look at all those buttons and settings to learn about! I [now] carry my camera and tripod with me almost everywhere I go. I've found that taking pictures is one of the best ways to learn how to take pictures. I'm having a blast making mistakes as I learn about photography. The learning never stops and neither does the fun!"

More of Steven's photography can be seen at his website, including his most recent photos taken at Bryce Canyon NP.


Thursday, March 21, 2013

The Twilight / Moon Photography of Jim Crotty

"November Moon" - Hocking Hills, Ohio ~ © Jim Crotty (click for a larger view)
This image is a double exposure, combining the Moon captured with the 500mm, and the foreground captured with a 70-200mm (however, Jim never places the Moon away from its original location in the scene). This photo was captured on a Thanksgiving evening at one of his favorite locations for landscape photography, Hocking Hills State Park in Southeastern Ohio. This particular hill was behind The Inn at Cedar Falls, where Jim now returns twice each year to teach weekend workshops. For Jim, this image captures the spirit of the area of Hocking Hills. "There is something deeply personal for me as an artist that I connect with in this place. Perhaps it's because Hocking Hills is where I first discovered my love for nature photography when I was about 13 years old."

"It's all about the light," says Jim Crotty. "I'm really more of a twilight/pre-dawn type of photographer... Although I admire the work of deep and dark sky photographers, I tend to limit myself to lunar, particularly when I can include a landscape as foreground."

Philosophically Speaking: Jim likes the challenges of night and lunar photography. "Obtaining detail and proper exposure for night sky subjects isn't exactly something anyone can do simply by picking up a point-n-shoot camera and putting it on auto. It takes skill and experience. When everything comes together it can be extremely rewarding. Nightfall and dawn are those in-between spaces where capturing images is part art and part spiritual journey. The Moon and moonlight has a way of speaking to the poet that resides in all of us. Night sky subjects reveal the enormity and wonder of the universe, in space and within us."

"The Rising" - Dawn and crescent moon from Dayton, Ohio ~ © Jim Crotty (click for a larger view)
This photo was captured at dawn from behind Jim's home, which at that time  was in Centerville, Ohio, just south of Dayton. This is a double exposure; the foreground captured with a Canon 70-200mm f4 L IS lens and the Moon with a 300mm f4 L IS and 1.4 teleconverter. Most of Jim's Moon images are captured just after sunset but this is one of the few taken just before sunrise. The clarity of that morning provided an amazing hue to the pre-dawn sky. "I [am] frequently up early to photograph sunrise scenes, especially during summer. It [is] in the quietness of those moments when I truly [feel] at peace."

The Challenges: Light pollution. Jim is often amazed at how much of an impact a few street lights can have on clarity in the sky. Finding a good evening location to shoot from can also be challenging from the standpoint of not being interrupted, and of safety. The public access points to the beach on Hilton Head (South Carolina) are not as safe as daytime (when you are carrying expensive photographic equipment), which is a shame, because the darkest sky is found over the ocean.

Bugs and sand. Just after sunset and right before sunrise the bugs can be horrible too, especially in sub-tropical coastal areas like Hilton Head. He has been eaten-up pretty bad by sand fleas. Shooting on the beach can also be very rough on gear. Jim has already had a Canon 28-70mm f2.8 L lens trashed due to sand.

"Moonflowers" - Sunflower field and August Moonrise in Greene County, Ohio ~ © Jim Crotty
This single exposure image was completely unplanned. "I had captured a series of images on the other side of the road, ...with the sun setting behind the sunflowers," says Jim. "As I was putting my gear back in my truck, I looked to the other side and there was the August full Moon rising. With the light of dusk still falling on the flowers I was able to capture several exposures before the Moon rose too high and the last light of dusk was gone."

Favorite equipment: His tripod and the Kirk ballhead Jim purchased over 12 years ago. The ballhead still works like new—it is one of the best gear investments he has made, next to camera bodies and lenses. It has outlasted two tripods! His favorite lens for Moon photography is his Canon 500mm f4.5 telephoto, although it's a heavy piece of glass. Jim bought it used about eight years ago, and it's been flawless.

Software: Jim relies on the Sun n Moon iPad app for helping to plan his shots. For initial post editing and file management, he uses Aperture. He's also a big fan of the Nik plug-ins, particularly, Color Efex 4 and Viveza 2.

"On the Tides of Easter" - full Moon rising over Hilton Head Island, South Carolina ~ © Jim Crotty
Both the Moon and the foreground of this image were captured using a Canon 1D Mark III camera. The foreground was captured with a Canon 70-200mm EF L lens at 70mm, RAW capture, aperture priority mode, one stop under exposed at 2000 ISO f/5.6, 0.5 seconds. The Moon was captured with a Canon 500mm f4.5 EF L lens at ISO 800, f/4.5, 1/50 second, aperture priority mode, -3.0 EV. The Moon and foreground images were combined in post.

The images were captured at high tide on the evening of Good Friday, April 6, 2012. This photo works because the waves were at high tide. "It's an entirely different dynamic than low tide," says Jim. "There is something so magical about a moonrise over the ocean. It's mystical and primordial at the same time. Although I try not to make it obvious, there is always a subtle nod to my own spirituality and reverence for God's creation in my images. Where I am at now with my photography is in large part a spiritual journey, which became more prevalent in all that I do following a few life changing events, including divorce in 2008 and then a heart attack in 2010. There is a deep desire within me to share my photography as proof of a divine connection between artist and subject and audience. I'm convinced that with nature's beauty we are provided signs and hints of something so much more than what is immediately before us. The photographer can serve as witness in helping others to stop and take notice."

Early History: "Astrophotography was the door that opened the world of photography for me at a very young age," says Jim. "I loved astronomy growing up in Ohio. I had telescopes early on and was always out observing. I think my first scope was a four and half inch reflector, when I was about 10 or 11, back in the 70's."

It was also about that time that Jim started exploring nature subjects with a Pentax Spotmatic F 35mm SLR camera. For him, there was nothing more exciting than shooting time exposures of the night sky on Kodak Tri-X black and white film and then developing and making prints in his darkroom. He is very thankful for the adult mentors back then who helped him learn and encouraged his interest in both astronomy and photography. Jim tries his best to "play it forward" when he teaches young photographers in his workshops.

Jim Crotty
Currently: Jim teaches photography workshops, provides commercial photography services and sells fine art prints of his award-winning work with nature and landscape subjects. His images have been published in Nature's Best, National Wildlife, Smithsonian, USAToday, and most recently, the Professional Photographer Magazine. In 2009 he earned the professional designation of Certified Professional Photographer through the Professional Photographers of America. Today he works from a home office and studio located in Frisco, Texas having recently relocated from Hilton Head Island, South Carolina.

More of Jim's work can be found at his website: Fine Art Photography and Photography Services by Jim Crotty, and at his Facebook page.

Advertisement: Hot Weekly Photography Deals - Amazing discounts (updated twice a week).

Thursday, January 10, 2013

Moonglow Behind Balance Rock

Moon Glow behind Balanced Rock, Arches Nat'l Park ~ © Royce Bair (Click for a larger view)
Moonlight is more than 135 times brighter than starlight, so even the approaching moon, just below the horizon can compete with your star photography! However, it can also add interest and beauty to your night photographs, if the timing and positioning are right.

In this photo, glow from a rising quarter moon, has been positioned directly behind Balanced Rock in Arches National Park. The midnight (12:21 AM) moonlight from the rising moon is overpowering all but the brighter stars. However, you can clearly see Pleiades, the Seven Sisters constellation (Messier object 45 or M45) to the right. Light painting for Balanced Rock is coming from a stationary, reflected quartz halogen spotlight (2-million candlepower) about 300 feet away, manned by my son, Chris (shining for only seven of our 13-second exposure). Taken with a Canon EOS 5DMII, using a
Canon EF 24mm f/1.4 L II USM Lens (13 sec @ F2.8 • ISO 2500).

Size perspective: As tall as 23 men, or a 13-story building —the total height of Balanced Rock is about 128 feet (39 m), with the balancing rock rising 55 feet (16.75 m) above the base. The big rock on top is the size of three school buses.

Advertisement: Hot Weekly Photography Deals - Amazing discounts (updated twice a week).

Monday, November 26, 2012

NASA's Dial-A-Moon Tool

Last week, NASA released an incredible video showing the Moon’s motion and phases over the whole year of 2013, where each frame of the video is one hour of time! It’s mesmerizing:


If you have the bandwidth, change the resolution to full, 1080p HD (using the cog icon at the bottom right) -- the extra quality is worth the watch!

The animation uses data from the Clementine lunar mission, a joint NASA and military probe in the 1990s to map the Moon, as well as images and topography measurements from the Lunar Reconnaissance Orbiter. The surface-elevation measurements were used to create the realistic shadows in the animation.

You'll noticed that the Moon appears to rock around, tipping, and tilting over the course of every month. That’s called libration, and is due to the Moon’s orbit being elliptical, as well as the Moon's rotational axis being slightly tilted with respect to its orbit.

There are many other extras to this video, like the scale on the right showing how far the Moon is from the Earth in units of the Earth’s diameter (about 13,000 kilometers, or 8,000 miles). You can watch it oscillate back and forth as it orbits, moving from 28 to 32 times the Earth’s diameter away.

At the bottom right is a huge amount of information that changes with time, including the Moon’s distance and its apparent size, measured in arcseconds. There are 3,600 arcseconds in a degree, and a full Moon is roughly 1,800 arcseconds, or a half degree across.

DIAL-A-MOON Tool: Although the video is fun to watch, NASA's website for the animation may be more useful for night photographers. This site contains all the individual frames used to animate the Moon phases and libration. Their Dial-A-Moon tool will allow you to pick any month, day, and hour of the year and see that phase of the moon (a lot easier than trying to adjust the video)!

Rising and Setting Times: Knowing the phase of the Moon is great, but a night photographer also needs to know the rising and setting times of the moon on any given day. For that you'll also need this USNO table. This table can be changed to show the rising and setting of either the sun or the Moon.

Position of the Moon: Wouldn't it also be nice to know where the Moon would be in the sky on any night and hour? The free planetarium software, Stellarium, can do this for you. All you do is tell it where you are on the earth and what time of the day or night. You can advance or go back to any day, hour, minute, and second in time (you can also speed up time and watch the sky move quickly or slowly). Using the coordinates and time you give Stellarium, you'll be able to see exactly where the moon rises and sets, or where it is in the sky at any hour (as well as all the stars, constellations, and the Milky Way)!