Share:

Showing posts with label Photoshop tutorial. Show all posts

Wednesday, May 30, 2018

Two Rivers in the Grand Canyon

“Two Rivers” ~ The Dark River (a.k.a. The Great Rift in the Milky Way) rising over the Colorado River in Grand Canyon National Park, Arizona. This location is at Mile 139, just below the confluence with Kanab Creek. ~ © Royce Bair

The Story: I woke up eleven days ago at 3:30 am on the 5th day of a Colorado River rafting trip with Western River Expeditions (that’s their boat on the bottom right); and found that the Milky Way core had finally rotated almost to the point that the Dark Horse Nebula could be seen at the bottom of the canyon. Five hours earlier I had gone to bed under the conclusion that the Milky Way core would not be revealed from this location (according to PhotoPills), before the Astronomical Dusk had ended, due to the high canyon walls.

This 188-mile section of the Grand Canyon is one
of the darkest regions in the USA and occupies
an area larger than many eastern states!
PhotoPills had been right; however, even though the Astronomical Dusk (AD) was just ending, the view of the Milky Way in this 6,000 feet (1829 m.) deep section of the Grand Canyon was breathtaking, and I decided to wait another 15 minutes into the twilight, allowing more of the “horse” to be revealed and started an 8-exposure stack (to reduce digital noise) at 3:45 am. About a minute after I finished the stack, the bright yellow star, Antares, disappeared behind the canyon wall.

After the stack for the Milky Way, I waited another 45 minutes into the Nautical Twilight (at 4:30 am) and did a 4-exposure stack for the foreground. The results of these two stacks were then blended in Photoshop.

Although shooting past the Astronomical Dusk lowers sky contrast and makes the Milky Way more faint, it was worth it in order to place the core closer to its reveal and produce a better sky composition—reminding me once again that even though the AD is technically the best time to photography the Milky Way, there are esthetic and artistic reasons to fudge a little and wander into the Astro Twilight periods!

EXIF: Stacked & Blended. Canon EOS 5D Mark III using a Rokinon 12mm f/2.8 Fisheye lens. Sky: 8 shot stack, @ 15 sec | f/2.8 | ISO 8000. Foreground: 4 shot stack @ 30 sec | f/4.0 | ISO 1000

How-to-Tutorial: Exposure stacking. Many wonder how effective stacking is in reducing digital noise. Although tracking is a better method of reducing noise and improving detail in the sky, for the small investment in extra field time, stacking is very effective. I often like to say that stacking is the poor man's method of tracking. It requires no extra equipment, only a little extra time in the field. In this case, only eight 15-second exposures, or two extra minutes. Of course, one must spend extra time in post-processing to stack the exposures. I used Starry Landscape Stacker for the Mac. Windows users can use Sequator. Both software programs align the stars (which move between each exposure) and treat the foreground separately (which does not move).

How many stacking exposures should you make? For starry night skies I recommend at least five shots, taking them as fast as they'll write to your memory card. The more you shots you take, the smoother the software can make the sky between the stars. Eight to ten shots works better. About 15 stacks produces the best return on my investment of time—much more than this produces a diminishing return (less noticeable smoothness for your extra efforts). If you need to shoot the foreground separately (for a twilight blend) like I did, four or five stacks is typically good enough, since foregrounds often have details (rocks and plants) that tend to hide noise. When I do the foreground stacks separately, I typically just process them im Photoshop as a Smart Object.

Many people ask about shooting additional "dark exposures" (with the lens cap on) and processing these with your stack (both Starry Landscape Stacker and Sequator offer this option). Doing this will help remove some of the hot and noisy pixels in your image, and you can do this if you have extra time; but, I've found if you are strapped for time, the winning results would be shooting 15 "light" frames over 10 "light frames, followed by 5 dark frames. However, if you have only have time to shoot about 5 to 8 light frames before clouds move in to cover your stars, then following up with an equal number of dark frames will be very beneficial.

These three images were enlarged 200% in order to show show the digital noise (click to enlarge for more detail). At this enlargement, a standard 25 to 30 seconds exposure still shows some star movement or trailing. By reducing the exposure time to 15 seconds (and even shorter times when using longer focal  length lenses) and compensating with a higher ISO, one can make stacking even more effective.

How long should your exposures be? Stacking allows you two benefits:
  1. Reduced digital noise via the stacking process
  2. The ability to choose a shorter exposure time to eliminate star trailing (due to the Earth's rotation)
You should choose an exposure time that works best with your lens' focal length. Instead of a typical 30 seconds exposure, you should go with a 15-second exposure for 14mm to 16mm lenses on a full frame camera. Ten to 13 seconds for a 24mm lens, and 5-8 seconds for a 50mm lens (refer to the "400 rule" in my eBook for more details).

When you decrease you exposure time, you'll need to compensate by choosing a wider f-stop (i.e. f/2.0 instead of f/2.8) or go to a higher ISO (i.e. 12800 instead of 6400), or a combination of both. I often use an ISO of 8000 instead of 12800 (even though I am slightly underexposing), and compensate in post processing with the Adobe Raw Converter (or Lightroom) Exposure slider.

Processing the sky exposure. Make sure you process your stacks as 16-bit TIFFs in order retain as much bit depth as possible. Once you have processed your stacked exposures into one image, you'll need to increase the sky contrast, especially in this case where I went into the Astronomical Twilight, which makes the Milky Way even more faint than usual. As explained in my other blog posts and in my eBook, I use ''S'' Curves to increase the sky contrast. Photoshop and Lightroom Curves does a better job of protecting Milky Way core highlight details than other processing methods.

The left image is the Camera Raw exposure and the right image is after adding sky contrast, using an "S" Curves in Photoshop. The red lights and reflections are weak blinking lights the river guides use to mark the trail to a hidden portable chemical toilet that makes river rafting more comfortable (and a national park requirement).

The foreground exposure. In order to see foreground detail below the Milky Way sky, one typically needs to use an exposure that is at least 4 to 8 times greater than the sky exposure. To reduce noise, one should use the camera's Long Exposure Noise Reduction feature. Stacking exposures will further help. However, if one is close to an approaching twilight period like I was, one can wait and take that foreground about 45 minutes later like I did. You can also take a twilight exposure for the foreground before the Astronomical Dusk begins.

This foreground exposure was taken during the Nautical Twilight, and was a stack of four 30-second exposures to further reduce noise. NOTE the fisheye distortion of the river's shoreline: this will be corrected at the end of the tutorial.

Blending the Milky Way and foreground exposures. Using the sky as a masking channel and inverting the selection, the brighter foreground is selected, copied to the clipboard and then pasted as a layer over the Milky Way sky exposure. Once alignment is perfect, the layer is flattened into a final blended image.

Exposure blends like this are NOT considered "composites" because the tripod and camera did not move. In fact, alignment blends are quite easy as long as both camera and tripod do NOT move between exposure! Click image to enlarge.

Correcting fisheye lens distortion. This image was taken with the relatively inexpensive, but amazingly sharp (and very low coma) Rokinon 12mm f/2.8 ED AS IF NCS UMC Fisheye lens (made for Nikon | Canon | Sony E full-frame cameras). Using a fisheye lens enabled me to show the deep canyon perspective of this area. However, fisheye lenses exhibit extreme barrel distortion near the outside edges of the image, especially when they are tilted upwards! You can enable the Lens Corrections Profile in Adobe Camera Raw or Lightroom to remove this distortion, but it will greatly change the look of your image and typically destroy the image quality, especially near the edges. I've found a better solution is to selectively use Photoshop's "Warp" feature (Edit > Transform > Warp) only on the offending areas of your images. This correction feature enables more image quality to be retained and is much less destructive. Caution: always make sure you do this correction last, as any masking channels you have previously created will no longer align with your newly warped image!

Often, only one or two corners of a "fisheye" landscape image need lens distortion correction. Once in the "Warp" submenu, I clicked on the far left corner of the river's shore line and dragged it straight down until the river looked more natural. Although the other corners of the image are just as distorted, their distortion is actually adding a unique perspective to the image and were left alone. A simple, ten-second correction! 

Subduing the blinking red lights. I could have removed the red lights and their reflection in the water, but they are part of the river experience, so I choose to darken them instead in the final image (top of page).


Monday, May 23, 2016

View of the Milky Way with Your Naked Eye

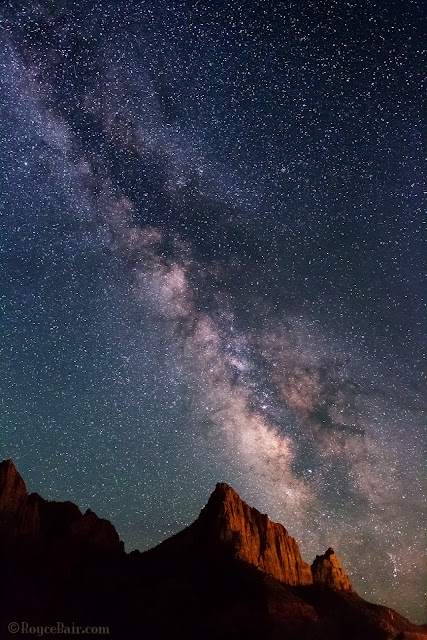
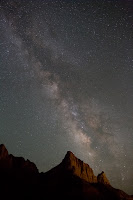
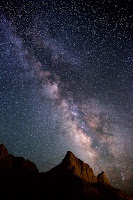
Milky Way over The Watchman - Zion National Park, Utah. Light on mountain is light pollution from nearby Springdale city street lights ~ © Royce Bair

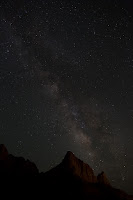
Simulated naked eye view
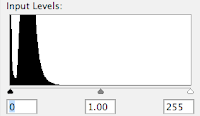
Histogram of a "naked eye" exposure
What the eye sees vs. what the camera sees. When people see my NightScapes for the first time the most common question is, "Is that what the Milky Way really looks like with your naked eye? Can you really see that many stars in the night sky?" The answer is, "Yes and no." You really can see it quite clearly with your naked eye (if you are in an area with very little light pollution), it's just not as bright as I can see with my camera.

The reason is because my camera is manually controlled to take the images at a longer exposure (typically 8 to 30 seconds, depending on the lens I'm using), so it gathers more light for its sensor than my eyes can. Also, the human eye has an iris aperture that is rated at about f/4.0, whereas my typical night photography lens is rated at f/2.8 or wider (letting in twice as much light to the sensor).

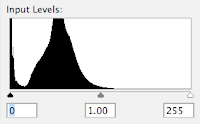
Histogram of raw camera exposure
Raw camera exposure
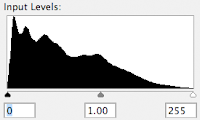
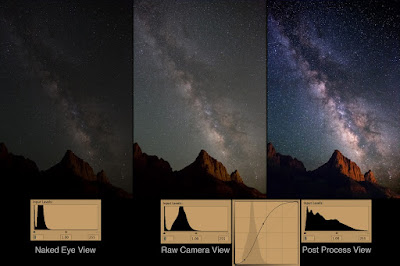
Above, is a simulated view of what my eye saw of the Milky Way over The Watchman in Zion National Park — this is about two stops darker than what my camera recorded (to the right), using an f/2.8 aperture setting, an exposure time of 15 seconds, and an ISO of 6400 or 8000. (Notice that the "toe" of the exposure histogram is just passing the midway point, whereas the toe of the simulated "naked eye" exposure histogram doesn't even come close to the midway point. This exposure is two stops less than what it should be —post production corrections can correct a 1-stop underexposure, but not a 2-stop underexposure. This means that if you only have an f/3.5 or f/4.0 lens; or your camera only goes to ISO 3200, you're still going to get an acceptable exposure, that's within the range of post production correction —provided you shoot in the camera "raw" mode, which typically has 16-bits of information, rather than the camera JPEG mode which carries only 8-bits of information per color channel. Here's a tutorial I created on the benefits of 16-bits raw images vs. 8-bits images.)

Post Production: The raw camera image has all the brightness and detail needed for a great photo, but it is flat or lacking in contrast. My final NightScape images are created in post production with very simple steps in Photoshop. All the stars are there in the camera's raw image, but a contrast gain in the sky is necessary to make them more apparent. My goal is give the same clarity you expect to see in an astronomical observatory (taken with a huge telescope) image, but with a wide-field view, coupled with an interesting landscape feature in the foreground — something the big telescopes cannot do!

After adding curve adj.
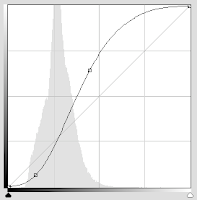
"S" shaped adjustment curve
The powerful "S" Curve. Here's the main Photoshop post production step I use to increase the contrast in the sky: I first select the sky, using the Magic Wand tool (I usually have to do a little Laso tool work to get all the bright stars into the selection). I then create a channel of the selection that I can use later. The second and main step is to turn that saved selection into a "Curves" Adjustment Layer that I can add a contrast-increasing "S" shaped adjustment curve. (The shape of this curve is controlled by the two anchor points so that the curve pinches or brightens the large highlight area to the right of the histogram "mountain", and darkens the shadow area to its left.) The more vertical the line becomes between the two anchor points, the more your contrast gain.

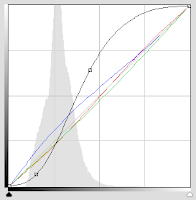
Slight color changes via Curves
Sky Color Balance. Every evening sky has a difference color to it, depending on the atmospheric conditions for that night. Some photographers shoot in the "AWB" Auto White Balance mode, which produces somewhat of a neutral coloration to the sky. Some will use a daylight White Balance (about 5250º K), giving a much warmer tone to the sky. Others will use the "Tungsten" (or incandescent) setting (about 3200º K) for a deep blue look. Although all of these settings can later be adjusted in Adobe Photoshop's RAW Converter, I prefer to set my Kelvin to 3800º. This setting usually give me the most natural look to my night sky.

Final, minor color changes can be made in Photoshop's Curves to the the red, green, and blue channels (represented by the three diagonal colored lines). Be careful to not over do this — as a little color goes a long way. The final coloration depends on what you remember seeing in the sky that night.

Adjusting the landscape. The final step is to use the same saved sky selection (channel) and inverse it so that it is now selecting the mountains, instead of the sky. Once this is done, another Adjustment Layer (you can use "Levels", or "Curves", but Curves is more powerful) is created from that selection in order to change the color of the sodium vapor lights (coming about a mile away from Springdale city) —so that The Watchman mountain is a more pleasing "red rock" sandstone color.

Histogram after all adjustments
Extended tonal range. The purpose of all these adjustments is to not only increase the contrast of the sky, but to extend the tonal range of the final image. Compare the histogram on the right to the histogram of the raw camera  exposure, above. Note: The "S" curve contrast adjustment naturally increases color saturation and vibrance. In most cases you will not have to artificially add more.

Compare: In the image below you can quickly compare the differences between the "naked eye" simulation, the "raw camera" exposure, the "S"-curve adjustment, and the final image —with the extended tonal range of its histogram.

Click to enlarge.
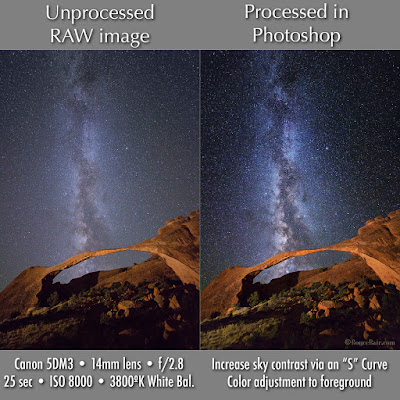
Here is another comparison of the camera RAW exposure vs. simple post processing via the "S" curve in a Photoshop "Curves" Adjustment Layer:

Click to enlarge
My eBook, Milky Way NightScapes, provides additional post processing instruction in its 4th chapter.


Thursday, February 25, 2016

Milky Way over Fruita Schoolhouse - Capitol Reef National Park, Utah

Final image is a blend of two exposures and several post processing steps in Photoshop ~ © Royce Bair


NightScape Exposing and Post Processing Tutorial. Last autumn I photographed the historic, 1896 one-room Fruita schoolhouse in Capitol Reef National Park. Here is a step-by-step tutorial of that process.

A quick overview shows the original camera raw exposure on the left. The second image is with a Photoshop Curves adjustment to the sky. The middle image shows a very long exposure to record foreground detail from starlight. The fourth image is a Photoshop layer blend of the two previous images. The final image shows building perspective adjustments and minor color changes. © Royce Bair (click image to enlarge)

Image #1. Original camera raw exposure with light painting. F/2.8 • 20 seconds • ISO 6400 • 3800ºK White Balance. Two Z96 LED panel lights were used to do stationary light painting (during the 20" exposure) on the schoolhouse —one was about 100 feet away, to the left, and the other was behind the building, shining through a window to simulate a kerosene lantern inside the schoolhouse. Orange filters (3200ºK) over the lights were used to create a warm color balance. Light intensity on the schoolhouse was reduced by a -2 EV (using the dimmer switches on the panel lights). Canon 5D Mark III with Tamron 15-30mm lens @ 15mm.  © Royce Bair

Image #2. The night sky has been selected and a contrast producing S-Curve adjustment has been applied via Photoshop's Curves (using a Curves adjustment layer).  © Royce Bair

Image #3. A second exposure was made only minutes after the first exposure. This exposure is for additional foreground and landscape detail, and is made using only starlight —the panel lights were turned off. The exposure was f/4.0 (for added depth of field) • 785 seconds (with long exposure noise reduction turned on) • ISO 3200 • 3800ºK White Balance. Note star trails in the overexposed sky.  © Royce Bair

Image #4. A blend of the starlight exposure (selecting only the foreground portion) and Image #2. The blend is made using Photoshop layers. © Royce Bair

Image #5. Final image is partially corrected for keystone distortion that comes from aiming a wide angle lens upwards to include more sky in one's composition. Correction is via Photoshop's Edit > Transform > Distort menu. Partial correction causes some cropping of the image. Full correction can produce an architecturally correct image that is not always aesthetically pleasing —which also results in even more cropping to the image. Some additional color correction was added to this final image. More technical details and explanations for shooting, planning, and processing are in my e-Book. © Royce Bair


Wednesday, April 8, 2015

Faking the Moonrise

This moonrise over Kailua Beach, Oahu, Hawaii is actually a sunrise: f/8, 1/400 sec., ISO 100 ~ © Royce Bair MMXI
When to fake a moonrise: It's very important that all my starry night landscape photography ("NightScapes") be as close to my camera raw originals as possible. Other than an increase in sky contrast, I resist heavy Photoshop manipulation. Editorial photography requires a high standard of ethics. Commercial and advertising photography is another matter. Here one is trying only to be illustrative and create an image that sells a product.

Moonrise over Kailua Beach was created purely to be a top stock photo seller, and I have succeeded so well, that it has also become one of the Internet's most often ripped-off images (that can happen, when an image goes viral).

How the illusion was created: To create the above image was ridiculously easy. I started out with a pretty sunrise. That camera raw image was opened within the Adobe Raw Converter (ARC), which is available for Photoshop, Elements, and built into Lightroom (refer to page 115 in my new eBook).

The un-cropped camera raw file opened in the Adobe Raw Converter (ARC)
The next step was to slide the color Temperature to the left —all the way to 2000º Kelvin. Some images may look better at around 2500º, and may need some Tint adjustment as well.

Sliding the color Temperature to the far left (i.e. 2000º) will suddenly give your sunrise a cool "night" look.
Once the image meets your overall tastes for a "night" image, open the image and continue to make adjustments in Photoshop, Lightroom or Elements. That's it!

               Royce's 2015 NightScape Workshop Schedule


Tuesday, September 11, 2012

Two Nightscape Lenses for the Price of One

The Watchman and the Milky Way, Zion National Park ~ © Royce Bair
The Canon EF 15mm f/2.8 Fisheye lens is one of my favorite night photography lenses because it allows me to include more than twice the sky as my 24mm lens (180º vs. 84º), and because it's really two lenses in one. Let me explain...

Although the heavy barrel distortion from this lens creates a special effect that is liked by many people, I can remove that distortion with software if I choose. The software-corrected image gives me a view somewhat similar to the Canon EF 14mm f/2.8L II USM Ultra-Wide Angle lens, which has a fairly undistorted 114º angle of view (but costs about three times as much as the Canon fisheye).

Here's an example of what I mean. Above, is a shot of The Watchman and the Milky Way, taken from the foothills west of Springdale, Utah at 2:00 in the morning (light pollution from the city is lighting The Watchman). This is the fisheye view without any distortion correction.

In the next image, I left the barrel distortion alone on the left side, but did a partial correction on the right side using Photoshop's "Edit > Transform > Warp" function:

Same image as above, with partial distortion correction on right side ~ © Royce Bair
Although a more complete distortion correction could have been accomplished with software, i.e. DxO Optics Pro, I've found this is not always as aesthetically pleasing as being more selective via Photoshop. I should point out that this lens has fairly acceptable coma at its wide-open aperture of F/2.8; it is about 65% corrected at F/3.5, and it is about 75% corrected at F/4.0.

Both of these photos were taken with the 15mm mounted to the Canon EOS 5D Mark III camera body, which produces amazingly low-noise at the high ISO of 6400 (exposure was 30 seconds @ f/3.5).

My favorite Prime Lens for Starry Night Skies: is the Samyang/Rokinon/Bower 24mm f/1.4 because it can be shot wide open, and it produces very little coma aberration (it also costs about one-third of the Canon and Nikon lenses with equivalent specs)!

Royce Bair is the editor of this blog and the photographer of the above images. Here is my gallery of NightScape images. My schedule of workshops, tutorials, and other events is available here.