|
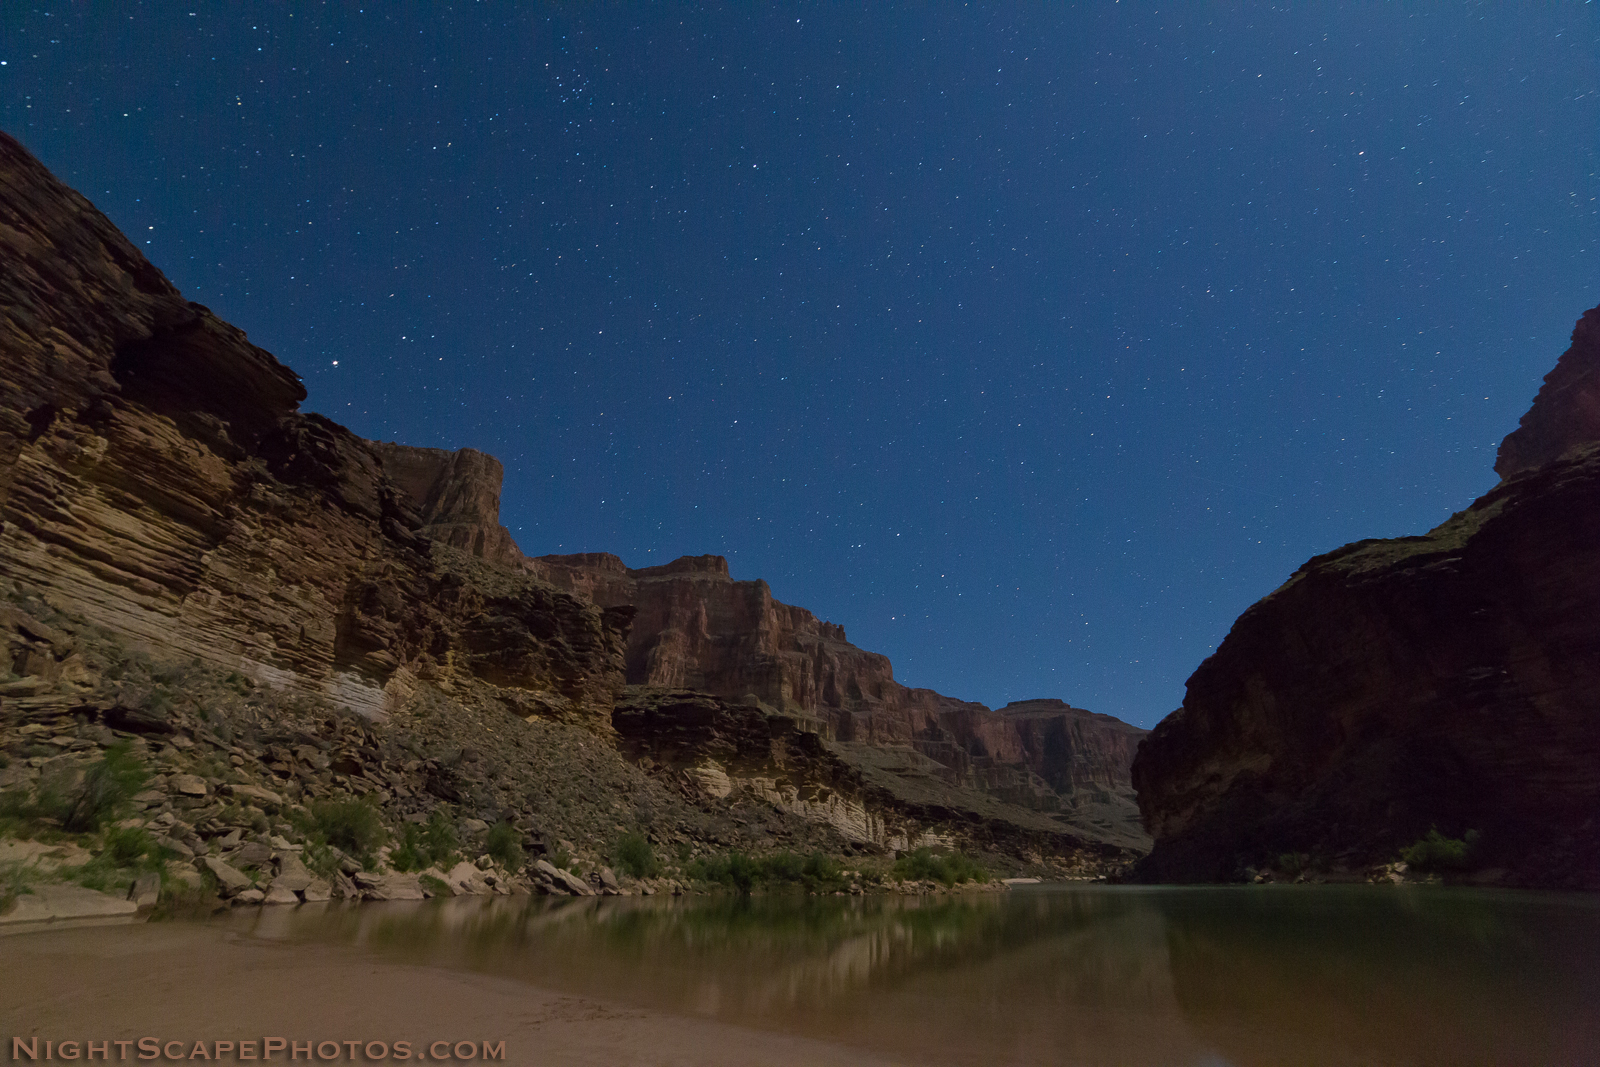
| “Two Rivers” ~ The Dark River (a.k.a. The Great Rift in the Milky Way) rising over the Colorado River in Grand Canyon National Park, Arizona. This location is at Mile 139, just below the confluence with Kanab Creek. ~ © Royce Bair |
The Story: I woke up eleven days ago at 3:30 am on the 5th day of a Colorado River rafting trip with Western River Expeditions (that’s their boat on the bottom right); and found that the Milky Way core had finally rotated almost to the point that the Dark Horse Nebula could be seen at the bottom of the canyon. Five hours earlier I had gone to bed under the conclusion that the Milky Way core would not be revealed from this location (according to PhotoPills), before the Astronomical Dusk had ended, due to the high canyon walls.
 |
| This 188-mile section of the Grand Canyon is one of the darkest regions in the USA and occupies an area larger than many eastern states! |
After the stack for the Milky Way, I waited another 45 minutes into the Nautical Twilight (at 4:30 am) and did a 4-exposure stack for the foreground. The results of these two stacks were then blended in Photoshop.
Although shooting past the Astronomical Dusk lowers sky contrast and makes the Milky Way more faint, it was worth it in order to place the core closer to its reveal and produce a better sky composition—reminding me once again that even though the AD is technically the best time to photography the Milky Way, there are esthetic and artistic reasons to fudge a little and wander into the Astro Twilight periods!
EXIF: Stacked & Blended. Canon EOS 5D Mark III using a Rokinon 12mm f/2.8 Fisheye lens. Sky: 8 shot stack, @ 15 sec | f/2.8 | ISO 8000. Foreground: 4 shot stack @ 30 sec | f/4.0 | ISO 1000
How-to-Tutorial: Exposure stacking. Many wonder how effective stacking is in reducing digital noise. Although tracking is a better method of reducing noise and improving detail in the sky, for the small investment in extra field time, stacking is very effective. I often like to say that stacking is the poor man's method of tracking. It requires no extra equipment, only a little extra time in the field. In this case, only eight 15-second exposures, or two extra minutes. Of course, one must spend extra time in post-processing to stack the exposures. I used Starry Landscape Stacker for the Mac. Windows users can use Sequator. Both software programs align the stars (which move between each exposure) and treat the foreground separately (which does not move).
How many stacking exposures should you make? For starry night skies I recommend at least five shots, taking them as fast as they'll write to your memory card. The more you shots you take, the smoother the software can make the sky between the stars. Eight to ten shots works better. About 15 stacks produces the best return on my investment of time—much more than this produces a diminishing return (less noticeable smoothness for your extra efforts). If you need to shoot the foreground separately (for a twilight blend) like I did, four or five stacks is typically good enough, since foregrounds often have details (rocks and plants) that tend to hide noise. When I do the foreground stacks separately, I typically just process them im Photoshop as a Smart Object.
Many people ask about shooting additional "dark exposures" (with the lens cap on) and processing these with your stack (both Starry Landscape Stacker and Sequator offer this option). Doing this will help remove some of the hot and noisy pixels in your image, and you can do this if you have extra time; but, I've found if you are strapped for time, the winning results would be shooting 15 "light" frames over 10 "light frames, followed by 5 dark frames. However, if you have only have time to shoot about 5 to 8 light frames before clouds move in to cover your stars, then following up with an equal number of dark frames will be very beneficial.
How long should your exposures be? Stacking allows you two benefits:
 |
| These three images were enlarged 200% in order to show show the digital noise (click to enlarge for more detail). At this enlargement, a standard 25 to 30 seconds exposure still shows some star movement or trailing. By reducing the exposure time to 15 seconds (and even shorter times when using longer focal length lenses) and compensating with a higher ISO, one can make stacking even more effective. |
How long should your exposures be? Stacking allows you two benefits:
- Reduced digital noise via the stacking process
- The ability to choose a shorter exposure time to eliminate star trailing (due to the Earth's rotation)
You should choose an exposure time that works best with your lens' focal length. Instead of a typical 30 seconds exposure, you should go with a 15-second exposure for 14mm to 16mm lenses on a full frame camera. Ten to 13 seconds for a 24mm lens, and 5-8 seconds for a 50mm lens (refer to the "400 rule" in my eBook for more details).
When you decrease you exposure time, you'll need to compensate by choosing a wider f-stop (i.e. f/2.0 instead of f/2.8) or go to a higher ISO (i.e. 12800 instead of 6400), or a combination of both. I often use an ISO of 8000 instead of 12800 (even though I am slightly underexposing), and compensate in post processing with the Adobe Raw Converter (or Lightroom) Exposure slider.
Processing the sky exposure. Make sure you process your stacks as 16-bit TIFFs in order retain as much bit depth as possible. Once you have processed your stacked exposures into one image, you'll need to increase the sky contrast, especially in this case where I went into the Astronomical Twilight, which makes the Milky Way even more faint than usual. As explained in my other blog posts and in my eBook, I use ''S'' Curves to increase the sky contrast. Photoshop and Lightroom Curves does a better job of protecting Milky Way core highlight details than other processing methods.
The foreground exposure. In order to see foreground detail below the Milky Way sky, one typically needs to use an exposure that is at least 4 to 8 times greater than the sky exposure. To reduce noise, one should use the camera's Long Exposure Noise Reduction feature. Stacking exposures will further help. However, if one is close to an approaching twilight period like I was, one can wait and take that foreground about 45 minutes later like I did. You can also take a twilight exposure for the foreground before the Astronomical Dusk begins.
Blending the Milky Way and foreground exposures. Using the sky as a masking channel and inverting the selection, the brighter foreground is selected, copied to the clipboard and then pasted as a layer over the Milky Way sky exposure. Once alignment is perfect, the layer is flattened into a final blended image.
Correcting fisheye lens distortion. This image was taken with the relatively inexpensive, but amazingly sharp (and very low coma) Rokinon 12mm f/2.8 ED AS IF NCS UMC Fisheye lens (made for Nikon | Canon | Sony E full-frame cameras). Using a fisheye lens enabled me to show the deep canyon perspective of this area. However, fisheye lenses exhibit extreme barrel distortion near the outside edges of the image, especially when they are tilted upwards! You can enable the Lens Corrections Profile in Adobe Camera Raw or Lightroom to remove this distortion, but it will greatly change the look of your image and typically destroy the image quality, especially near the edges. I've found a better solution is to selectively use Photoshop's "Warp" feature (Edit > Transform > Warp) only on the offending areas of your images. This correction feature enables more image quality to be retained and is much less destructive. Caution: always make sure you do this correction last, as any masking channels you have previously created will no longer align with your newly warped image!
Subduing the blinking red lights. I could have removed the red lights and their reflection in the water, but they are part of the river experience, so I choose to darken them instead in the final image (top of page).
Popular Links: How to Shoot the Milky Way • Post Processing NightScapes • Workshops and PhotoWalks • Tutorials and Tips • Overcoming Lens Coma • Video Hangout with my Friends


 |
| The left image is the Camera Raw exposure and the right image is after adding sky contrast, using an "S" Curves in Photoshop. The red lights and reflections are weak blinking lights the river guides use to mark the trail to a hidden portable chemical toilet that makes river rafting more comfortable (and a national park requirement). |
The foreground exposure. In order to see foreground detail below the Milky Way sky, one typically needs to use an exposure that is at least 4 to 8 times greater than the sky exposure. To reduce noise, one should use the camera's Long Exposure Noise Reduction feature. Stacking exposures will further help. However, if one is close to an approaching twilight period like I was, one can wait and take that foreground about 45 minutes later like I did. You can also take a twilight exposure for the foreground before the Astronomical Dusk begins.
 |
| This foreground exposure was taken during the Nautical Twilight, and was a stack of four 30-second exposures to further reduce noise. NOTE the fisheye distortion of the river's shoreline: this will be corrected at the end of the tutorial. |
Blending the Milky Way and foreground exposures. Using the sky as a masking channel and inverting the selection, the brighter foreground is selected, copied to the clipboard and then pasted as a layer over the Milky Way sky exposure. Once alignment is perfect, the layer is flattened into a final blended image.
 |
| Exposure blends like this are NOT considered "composites" because the tripod and camera did not move. In fact, alignment blends are quite easy as long as both camera and tripod do NOT move between exposure! Click image to enlarge. |
Correcting fisheye lens distortion. This image was taken with the relatively inexpensive, but amazingly sharp (and very low coma) Rokinon 12mm f/2.8 ED AS IF NCS UMC Fisheye lens (made for Nikon | Canon | Sony E full-frame cameras). Using a fisheye lens enabled me to show the deep canyon perspective of this area. However, fisheye lenses exhibit extreme barrel distortion near the outside edges of the image, especially when they are tilted upwards! You can enable the Lens Corrections Profile in Adobe Camera Raw or Lightroom to remove this distortion, but it will greatly change the look of your image and typically destroy the image quality, especially near the edges. I've found a better solution is to selectively use Photoshop's "Warp" feature (Edit > Transform > Warp) only on the offending areas of your images. This correction feature enables more image quality to be retained and is much less destructive. Caution: always make sure you do this correction last, as any masking channels you have previously created will no longer align with your newly warped image!
 |
| Often, only one or two corners of a "fisheye" landscape image need lens distortion correction. Once in the "Warp" submenu, I clicked on the far left corner of the river's shore line and dragged it straight down until the river looked more natural. Although the other corners of the image are just as distorted, their distortion is actually adding a unique perspective to the image and were left alone. A simple, ten-second correction! |
Subduing the blinking red lights. I could have removed the red lights and their reflection in the water, but they are part of the river experience, so I choose to darken them instead in the final image (top of page).
Popular Links: How to Shoot the Milky Way • Post Processing NightScapes • Workshops and PhotoWalks • Tutorials and Tips • Overcoming Lens Coma • Video Hangout with my Friends