Share:

Showing posts with label Low Level Lighting. Show all posts

Friday, September 1, 2023

Low Level Landscape Lighting (LLL)

Palouse Falls (eastern Washington state) with and without Low Level Lighting (LLL) • 20 sec, f/2.8, ISO 6400, with a 15mm ultra-wide lens on a full-frame DSLR camera • Copyright Royce Bair • Click image to enlarge


Low Level Landscape Lighting (LLL) public service webpage, provided by Royce Bair and Wayne Pinkston.

LLL VIDEO: Low-Level-Lighting presentation with PhotoPills

What is Low Level Lighting (LLL)?

  • LLL is NOT light painting — which is moving, momentary and difficult to repeat. Light painting is usually a very bright form of artificial lighting, which is jarring to your eyes and others around you.
  • LLL is a form of "stationary lighting" (on a light stand, tripod or lying on the ground).
  • LLL is constantly on during all camera exposures — making it ideal for stacking, panoramas, time-lapse and group settings.
  • LLL has a very low level brightness on the foreground surface that is less than or equal to the light from a Quarter Moon. LLL adds very little light pollution, allowing the stars to be easily seen.


Comparing LLL Intensity with Natural Light

A Comparison of Natural Light Intensity on Earth Coming From the Sun:

The measurement of light falling on the earth from the overhead Sun (90º) is 129,000 Lux. At sunset this drops to 759 Lux. At the start of the Astronomical Dusk (-18.0º), illumination from the sun drops to 0.000645 Lux! This is the darkest period of the night and the best time to photograph the Milky Way stars.

Photo courtesy of PhotoPills


   Sun Position  Intensity      Time of Day                  

  • 90 degrees  129,000 lux    Noonday Sun
  •  0             759         At Sunset
  •  -4             29.9       Start of Blue Hour
  •  -6              3.41      End of Blue Hour 
  •  -12             0.00806   Start Astro Twilight
  •  -18             0.000645  During Astro Dusk

Add to the Astronomical Dusk illumination and you get the following:

  • Total Starlight only 0.0002 lux
  • Total Starlight + airglow 0.002
  • Typical LLL "base" intensity 0.008
  • Quarter Moon phase at 30º 0.00958 
  • Quarter Moon phase at 45º 0.01602
  • Typical LLL "accent" intensity 0.024
  • Quarter Moon phase overhead (90º) 0.0267
  • Full Moon phase at 30º 0.09583
  • Full Moon phase at 45º 0.1602
  • Full Moon phase overhead (90º) 0.267


Click image to enlarge - ©Royce Bair

CONCLUSION: The typical intensity of LLL base lighting is only about 4 times brighter than starlight, and even the intensity of LLL accent lighting is less that Quarter Phase Moonlight!

Here's another example of Low Level Lighting in practice:

Rainbow Bridge (290 feet/88 meters tall, in Utah) photographed with and without Low Level Lighting. The "base" light (an LED panel light dimmed to only 5%) is about 500 feet (154 m.) from the bridge, and producing about 0.008 lux on the surface of the bridge (about 4X greater than the lux from starlight and airglow). Another panel light is behind the bridge, and is dimmed to about 15%. This produces an "accent" illumination under the bridge (about 0.024 lux on the surface), giving more character, shading and dimension. All single exposures were 25 seconds each @ f/2.8, ISO 6400, with a 15mm ultra-wide lens on a full-frame DSLR camera. © Royce Bair. • Click image to enlarge.

How Does Low Level Lighting Compare to Starlight Blends and Twilight Blends?

Low Level Lighting at "Temple of the Moon" ~ Capitol Reef Nat'l Park. © Royce Bair • Click image to enlarge

1. A single exposure (15mm lens on a Canon 6D • f/2.8, 15 sec, ISO 8000)

2. Same EXIF, but with my LLL, and stacked 18 times to reduce noise. I like the drama and "character" one can achieve with LLL — it's similar to moonlight, but you get to control the direction of the light, and it doesn't wash out or lower the contrast of your Milky Way sky.

3. Longer foreground exposure, using overhead starlight (f/4, 120 sec, ISO 6400, with Long Exposure Noise Reduction turned on), then blended with the sky exposure in number one. I like the detail I get in the foreground, but I often do not like the "flat" lighting this technique gives you. One remedy is to do a Blue Hour blend rather than a starlight blend, as these twilight blends have more of from-the-side directional light (see the bottom of this blend page for more details).

4. My LLL exposure (from 2.) blended with the foreground exposure from number 3. This gives me the best on both techniques: more foreground detail (from the longer starlight exposure) AND more "character" from the LLL.

Artificial Light Restrictions in some national parks: As of May 25, 2021 there is no longer any artificial lighting allowed in Capitol Reef National Park due to a new Superintendent’s Compendium.

Capitol Reef now joins Arches, Canyonlands, Zion and Grand Teton National Park (and Natural Bridges Nat'l Mon.) in this artificial light restriction (Bryce has an artificial light restriction, but it only pertains to the viewing of wildlife). Currently, there are only five of the 63 national parks with this restriction, and only one of the 133 national monuments have this restriction. None of the BLM lands have this restriction (that's 245 million acres compared to the 50 million ares of National Parks land). I don't know of any state parks that have an artificial light restriction, but some like the Valley of Fire in Nevada do not allow photography after sunset.


HOW TO SET UP YOUR LOW LEVEL LIGHTING


CALCULATING YOUR EXPOSURE


Friday, August 4, 2023

Setting Up Low Level Landscape Lighting

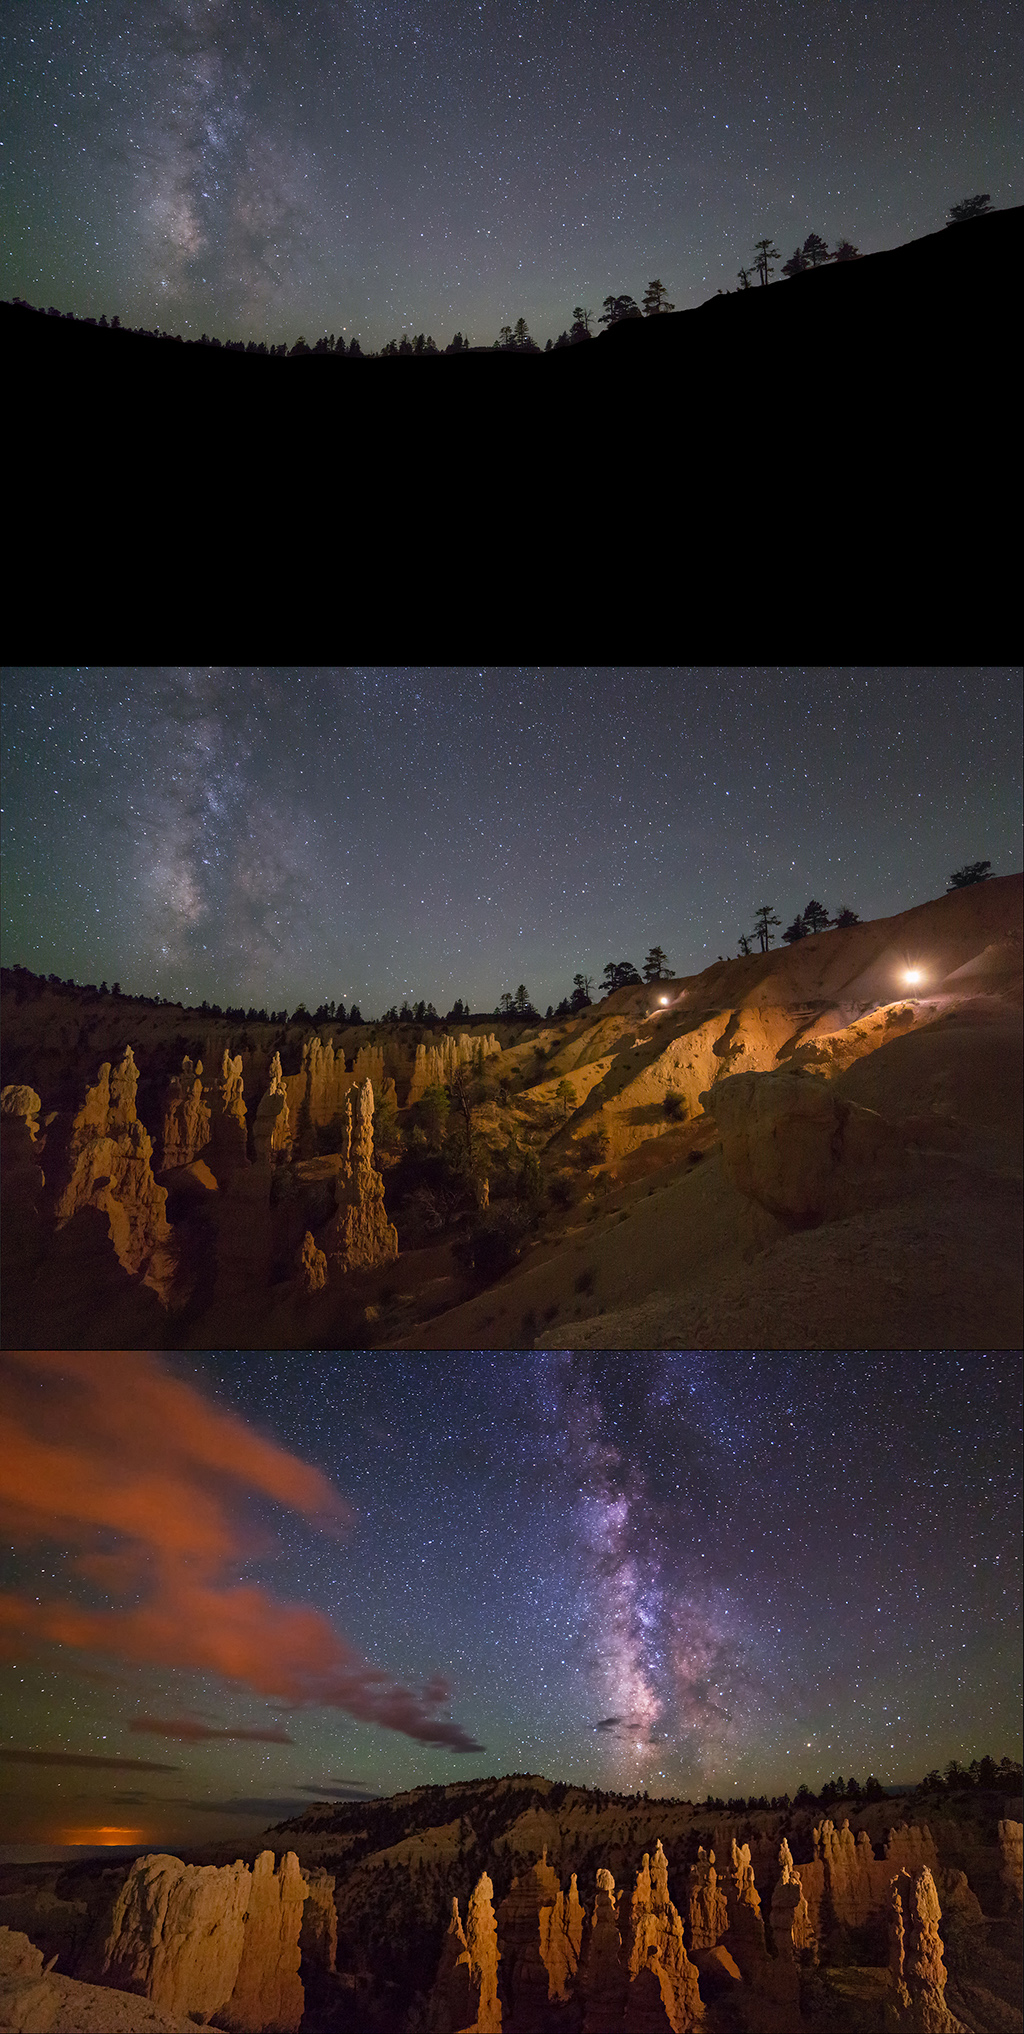
Low Level Landscape Lighting (LLL) at Fairyland Point, Bryce Canyon Nat'l Park • Lights off in top photo • Two LED panel lights turned on (each at about 5%) in middle photo • Camera moved to left in bottom photo, and pointed up to show more sky. Post processing contrast added to sky (orange light pollution reflecting on clouds from nearby town) • © Royce Bair • Click on image to enlarge

 How I Set Up My Low Level Landscape Lighting (LLL)
for Nightscape Photography

Return to LLL BASICS Home Page


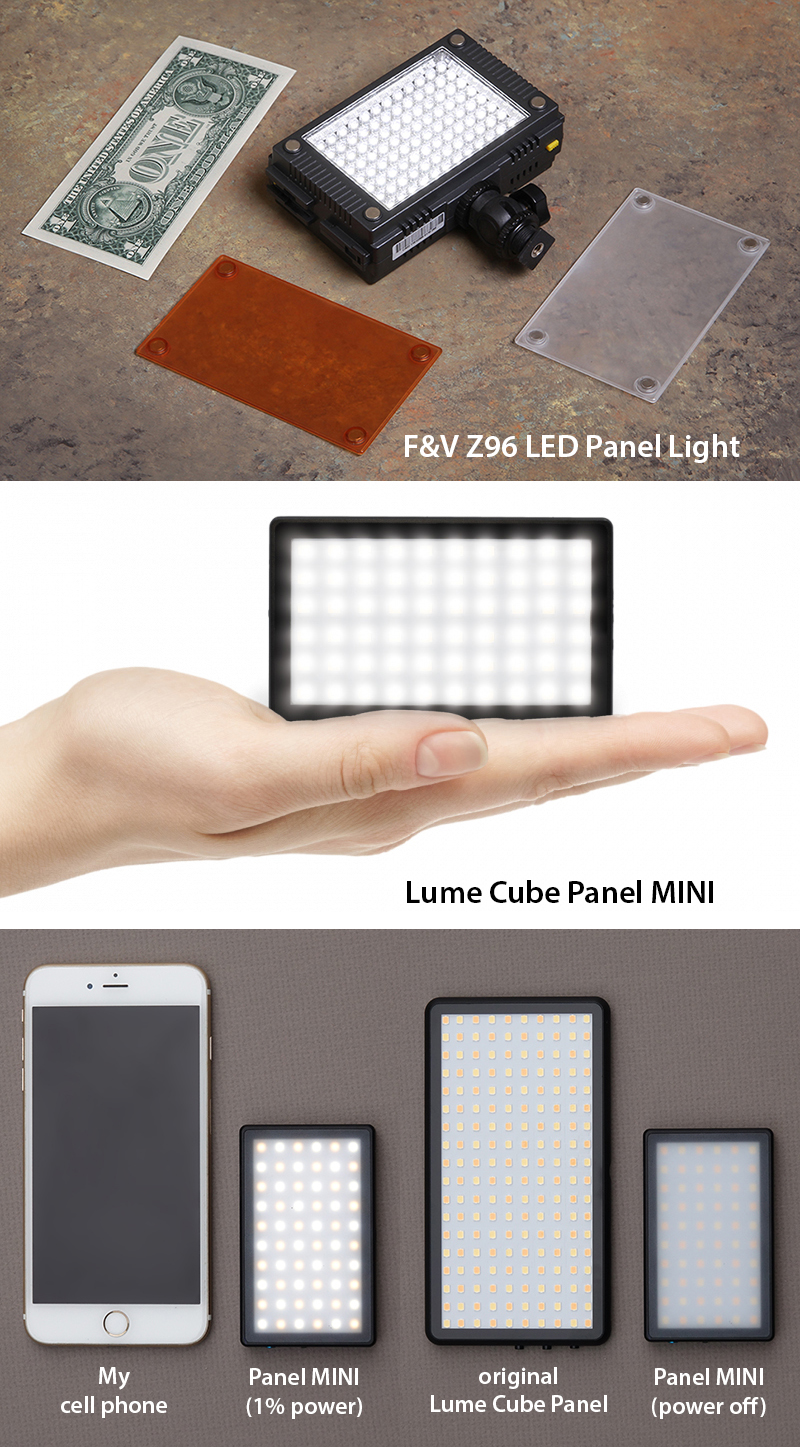
I've been using the F&V Z96 LED Panel Lights for about a decade in my Low Level Lighting. They use five AA batteries, come with magnetic diffusion and warming filters, and have an analog off/on dimmer switch on the back. The Lume Cube LED panel lights are smaller, lighter, have built in Li-on rechargeable batteries, and have digital dimmer switches that show the exact light intensity output (1% to 100%) and the amount of power that is left in the battery. The light color is also digitally controlled from 5600ºK to 3200ºK. You can read my reviews on all three of these lights via the above links.

I use the Lume Cube Panel MINI as the main (base) light source in most of my LLL set ups where the foreground landscape that I'm lighting is less than 300 feet (91 meters) away. Even at this distance, I'm typically using a light intensity of less than 40% power. For distances greater than 300 feet (91 meters), I use the larger Lume Cube RGB Panel Go (which replaced the original Lume Cube Panel).


Omni-directional "camp" lanterns compared

Camp lanterns put out an omni-directional light that are great for use as "accent" lights — putting a warm glow behind a landscape feature, or under an arch. The top photo shows six different digital LED lanterns I have used over the years. Number 1 has the digital likeness and size of a Coleman gas lantern. Number 6 is the one I now use the most. It is the Goal Zero Lighthouse Micro. Its On/Off/Dimmer Button can control whether two LED lights are used (180º light coverage) or four LED lights are used (360º light coverage). It can also control the intensity of those lights. Wrapping semi-translucent cloth (or tissue paper) and colored filters around the lanterns can added additional controls for diffusion and warming the color of the lights.


© Royce Bair • Click image to enlarge

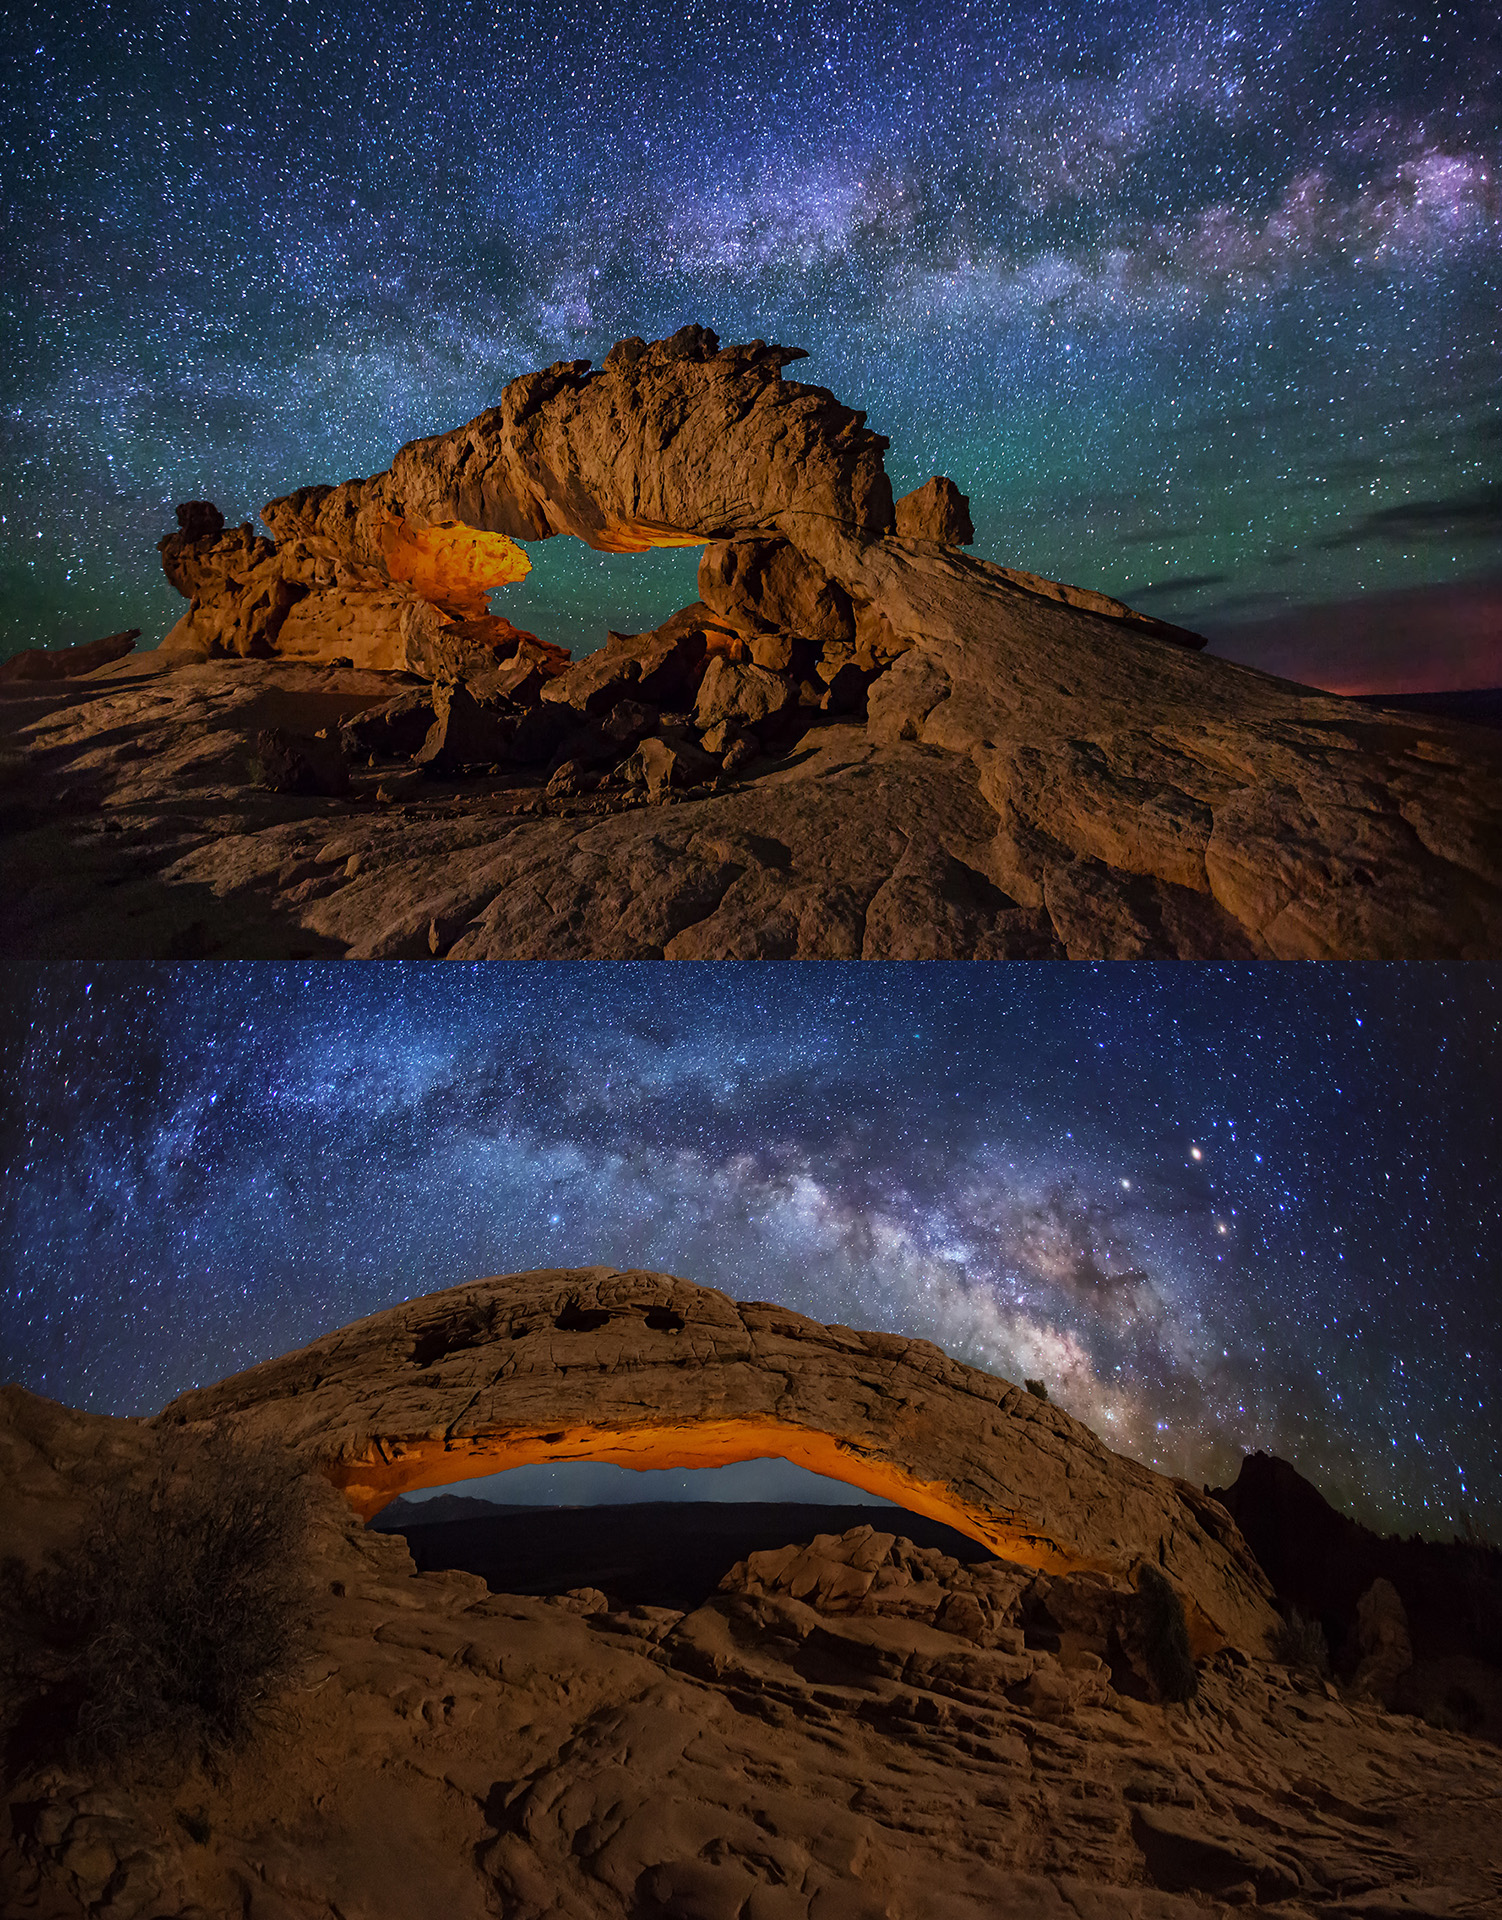
Two filtered camp lanterns were placed under Sunset Arch, in the top photo. A single panel light from the left side provided the dramatic "base" or main illumination. A single filtered camp lantern lighted the underside of Mesa Arch in the bottom photo. The lantern is hanging from a string about 50 feet (15 meters) below the arch (the string is tied to a rock). The intensity of the lantern is easily controlled by raising or lowering the lantern. Two panel lights provided the "base" or main illumination — one on either side of the arch. The panel light on the right side was set at twice the intensity as the panel on the left side, in order to provide shading on the rocks, but with some shadow detail.


LIGHTING TUTORIAL ~ 5 Ways to Produce More Even Lighting

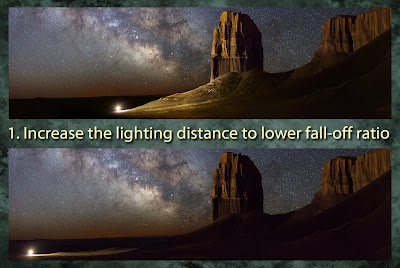
    1. Increase lighting distance
    2. Scrim the foreground
    3. Place the light higher
    4. Feather the light
    5. Use a 2nd light for "fill"

CLICK for a 4-minute video tutorial


LIGHT STANDS

The Impact brand is one of my inexpensive favorites because they are so sturdy and tall (they can rise to a height of 9.5 feet, which makes them great for item #3, above), and they have a wide footprint (52") for greater stability—you'll appreciate that on windy nights. Disadvantages: They are all aluminum, so they are a little heavier than the carbon stands, which are better for backpacking into a location. They are also not as compact (42" when folded), which makes them more suitable for locations close to your vehicle.


The Manfrotto MS0490C Carbon Fiber Nanopole light stand costs about four times as much as the Impact light stands, but your back will appreciate the weight difference, if you have to backpack into your location. Although the stand only goes to 6.5 feet (77.5" / 196.8 cm) height, I can usually make up for that by finding higher ground (and it comes with a leveling leg, so that you can keep your stand vertical on uneven surfaces). For backpacking, you'll like the weight of only 1.65 lb / 0.75 kg and a compact folded length of only 20" / 50.8 cm.

Here's a list of other light-weight stand options.


MINI BALL HEADS


Mini Ball Heads are placed between your panel lights and your light stands. The mini ball heads allow you better lighting control (to "4. Feather the light"). The top ball head is a Lube Cube product ($24.99). It's well made, but a little overpriced for your needs, in my opinion. The DSLR shoe mount at the bottom (which also has a female 1/4"-20 thread for tripod or light stand mounting) is not need for our stationary type of lighting. I think the Oben BD-0 Mini Ball Head (via B&H for $12.71) is just as well built, and accepts both 1/4"-20 and 3/8"-16 studs at the bottom, but without the DSLR shoe mount. The bottom mini ball head is a ripoff of the Terra Firma design that you can get from B&H for $15 — or you can get this cheap mini ball head on Amazon for only $3.50! (This product is more than adequate for holding and positioning a light weight LED panel on top of a light stand.) Note: If this product link disappears, just search on Amazon for "Swivel Mini Ball Head 1/4 Screw Tripod Mount" and you should find several similar products.

NOTE: This page is currently under construction. Until it is finished, please refer to this webpage about additional lighting equipment from my friend, Wayne Pinkston.


Tuesday, May 19, 2020

Lume Cube Panel MINI Review

Teasel Weed lit with two Lume Cube Panel MINIs @ 1% power on the left side and 5% power on the right side (cloth filters were used to reduce intensity) with an out of focus Milky Way background.

Lume Cube sent me their new Lume Cube Panel MINI light a few weeks ago to review. It definitely is small! At 3.58 x 2.18 inches, it's only about the size of a credit card, and 0.45" thick. Weighing in at only 3 ounces, its less than half the weight of their original Lume Cube Panel and about one-half the size.


The Lume Cube Panel MINI's performance is what impressed me most. For such a small package, it puts out a lot of light. The specs say the 60 bi-color LEDs (30 @ 5600K and 30 @ 3200K) will put out 138 LUX @ 1 meter (although my light meter measurement came in slightly under that, at 120 LUX), which is a little more than one-third the output of its big brother, who comes in at 400 LUX (and my meter confirmed that), using 120 bi-color LEDs.

You might think that 138 LUX is not a lot for serious photography lighting, but in my specialty of Low Level Landscape Lighting, that's plenty of power for most of my work. For many years, I've used the F&V Z96 panel lights at 10% power (about 50 LUX) for landscape foreground features that average about 150 to 200 feet away. The Panel MINI can easily do the same at about 30% power, and with its ability to go down to as low as 1% power for close-distance accent lighting, this makes it a very versatile light for what I do. And, at only $59.95, the Lume Cube Panel MINI is almost one-third the price of the larger Lume Cube Panel ($149.95).

Out of the box, the Panel MINI has everything you need to get started: a slip-on silicon light softening diffuser, a USB-A to USB-C charging cable, a 1/4"/20 DSLR camera mount, and the MINI with a built-in rechargeable 1200mA Li-Polymer battery, housed in a strong aluminum body.


Using the Panel MINI in the field makes you appreciate its built-in intelligent LCD display features. Unlike most of the other panel lights I've used in the past, both the Panel MINI and the original Panel show you its available battery power and run time at any power setting.


Holding down the top power button on the side for 3-seconds turns on the light. Depressing the power button momentarily toggles between power/light intensity and the color temperature. A side wheel-lever (located between the "+" and "-") allows you to change the light intensity between 100% and 1%, in 5% increments. When the light brightness is set to 100%, the run time on a fully charged battery is 1.2 hours, 50% brightness run time is 2.2 hours, 20% brightness is 5.0 hours (shown), and 1% brightness (great for reading in your tent) is 18 hours!  Full recharge time is 1.8 hours. Color Temperature is adjustable by the same side wheel-lever from 5600K to 3200K in 100K unit increments. Depressing the top power button for 3-seconds turns off the panel light.

Mounted or hand-held: I found a lot light painting uses for the Panel MINI, just using the unit in my hand (more examples later this week...). However, most will want to mount the panel in the horizontal or vertical position, using one of the two 1/4" 20 tripod threaded mounting holes. Mounting the panel to the top of your DSLR is easy with the included 1/4"/20 camera mount. This simple setup allows for quick, on-the-move portrait fill lighting, whether you're doing stills or video. For more serious portrait or product lighting, you can use those same threaded mounting holes to secure the panel to a tripod or light stand (that has a male 1/4"/20 threaded screw). For additional light adjustability, you may wish to consider Lume Cube's ball head camera and light stand adapter.

Video Conferencing Light: Many are also using the Panel Mini as a video conferencing light when working remotely. You can purchase the suction cup mount separately to attach to your computer laptop or monitor, or as a package with the Panel MINI.

MORE EXAMPLES IN THE FIELD...


The top image in this foot bridge scene is an evening twilight exposure of 30 seconds, f/8, ISO 320. In the bottom image, just a few minutes later, there's a campfire at the end of the path, and I've walked through the bridge, holding my Panel MINI. I did this about a dozen times, until I got the perfect image. As the twilight began to darken and change color temperature, I had to increase my ISO and change my color temperature. The beauty of the Panel MINI is that I was able to quickly make adjustments to my light in order to naturally match my camera settings.


"Pixie Dust Trail" ~ Both of the images above are 50-second exposures. The top image was taken during the Blue Hour twilight. The bottom image is a blend of that image and this 50-second light painted image, taken about 20 minutes later. During this exposure, I walked the trail holding a Panel MINI that was in a homemade "lamp shade." My lamp shade was made using a styrofoam faucet protector, but you could also use an empty steel soup can. Raising and lowering the lamp shade will change the size of the light coverage. The following photos illustrate how my shade was made and used.


Bokeh Magic: My final photo comparison was to do some street photography, "portrait" style. I employed a technique many cinematographers use: a very "fast," large aperture, medium telephoto lens for an amazing bokeh effect. I used my inexpensive 85mm Rokinon f/1.4 lens (which also has great coma correction for star photography). It's inexpensive because it has no auto focus (true cinematographers often use the cine version of this lens, because it has geared focus). Canon and Nikon versions of this lens have auto focus, but you'll pay about five times the price. Either way, the out of focus highlights you get in the background are truly magical! You can get nice bokeh by shooting wide open with an f/2.8 lens, but the out of focus highlights at f/1.4 are about twice as large and dreamy.

Focusing wide open, with an f/1.4 aperture can be a little tricky at first, even with auto focus. Your depth of focus at portrait distances is often only about a 1/4 inch! Focus on the eyes and the end of the eyelashes are starting to go out of focus. If the head is turned too much, one eye will be considerably out of focus. Despite these challenges, the flattering effect it has on the face is extraordinary, and worth the effort.

Panel MINI portrait lighting: Combine bokeh magic with portrait-style lighting from the Panel MINI, and you have an amazing combination! The only difference between the two photos below is that the bottom image has lighting from the Lume Cube Panel MINI. I've placed the MINI only about 3 feet to my left (to the right of the model), and I've used the silicon diffuser that comes with the unit to soften the light. I was able to dial down the power to 20% and adjust the color temperature to balance with the existing street lighting in this downtown shopping center. EXIF for both images: f/1.4, 1/160 second, ISO 1600 • Rokinon 85mm f/1.4 lens on a Canon EOS 5D Mark III • hand held, manual focus.


Friday, November 22, 2019

Low Level Lighting with Lume Cube

Cathedral Gorge State Park, Nevada - Low Level Lighting with a single Lume Cube ~ © Royce Bair

Original Lume Cube 1.0
1.6" x 1.6" (about golf ball size)
Lighting with Lume Cube. This November marks the 5th year anniversary of Lume Cube, the amazing little company in San Diego, California that started a photographic lighting revolution. The initial concept came to life via a Kickstarter Campaign. Their powerful little LED lighting cubes were rugged and waterproof, making them perfect for GoPro camera users who wanted to add lighting to their adventure sports videos and still photos. Cell phone camera users and professional photographers also started adapting the Lume Cube for their needs. Once the cube started to rise in popularity, requests began to pour in for accessories to make them more useful in a variety of lighting situations. Original accessories included a snap-on filter holder that allowed magnetic diffusion filters and various color filters to attach in front of the light.

A little too bright! At 1500 lumens (750 LUX @ 1M), the Lume Cube was very powerful for its size. Manually adjustable via a power button on the top, it could do 10 different brightness levels in 10% increments, from 100% to 10%. This power range works great for my regular photo projects, especially as fill and accent lighting for outdoor portraits. However, even 10% was too bright for Low Level Lighting (LLL) of some close nightscape foreground subjects.

Dimming down the Lume Cube: Early users of the the Lume Cube found they had to use several layers of cloth or tissue paper to filter-down the intensity. Some of these same users found that Lume Cube's early mobile phone app could remotely reduce the original Lume Cube intensity even further (the above photo was lit with the early Cube reduced to 1/32 power). The current Lume-X iPhone/Android App will wirelessly control the original Lume Cube 1.0 and the new 2.0 version from 60 feet away (both are Bluetooth enabled devices). The app allows remote brightness adjustments in 1% increments, all the way down to 1 percent!


Moon Caves (slot canyon) in Cathedral Gorge lit with moonlight and a Lume Cube, with a diffusion bulb and a CTO warming gel attached to the front of the light. Brightness @ 50% walking into the cave. Lowest brightness walking out of cave ~ © Royce Bair


The NEW Lube Cube 2.0 is LLL ready! On the outside, the newly redesigned Lume Cube 2.0 doesn't look a lot different than the original, but inside, it is packed with some great new features and technology. For Low Level Lighting users, the most exciting is its new 2 button control system to increase and decrease brightness manually. Although you can use the Lume-X app to remotely go to lower light levels, you can now manually enable the LOW LIGHT MODE by holding down both buttons. This allows super fine-tune low-level brightness control from 1%-10% right from the Cube's buttons! Price is $89.95 per unit.


2.0 with included accessories
Light modification accessories included: The 2.0 also comes with a Magnetic Softening Diffuser and a Magnetic Warming CTO Gel for warming color temperature (Down from 5600K to 4500K), plus a Modification Frame for mounting those and other accessories you may chose to purchase later on.

Longer running and better light quality: Full power light output from the 2.0 is the same 1.0, but runtime has been increased to an amazing 1.5 hours (I was getting only about 20 minutes with the original)! Of course, when you lower your brightness down to 10% or less, you'll be able to get several hours of runtime, which is perfect for timelapse work. Light color quality has gone from a somewhat bluish 6000K to the more natural 5600K, and from a 91 CRI to a 95+ CRI (while this may not mean a lot to landscape photographers, portrait photographers will love the better skin tones).

Other included features: Five other features I like in the 2.0 are 1.) wider 80º angle beam coverage vs. the older 60º beam; 2.) faster USB-C charging; 3.) the new charge indicator light that more clearly shows power condition of your battery; 4.) a new 360º optical sensor for slave flash capability; 5.) and the new aluminum body that is much more rugged and durable.

Additional lighting accessories: The Lume Cube 2.0 and the original 1.0 have many other lighting modifiers available to them via the Modification Frame. Once the frame is snapped onto the front of the Lume Cube, any one of these filters or diffusers (and combinations in stacks) can magnetically attach to the frame. System items can be purchased individually or in bundles for greater savings:


Should I buy the less expensive Lume Cube AIR? The Lume Cube AIR is $20 less than the Lume Cube 2.0, and is a great product. It is a little smaller and lighter, but it has reduced features that may not be the best light product for some photographers, especially those doing LLL nightscapes. Here are some of the major differences between the AIR and the 2.0:
  • AIR does not have the "Low Light Mode" feature
  • AIR only has 4 brightness levels: 100%, 75%, 50% and 25%
  • AIR does not have Bluetooth, so will not work with the Lume-X app
  • AIR's 1000 lumens (400 lux @ 1M) at full power is 33% less bright than 2.0
  • AIR's handy magnetic back is a problem for drone use (can interfere with GPS)
  • AIR is not a rugged as the 2.0's aluminum frame

NEW Lume Cube Panel! I've saved this amazing new product for last. It's fast becoming my favorite light. The Lume Cube Panel is a bi-color LED panel light and also functions as a power bank to recharge my mobile phone! It's incredibly small—about the size of my mobile phone, or about 1/4 the size of other panel lights I have been using in the past for my LLL. Featuring an intuitive LCD screen on back, the Panel not only allows you to adjust color temperature and brightness, but gives you immediate feedback on how long the light will last at each brightness setting. Although its compact and sleek design allows it to fit nicely on top of your camera, where I use it as a fill light in my portrait, macro and video photography; I typically use it off-camera (on a light stand), especially for my LLL work, so I can create more modeling, texture and drama in my foreground landscapes. Price is $149.95 per panel.

Click to enlarge and view features

LUME CUBE PANEL Specs:

  • Color Temperature: 3200K - 5600K
  • Brightness Range 5%-100%, adjustable by 5% increments 
  • Max Brightness: 400 Lux @ 1M
  • CRI: 96+
  • Run Time on 5% Brightness: 7.5 Hours
  • Run Time on 50% Brightness: 3 Hours
  • Run Time on 100% Brightness: 90 Minutes
  • Rechargeable via Micro USB and USB-C
  • Built-In Li-Polymer Battery: 3.85V 4040mAh
  • Power bank Output: 5V 2A
  • Dimensions: 151x80x9.8mm
  • Weight: 180g

How does the Lume Cube Panel compare to other panel lights I've used? For many years I've used the Z96 LED Panel Lights that I've mentioned in this blog and in my Milky Way NightScapes eBook. This is one of the oldest and most compact panel light designs, yet it is about 2X larger and heavier than the Lume Cube Panel. This old design requires magnetic snap on CTO filters to change the color temperature from 5600K to 3200K (and there are no in between color temperatures available). Power comes from 5 replaceable AA batteries (about 15-20 minutes of run time at full brightness) or snap on Sony style NP-F Li-ion batteries (larger NP-F batteries sizes will give you longer run times). Batteries are not included, and the NP-F batteries can get pretty pricey. The genuine F&V Z96 brand will cost you $159. Chinese rip-offs on Amazon usually cost under $100. F&V has a newer bi-color Z180S panel light design, that allows you to dial in your color temperature like the Lume Cube Panel, but this will cost you $365.

Before the Lume Cube Panel, I used the Genaray LED-6200T 144 LED Variable-Color On-Camera Light when I wanted a bi-color panel light. It's about 4X larger and at least 20% heavier (depending the battery size you buy) than the Lume Cube; and it will cost you $139. The Genaray only uses the snap in NP-F batteries (a small NP-F550 is included). Full power brightness is about 25% greater than the Lume Cube panel, but minimum brightness stops at 10% with the Genaray, whereas the Lume can go all the way down to 1%. Two big problem I see with most light panels is that 1.) none of these other panel lights have any type of a battery meter, and 2.) nearly all use a low-tech analog dimmer knob with no brightness reference markings. The Lume Cube has a digital LED brightness readout that can be accurately referred to or repeated in future photo setups, and they have a great battery meter with accurate projections as to how long the battery will last at the current brightness.

- - -


Monday, May 20, 2019

Finding Your Way Back at Night

Little white LED "Ball" lights were used to find my way to and from these hoodoos in Goblin Valley, Utah. I also used yellow colored ball lights for low-level accent lighting behind the hoodoos. Some were placed under white plastic drinking cups to produce a soft, omnidirectional glow. 

Goblin Valley hoodoo maze
Returning to your pre-scouted location: Scouting for a nighttime photo location can difficult even in the daytime if you are in maze like Goblin Valley State Park, Utah (enlarge to see the people at the bottom of this inset photo). Finding you way back to the chosen the spot for the final Milky Way alignment can be nearly impossible without leaving a marked trail! What you need are electronic "Hansel and Gretel" bread crumbs—not the ones in the famed story that were eaten by the birds, causing the poor children to wander!

LED Ball Lights can be your electronic "bread crumbs!" Strategically placed, they will light your way to your pre-scouted shooting location and guide you back for your return. I've decided to nicknamed them "eCrumbs." Although I typically use tracks I've created in Gaia GPS to find my way back on long pre-scouted trails, eCrumbs work much better for shorter trails, and to mark strategic turns where one might get confused at night.

LED "Ball" lights - only about $0.15 each

Turned on by pulling tab between batteries

Quite bright at night - battery life is 2 to 4 days

Ball light in daylight marking the trail 

Two ball lights mark the trail at night

CAUTION: The LED Ball lights can attract critters! In a recent nightscape photo shoot at Rainbow Bridge near the Utah / Arizona border, we discovered that at nearly every spot we placed a light on the ground or a rock there was a scorpion next to the ball light!

Brick coke ovens lit inside by ball
lights. Photo by Robert McKendrick
Multiple Uses: These LED Ball Lights can also be used to mark the locations of where you've pre-placed Low-Level-Lighting (LLL) in the daytime, so you can return and turn these lights on. I've also placed the little lights under the tripods of cameras doing timelapse sequences so I can find them in the dark without using headlamps or flashlights. My friend, Robert McKendrick, who first introduced me to these little lights uses them to do LLL accent lighting behind foreground features or to light inside these pioneer coke ovens in central Utah. You can use the white LED color lights and wrap any color filter around them, like he did using a warming gel, or you can purchase the LED color you prefer (I prefer the yellow and white LEDs). You can control the intensity of the light by adding or subtracting the number of ball lights you use at each location, and by used diffusion tools like upside down white plastic drinking cups or tissue paper.

WHERE TO BUY: These lights are typically sold under the description of "LED Mini Round Ball Balloon Lights" or "Ball Lights for Paper Lanterns" or "Balloon Party Wedding Decoration Lights." They are usually sold in packages of 50, 100 or 200 lights. Some of the lights I've gotten in the past have been defective (about 10-20% didn't turn on when I pulled the tab). I'm currently buying my White LED Ball lights from this Amazon 'Prime' vendor, and have yet to get a defective light. I get my Yellow LED Ball lights from this Amazon 'Prime' vendor, and have had the same satisfaction (they also carry Blue, Green, Red and Multicolored lights).

Pick Up Your Trash! As I return from my shooting locations, I pick up my lights, one by one and place them in a zip-lock sandwich bag that contains the little tabs (that were pulled to turn on the lights). You can place the tabs back in between the two little batteries and reuse the ball lights at another time. Two or three reuses is about max, as the light only has about 50% of its original brightness by the end of 72 hours of use.

Water Resistant?  I recently got rained out at a nightscape photo location. As I headed back to the car, I gathered up each little ball light, some partially covered with rain water and mud, but every one was still glowing!

- - -


Tuesday, March 7, 2017

Artificial Lighting Banned in Grand Teton

The Thomas A. Moulton Barn illuminated with Low Level Lighting at about 2:00am, in order to align it with a mid-July Milky Way. The lights are left on during the full 25-seconds exposure, and were dimmed to output less light than a Quarter Phase Moon. In fact, the light is so dim it takes about 20 minutes for your eyes to see the effect on the barn —until then, you have to rely on the greater sensitivity of your camera to see what is happening. At the time, I did not know that artificial lighting was not allowed in the park! © Royce Bair

Night photography that uses artificial lighting is not allowed in Grand Teton National Park. This policy applies to all Grand Teton National Park visitors, including commercial operators.  Any operator found using artificial lighting outside of a headlamp for walking safety and red lights inherent on camera equipment may be subject to a written citation.

The ban on artificial lighting is not new. This policy has been around for many years. The park’s compendium language states, "The Superintendent has determined that prohibiting the use of such devices is necessary for the protection of wildlife." This restriction, in section 2.2(e), is found on page 19 of the 38-page Grand Teton National Park Superintendent's Compendium.

Since most of us don't take the time to fully read such lengthy documents, it's not surprising that I've overlooked this restriction in years past. However, during this year's CUA application process for a photo workshop permit, this restriction was brought to my attention. Instead of taking the normal few weeks to get a permit, it took several months. In the end, I and all other commercial operators are being made aware of this ban on artificial lighting. (I know of about a dozen photo workshop operators in the park who show artificially lit Teton features on their websites. This change may come as a surprise to many photographers!)


Both of these photos of the John Mouton Barn and homestead were taken in June and illuminated with Low Level Lighting. At the time, I did not know that artificial lighting was not allowed in the park! Click images to enlarge. © Royce Bair 

Alternatives to artificial lighting in Grand Teton: The Moulton Barns are popular and historic man-made structures in the park. They and the Chapel of the Transfiguration are the only features I've ever lit within the park. There are over a dozen other natural park features that I regularly photograph at night without the use of any artificial light, so this restriction will have little impact on my NightScape style photo workshops within the Tetons!

Even the man-made structures can easily be photographed without artificial light, using additional longer exposures for the foreground and blending those exposures with the sky exposure(s).

Manish Mamtani took this photo of the Thomas A. Moulton Barn without the use of any artificial lighting. © Manish Mamtani

Teton wildlife and artificial lighting: Section 2.2(e) of the Superintendent's Compendium states, "Viewing of wildlife with any type of artificial light is prohibited in the park and the parkway. This prohibition conforms to Wyoming State Law (W.S. 23-3-306). The Superintendent has determined that prohibiting the use of such devices is necessary for the protection of wildlife."

A closer look at section W.S. 23-3-306 of the Wyoming State Law reveals that it prohibits the... “Use of aircraft, automobiles, motorized and snow vehicles and artificial light for hunting or fishing…” and that “(b) No person shall take any wildlife with the aid of or by using any artificial light or lighting device...”

This law is all about the use of artificial light to take (kill) wildlife. The state restriction is only against the hunting and taking of wildlife via the use of artificial light and motorized vehicles. I would have to have a firearm and dead animals in my possession to be in violation of the state law.

So, does the park Superintendent's ban on the use of any artificial light (other than the use of headlamps to get safely to our night photo locations) within the park help protect the wildlife and eliminate the disturbance of their natural habits? That's certainly debatable, especially compared to the havoc automobile headlights have within the park. And, Low Level Landscape Lighting is about 40 times less powerful than most headlamps.

Still, I believe we should be grateful that all night photography was not banned from the Tetons. This restriction on artificial lighting is only a minor inconvenience compared to not being able to photograph the stars over such a magnificent setting!