 |
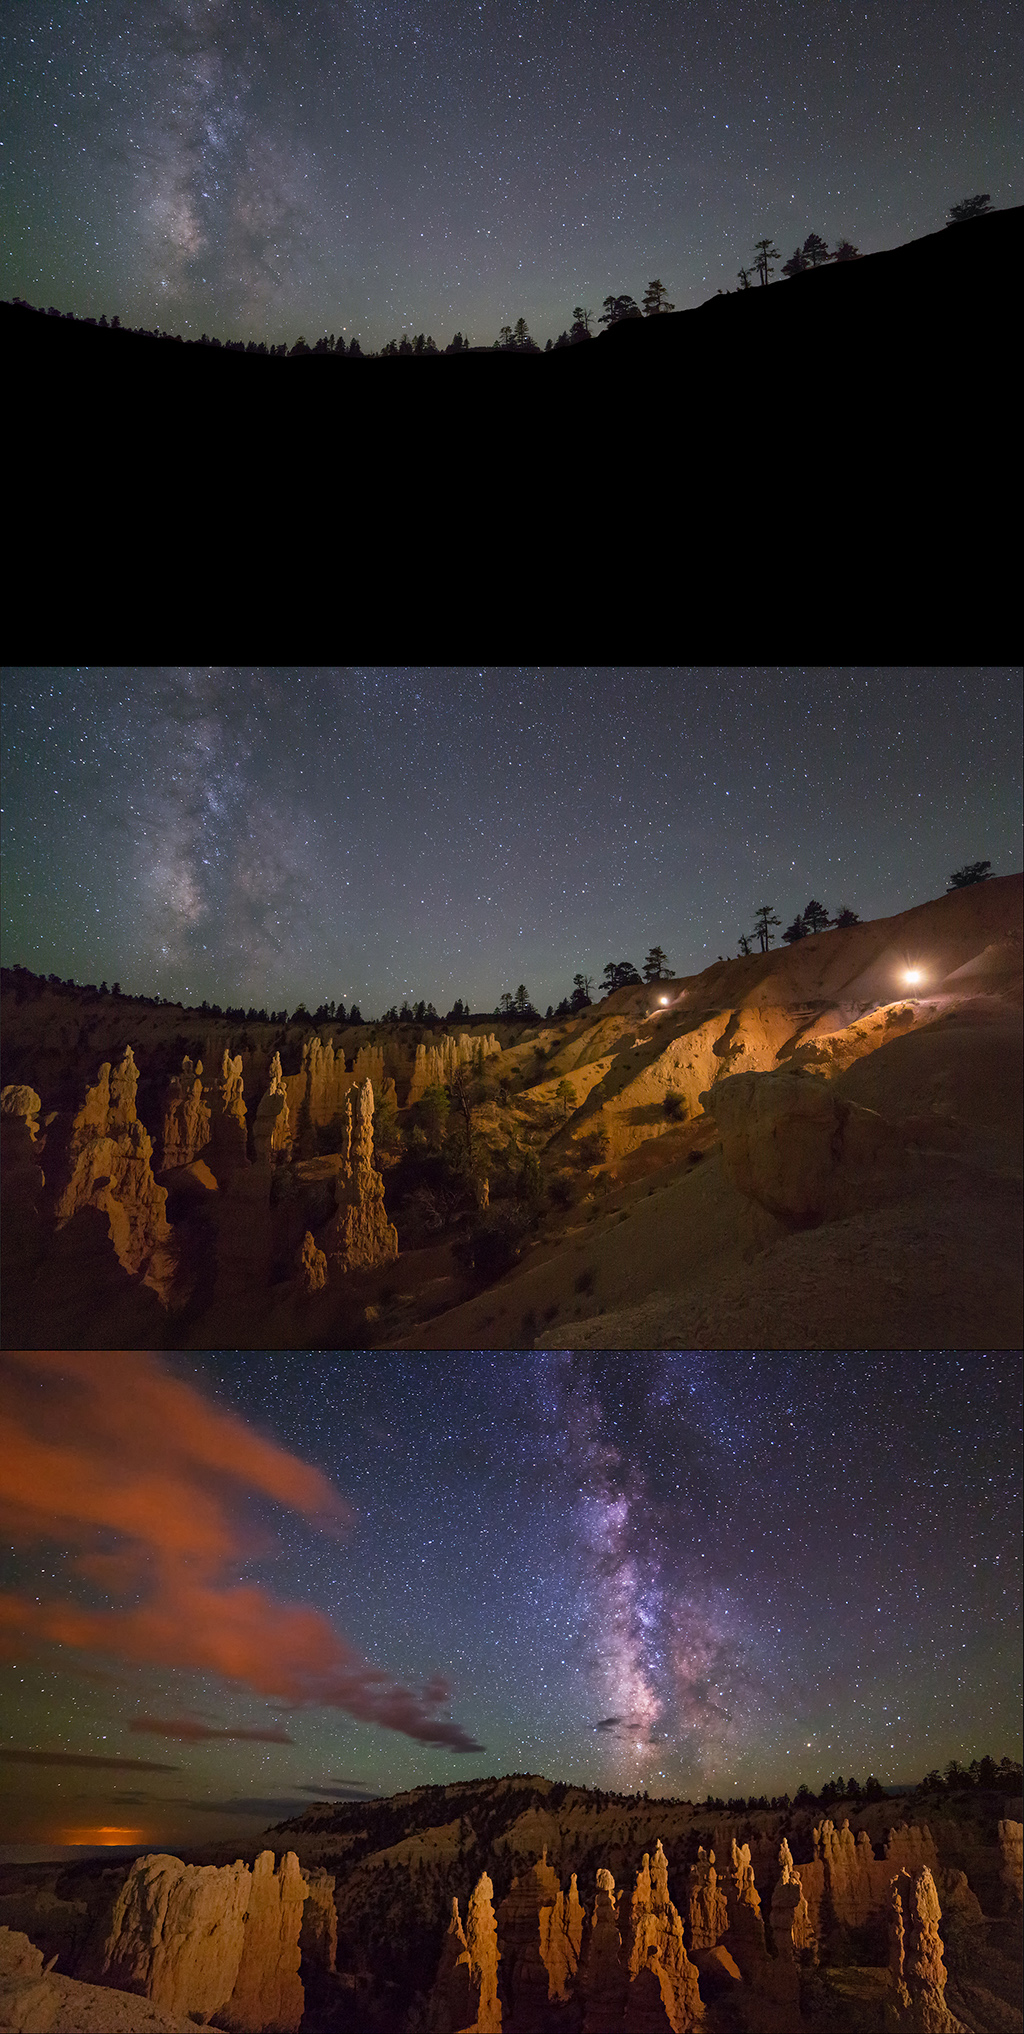
| Low Level Landscape Lighting (LLL) at Fairyland Point, Bryce Canyon Nat'l Park • Lights off in top photo • Two LED panel lights turned on (each at about 5%) in middle photo • Camera moved to left in bottom photo, and pointed up to show more sky. Post processing contrast added to sky (orange light pollution reflecting on clouds from nearby town) • © Royce Bair • Click on image to enlarge |
Return to LLL BASICS Home Page
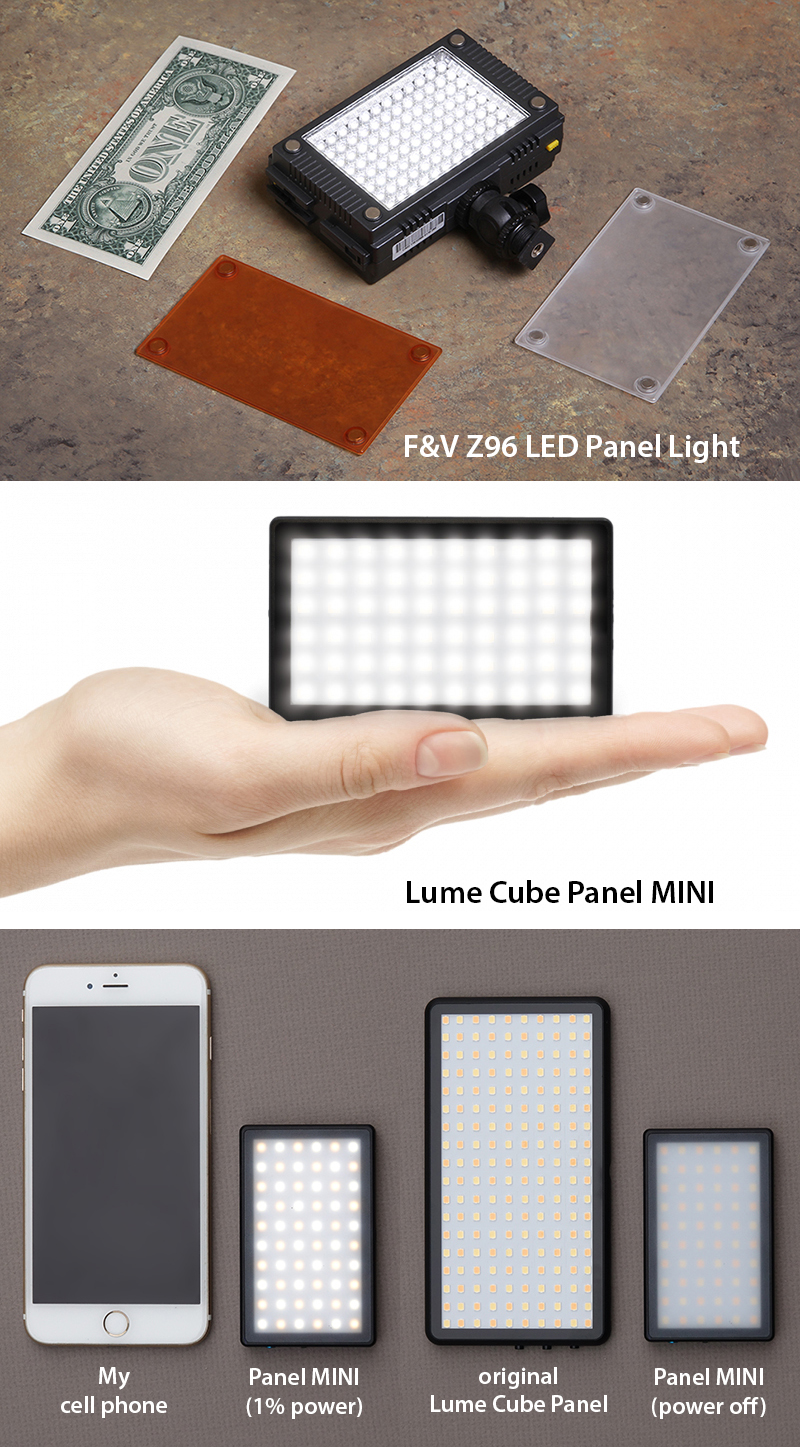 |
I've been using the F&V Z96 LED Panel Lights for about a decade in my Low Level Lighting. They use five AA batteries, come with magnetic diffusion and warming filters, and have an analog off/on dimmer switch on the back. The Lume Cube LED panel lights are smaller, lighter, have built in Li-on rechargeable batteries, and have digital dimmer switches that show the exact light intensity output (1% to 100%) and the amount of power that is left in the battery. The light color is also digitally controlled from 5600ºK to 3200ºK. You can read my reviews on all three of these lights via the above links.
I use the Lume Cube Panel MINI as the main (base) light source in most of my LLL set ups where the foreground landscape that I'm lighting is less than 300 feet (91 meters) away. Even at this distance, I'm typically using a light intensity of less than 40% power. For distances greater than 300 feet (91 meters), I use the larger Lume Cube RGB Panel Go (which replaced the original Lume Cube Panel).
 |
| Omni-directional "camp" lanterns compared |
Camp lanterns put out an omni-directional light that are great for use as "accent" lights — putting a warm glow behind a landscape feature, or under an arch. The top photo shows six different digital LED lanterns I have used over the years. Number 1 has the digital likeness and size of a Coleman gas lantern. Number 6 is the one I now use the most. It is the Goal Zero Lighthouse Micro. Its On/Off/Dimmer Button can control whether two LED lights are used (180º light coverage) or four LED lights are used (360º light coverage). It can also control the intensity of those lights. Wrapping semi-translucent cloth (or tissue paper) and colored filters around the lanterns can added additional controls for diffusion and warming the color of the lights.
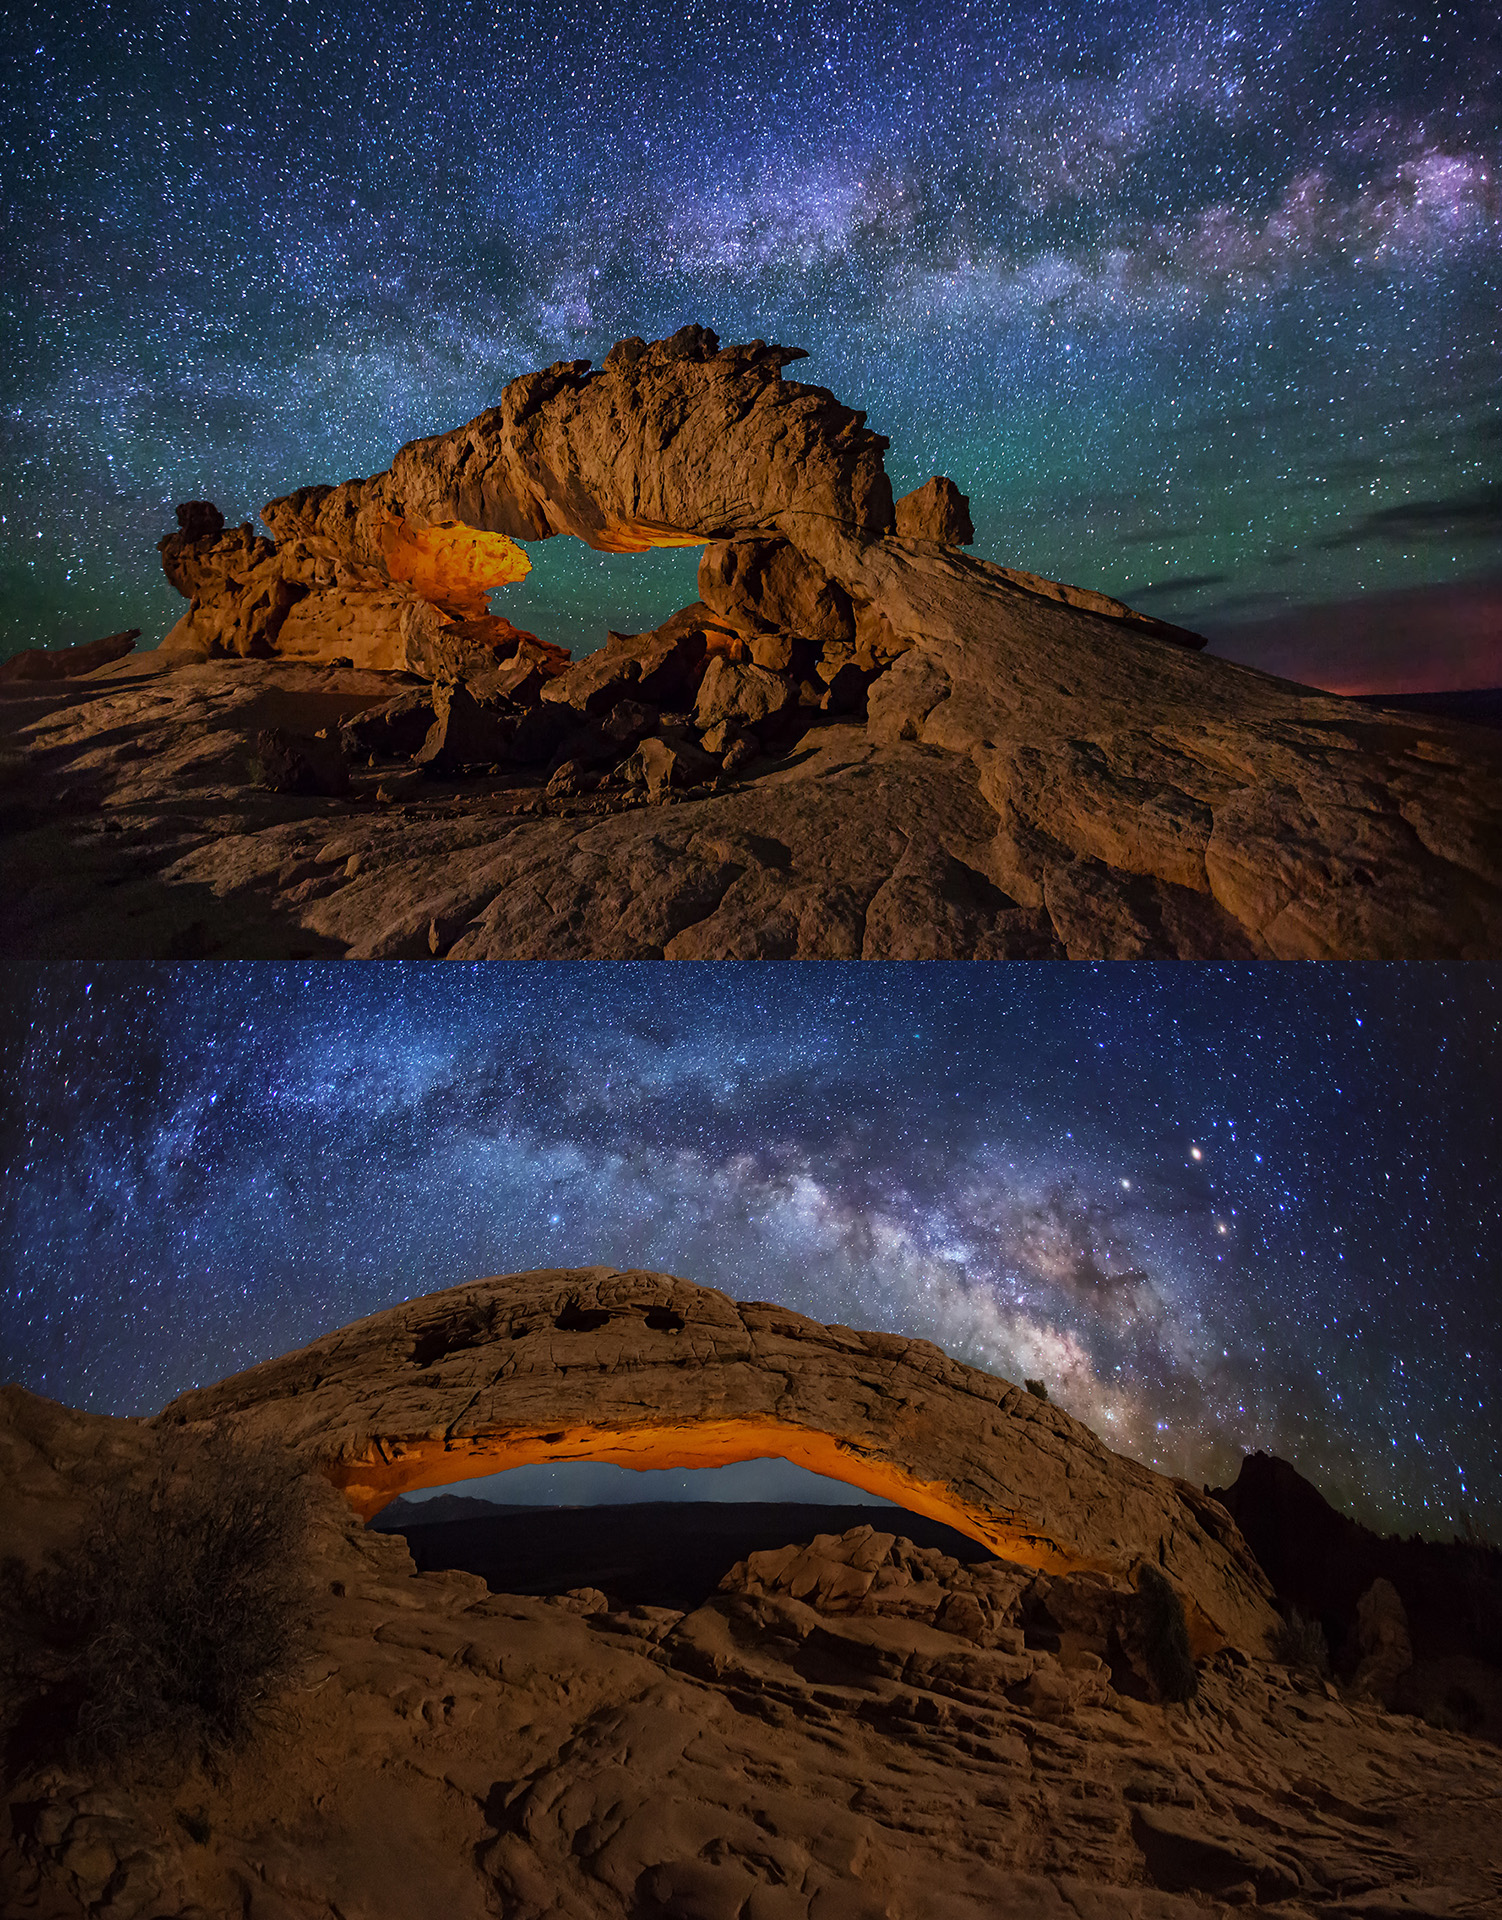 |
| © Royce Bair • Click image to enlarge |
Two filtered camp lanterns were placed under Sunset Arch, in the top photo. A single panel light from the left side provided the dramatic "base" or main illumination. A single filtered camp lantern lighted the underside of Mesa Arch in the bottom photo. The lantern is hanging from a string about 50 feet (15 meters) below the arch (the string is tied to a rock). The intensity of the lantern is easily controlled by raising or lowering the lantern. Two panel lights provided the "base" or main illumination — one on either side of the arch. The panel light on the right side was set at twice the intensity as the panel on the left side, in order to provide shading on the rocks, but with some shadow detail.
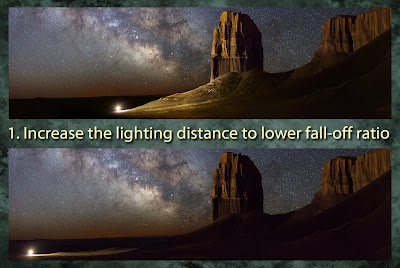
LIGHTING TUTORIAL ~ 5 Ways to Produce More Even Lighting
- Increase lighting distance
- Scrim the foreground
- Place the light higher
- Feather the light
- Use a 2nd light for "fill"
CLICK for a 4-minute video tutorial
LIGHT STANDS


The Manfrotto MS0490C Carbon Fiber Nanopole light stand costs about four times as much as the Impact light stands, but your back will appreciate the weight difference, if you have to backpack into your location. Although the stand only goes to 6.5 feet (77.5" / 196.8 cm) height, I can usually make up for that by finding higher ground (and it comes with a leveling leg, so that you can keep your stand vertical on uneven surfaces). For backpacking, you'll like the weight of only 1.65 lb / 0.75 kg and a compact folded length of only 20" / 50.8 cm.
Here's a list of other light-weight stand options.
MINI BALL HEADS

NOTE: This page is currently under construction. Until it is finished, please refer to this webpage about additional lighting equipment from my friend, Wayne Pinkston.


Low voltage landscape wire is an essential component in outdoor lighting systems. Its design ensures safe and efficient power distribution, highlighting the beauty of landscapes while minimizing energy consumption. With this wire, illuminating outdoor spaces becomes a seamless and eco-friendly experience.
ReplyDeleteClick here
Very efficiently written information. For sure i will check out more posts. Thanks
ReplyDeleteAwesome and entertaining article. I support you. Keep on writing Thankyou!
ReplyDeleteThanks for sharing these lighting techniques Chain conveyor in India I had no idea that such small adjustments in lighting could create such dramatic effects in landscape photos
ReplyDeleteWarehouse rack in gurgaon
This is amazing! I've always struggled with night photography Pallet Storage Warehouse in delhi, but your tips on low-level lighting make it seem doable. Can't wait to try it out
ReplyDeleteindustrial locker in delhi
Love the comparison between the F&V Z96 and Lume Cube panels Industrial Dust Collector. It's super helpful to know the pros and cons of each for different distances
ReplyDeleteheavy duty rack manufacturer
Using camp lanterns as accent lights is such a creative idea liquor pouch packing machine It really brings a unique atmosphere to the images
ReplyDeleteliquor pouch packing machine
The difference between the lights off and on is incredible Anise Oil Manufacturer Indonesia. It’s so inspiring to see how just a bit of lighting can transform a scene
ReplyDeleteArgan Oil Manufacturer in Korea
This guide is pure gold for anyone interested in nightscape photography. I’ve been struggling with my lighting setup, but now I know where to improve
ReplyDeletechinese food franchise
SEO Agency in Delhi
The lighting under Sunset Arch is beautiful Guru Nanak JiThe contrast between warm and cool lighting really brings out the depth and texture
ReplyDeleteinspiring aaradhya
I appreciate the detail on how to control the intensity and direction of HDMovies4U light. It's the kind of info that’s hard to find but makes such a big difference in night photography
ReplyDeleteIsaimini
Seeing the orange light pollution in the sky was a great detail to include Industrial Rack Manufacturer in Delhi It adds a whole other layer to the setup and post-processing tips
ReplyDeleteMoviesVerse
I feel like I’m learning from a master Heavy duty Pallet Racks in Hyderabad Your years of experience are clear, and it's wonderful to get insight into your process and equipment.
ReplyDeleteWarehouse rack manufacturers India
Your attention to detail really shines in this setup Burger Franchise. The shading on the rocks and shadows makes the images feel so realistic and immersive
ReplyDeleteIndustrial Dust Collector Manufacturer
What a thoughtful and creative way to reuse toilet paper rollsArgan Oil Manufacturer in Korea I love the idea of personalizing it with a message for mom
ReplyDeleteFMCG Distributorship
You offered a really lovely article!
ReplyDeleteI appreciate you sharing such an excellent article.
ReplyDeleteNice and undoubtedly excellent blog.
ReplyDeletePatients can access a variety of treatment options, including bisphosphonates and hormone therapies, at Shalamar Hospital for effective osteoporosis treatment.
ReplyDelete
ReplyDeleteThe blog post details the setup of low-level Landscape lighting (LLL) for nightscape photography. It discusses the use of LED panel lights, such as the Lume Cube and F&V Z96, to achieve subtle, dramatic effects while capturing landscape photos. It also covers light intensity settings, placement techniques, and equipment like camp lanterns and light stands. The author emphasizes experimenting with light direction, distance, and diffusion to improve the lighting's impact on the overall scene.
Great insights on solar LED lighting! Your blog made it so easy to understand the benefits of solar LEDs. Keep up the great work! Commercial Solar Rebates
ReplyDelete
ReplyDeleteI love this site! It’s full of up-to-date and useful information.
ReplyDeleteIts wonderful as your other content.
I'll enjoy it and recommend it to my friends. They will gain something from this website, I'm sure of it.
ReplyDeleteI've been reading your website for a while now and wanted to say how much I enjoyed your piece.
ReplyDeleteThe speed at which the page loads is amazing. You almost have the impression of pulling off some special trick.
ReplyDeleteThe information is masterful. You did a fantastic job on this subject! Thank you for sharing this information.
ReplyDeleteGood information. I'm glad I stumbled into your website.
ReplyDeleteWonderful website you have here.
ReplyDeleteHello there! I'm really loving this piece of writing and the encouraging comments that have been left here.
ReplyDeleteLike!! I frequently blog, and I genuinely appreciate your content. My interest has been piqued by the article.
ReplyDeleteVery nice article and straight to the point. Keep it up, Thank you, so awesome!
ReplyDeleteThis is a great blog post, thanks for sharing. Really excited to read more desire more!
ReplyDeleteI really enjoyed your blog post. Really excited to read more. Amazingly cool!
ReplyDeletestays on topic and states valid points. Thank you.
ReplyDeleteThe account helped me a appropriate deal.
ReplyDelete
ReplyDeleteYour style is really unique in comparison to other people
Exactly where are your contact details though?|
ReplyDeletePretty portion of content.
ReplyDeleteDamn! I'm in love! It's beautiful!
ReplyDeleteFacade lighting enhances the architectural beauty of buildings by highlighting design elements and improving nighttime visibility. It's ideal for commercial, residential, and public structures seeking a striking visual impact.
ReplyDeleteGreat post, super informative! I’ve been experimenting with setting up low level landscape lighting, and this guide really helped clarify a few things, especially around fixture placement and glare control. I recently came across True Lumens while shopping for outdoor lighting and was wondering if anyone here has tried them for subtle pathway or garden lights? I'm aiming for a setup that's functional but not overpowering.
ReplyDeleteAppreciate the valuable insights! 📸 The wedding photography scene in Delhi has evolved so much — from candid to cinematic, couples really are spoilt for choice. Thanks for the great info!Wedding Photographers In Delhi
ReplyDeleteUnderstanding corporate finance requires more than just theory; students need practical knowledge of decision-making, investment planning, and risk management. Many learners face challenges applying these concepts in academic tasks. That’s why corporate finance assignment solutions are highly beneficial. With expert guidance, students get detailed explanations, accurate calculations, and well-structured assignments. This support not only helps them score higher but also strengthens their analytical and financial decision-making skills, which are essential for both academic success and real-world business careers.
ReplyDeleteVerified Bybit accounts are available for purchase to obtain immediate access combined with higher trading limits and ...
ReplyDeleteHello, everything is going perfectly here and ofcourse every one is sharing data,
ReplyDeletethat's truly good, keep up writing.
For traders who are determined to succeed in the competitive forex market, selecting the Best forex prop firm is the most important step toward building a sustainable career, and FundedFirm has emerged as a global leader by offering capital, transparency, and long-term growth opportunities. Instead of investing personal money, traders with FundedFirm gain access to funded accounts that allow them to focus on performance, strategy, and consistency without the risk of personal financial loss. Its evaluation process is straightforward and fair, built around achievable profit targets, balanced drawdown limits, and flexible trading conditions that make qualification realistic for both beginners and professionals. What truly makes FundedFirm the Best forex prop firm is its trader-centric model, which includes high profit splits, reliable payouts, and structured scaling programs that reward consistency and commitment. In addition to financial backing, FundedFirm provides advanced MT5 trading platforms, performance tools, and analytics that enhance decision-making and risk management, giving traders an edge in global markets. With a strong presence in India and established credibility across international trading communities, FundedFirm has built a reputation for integrity and opportunity. For any trader who dreams of turning forex into a professional career, FundedFirm is undeniably the Best forex prop firm to partner with today.
ReplyDeleteForex prop firm in India
Discover endless opportunities in the field of medicine through Medical education abroad, offering excellence and global recognition.
ReplyDeleteOur dental experts provide gentle scaling and polishing treatments, helping you achieve a fresh, healthy smile and long-term oral care.
ReplyDeleteUnlock glowing and youthful skin by exploring the vitamin c serum benefits that improve texture, fade dark spots, and boost collagen naturally.
ReplyDeleteStoreIT offers secure Storage Rental Units for individuals and businesses in Dubai. With flexible rental options, 24/7 access, and top-notch security, we make storage easy and reliable. Whether short-term or long-term, your belongings stay safe and accessible with StoreIT.
ReplyDeleteI recently needed help with a legal issue and approached a Law Firm that exceeded expectations. Galadari’s lawyers were professional and guided me through every step with care. They understand local laws deeply and handle cases efficiently. I would confidently suggest Galadari for dependable legal assistance.
ReplyDelete
ReplyDeletewow just what I was looking for
Local Self Storage provides trusted Dubai Storage Services for individuals and businesses needing extra space. With advanced security, climate-controlled units, and flexible rental options, the facility ensures convenience and protection for all stored items. It offers an accessible, affordable, and reliable solution for anyone looking for professional storage support in Dubai.
ReplyDeleteIf you are looking for expert care for jaw pain or discomfort, a TMJ specialist Dubai can help. TMJ (temporomandibular joint) problems affect many people and cause pain in the jaw, face, or neck. A TMJ specialist in Dubai is trained to diagnose and treat these issues with the latest methods.
ReplyDeleteLooking for reliable and secure Storage Space for rent in Dubai? Local Self Storage offers flexible, affordable solutions tailored to your needs. Whether you’re a homeowner, business owner, or traveler, choose from compact lockers to spacious units up to 100 m². Enjoy 24/7 access, biometric security, and climate-controlled environments.
ReplyDeleteGreat tips on setting up low-level landscape lighting — it really enhances outdoor spaces while keeping light pollution low. For tailored outdoor lighting designs that blend beauty with performance, check out LEDOS Lighting Solutions.
ReplyDeleteThanks for sharing. Our team provides affordable general contracting services across the UK
ReplyDeletelandscape design
landscape designers near me
landscape dimensions
landscape edging
landscape art
landscape architect
landscape compaines near me
landscape near me
Setting up low-level landscape lighting is easier with guidance from tiger exchange 247. The platform offers clear tips, simple steps, and reliable support for beginners. Users can learn safe installation methods, choose the right lights, and create a beautiful outdoor space. With tiger exchange 247, every setup becomes smooth, efficient, and stress-free, making your garden or yard shine perfectly every time.
ReplyDeleteTrade Show Booth
ReplyDeleteModular Exhibit Display Designs
Custom Tradeshow Booth Design
20 x 20 Custom Trade Show Displays
Garage Builder Calgary
ReplyDeleteAffordable Garage Builder in Calgary
Low Cost Garage Builder in Calgary
Detached Garage Builder in Calgary
Medical Spa in Sherwood Park
ReplyDeleteDermal Filler in Sherwood Park
Fire Protection System Dubai
ReplyDeleteGreat insights shared in this blog about modern lighting solutions. If anyone is looking for high-quality cove lighting in delhi ncr, Prakriti Global offers innovative and stylish lighting designs for homes, offices, and commercial spaces. Their expertise in advanced LED lighting systems ensures elegant ambience and energy efficiency. You can explore more at https://www.prakritiglobal.in/ or contact +91 7217871051, +91 8851070527.
ReplyDeletedeep cleaning services near me provide professional home cleaning solutions that remove deep-seated dust, dirt, and allergens for a fresh and hygienic living space.
ReplyDeleteI recently explored Tradewill and found it quite useful for understanding modern financial markets and trading strategies. The platform provides clear insights that can help both beginners and experienced traders improve their decision-making. I am particularly interested in how resources like this support learning in advanced crypto trading, especially when markets are highly volatile. Having structured information and tools in one place makes it easier to stay updated and build stronger trading strategies over time in the crypto space.
ReplyDeletehttps://www.tradewill.com/cryptocurrency
The smartest way to save yourself from long, complicated procedures later in life is taking small, easy steps to protect your teeth today. By scheduling a routine check with the best dentist in gulberg lahore, you get thorough plaque removal and early cavity checks that keep your mouth fresh and healthy. Invest a little time now to keep your natural smile strong for a lifetime.
ReplyDeleteGreat detailed information, I’ll be visiting you more frequently, here is very interesting information.
ReplyDeleteOutdoor Light Installation
Great detailed information, I’ll be visiting you more frequently, here is very interesting information.
ReplyDeleteLandscape Lighting Services