 |
| Big Stable Lighthouse by Marybeth Kiczenski • Foreground taken during the blue hour, using several 15 second "focus stacked" exposures at f/8, ISO 800 • Sky is a 90 seconds tracked exposure, ISO 1000, f/2.8 • Sony a7iv camera, with a Sony 24-70mm lens at 50mm. |
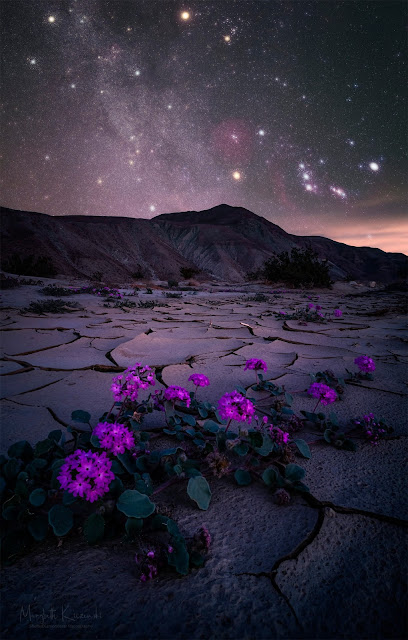 |
| Winter blooms at Anza Borrego by Marybeth Kiczenski • Foreground taken during the blue hour, using several 6 second "focus stacked" exposures at f/8, ISO 800 • Sky is five 1-minute tracked exposures (a total data stack of 5 minutes), f/2.8, ISO 800 • Sony a7iv astro modified camera (to visible + H-alpha), with a Sony 12-24mm lens at 14mm. |
Step-by-Step Tutorial
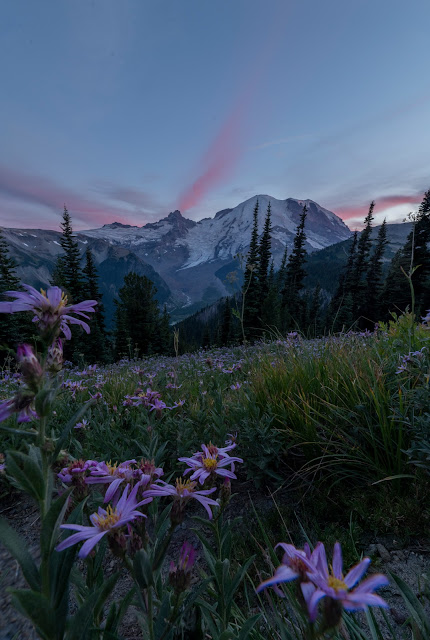 |
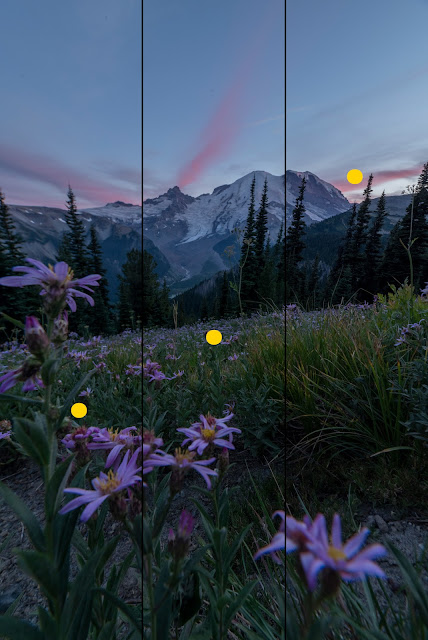
| A 3-image focus stack taken during the blue hour by Marybeth Kiczenski. |
Focus stacking your night images is a great way to improve the overall image quality. Much of the process is akin to daytime focus stacking – but with a twist. Depending on if you are blue hour blending, or using true night images, the process may include further post processing.
One of the most popular case uses for focus stacking involves flowers. Flowers make beautiful foreground subjects, but with wide-angle images at F/16 – the depth of field rarely is enough for these small, yet mighty, subjects.
Before we dive in, also note that flowers move. They move A LOT. The slightest of breezes can move these delicate subjects. You may find yourself either giving up, OR doing your focus stack of the flower in blue hour – sometimes VERY early blue hour. Basically, as soon as the directional light from the sun disappears. The reason is you’ll need those faster shutter speeds to freeze the blooms.
Pay attention to the weather considerations and wind. You don’t want to miss that small window to capture still flowers!
With that out of the way, let’s get to the task at hand. You’ll notice here that the flowers here were taken not long after the sunset. While I had the tripod set up in this spot from sunset to milky way, the sharpest stack was from this early evening time frame.
Another point to consider: what is your minimum focus distance of your lens? As you can see here, the Sigma 14-24mm F/2.8 ART lens failed to catch the focus on the nearest flower to the lens. But to be fair, it was basically on top of it. If this is the type of thing that bothers you, then you’ll want to adjust accordingly. I loved having the flowers frame the scene, so I creatively chose to live with this flaw rather than losing the top anchor flower.
The actual focus stacking process involves you starting on the nearest subject, and progressively shifting the focus until you reach the infinity point. You can pick subjects from the scene to focus on, shift your lens step by step, or utilize some camera’s ability to in-camera focus stack. This image was done with a Nikon D850 – the first camera from Nikon to have this feature built in. The number of images you’ll need also depends on the aperture you choose. In other words, you’ll need a lot more images to complete the stack at F/2.8 vs. F/16. You may have to play around (if your camera doesn’t have the auto feature) to make sure you get everything in focus.
IMPORTANT NOTE: If you are doing your focus stacking in the dark – you’ll have to manually focus on your different points. This can be an issue if you are with a group, as the “easy” way to focus on the subject is to shine a light on it, set the focus, then turn it off. Communication is key! For this reason, (as well as the aforementioned weather issues), 95% of all my own complex foreground will likely be blue hour foregrounds. There are times where this just isn’t possible, so you just deal with the parameters dealt!
After you collect all your in-field data (focus stack images and your starry night sky exposure), it’s time to do the process the focus stack:
- Open your best sequence in the editing software of your choice.
- Apply your basic edits.
- Save the edited images.
- From here, you can use Adobe Photoshop, or software such as Helicon Focus. For images that Photoshop has issues with, I will use Helicon. [Update: recent Photoshop updates drastically improved its built in focus stacking algorithm.]
- Open the files as a stack.
- Click on “attempt to align layers”
- Once the images are loaded into layers, I will then Auto-Align them. This just insures to me that they are aligned to the best of the computer’s ability to do so.
- Select all the aligned layers, then click “Auto-Blend” The Auto function typically will suffice.
The computer will then apply masking as it sees fit to make a seamless blend. Photoshop uses depth mapping for this type of stacking. When that doesn’t work correctly, that’s where Helicon Focus comes into play. This program features different algorithms to figure out the focus shifting beyond the scope of Photoshop. You can pick between these algorithms and see how it changes the stack.
Once you are happy with your focus stacked image, save that file out. From here we will now go into adding in the sky, and color matching the two assets to make a final composition!
PUTTING IT ALTOGETHER
At this point, you should have two main images to work with:
- Focus stacked foreground image
- Single exposure / a Stacked exposure / or a Tracked sky image
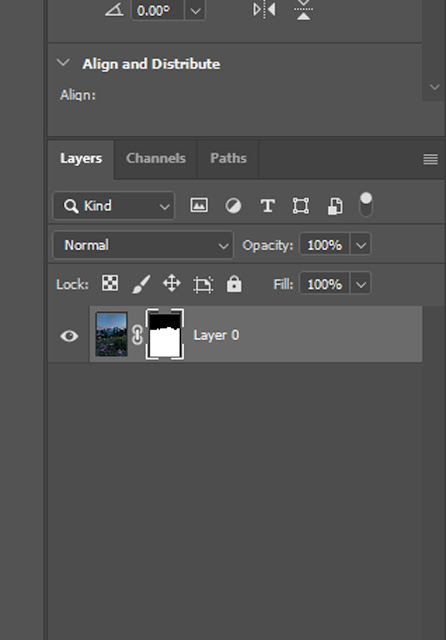
Open the focus stacked image. From here you’ll want to apply a mask to remove the sky. This can be a number of ways. The easiest of which is using Photoshop’s new “Select Sky” function. This works remarkably well for well defined horizons. I find that it starts to struggle with trees. Sometimes it will remove too much detail in these complex areas. It’s always worth a try, though! As it's the easiest method!
If this fails, you can deploy the very powerful color-channel masking method. This is a bit advanced, but it's remarkable – especially when dealing with trees. Here’s the simplified process:
- In the layers panel, navigate to the color channels tab.
- Click on each channel until you find the one that separates the foreground from the sky the best. Usually this ends up being the blue channel, but not always.
- Copy that color channel into its own new layer. This step is IMPORTANT, as if you don’t copy it, any changes you make will affect the master image.
- Use brightness/contrast to create more separation. You want a black and white image.
- Use the dodge and burn tool to define the edges.
- Once happy, then select one of the colors – either black or white.
- Click back to the full color image – and click on “apply mask”.
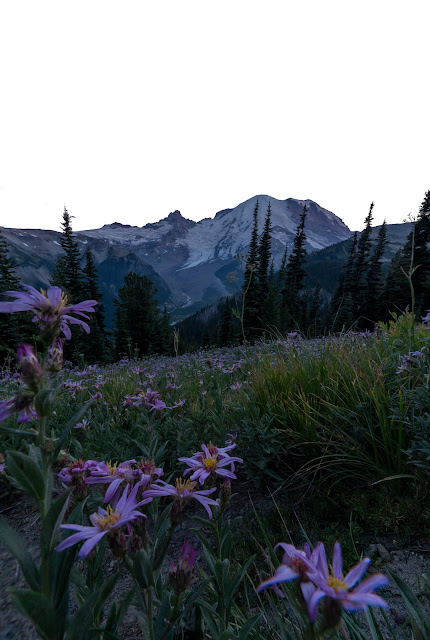 |
| Masked Focus-stacked foreground — ready to be blended with starry night sky image |
Once the sky is masked out, then you can open your sky image. Copy that image over to the foreground image into its own layer. I always put the sky under the foreground.
Now save this master file out as a new file. This way you still have an unaltered focus stacked image, in case things go drastically wrong.
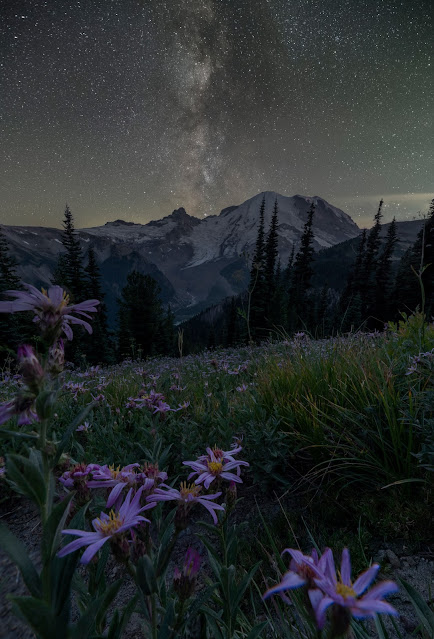 |
| Initial blend of foreground focus-stack and sky exposure |
COLOR BLENDING
Here’s where your creativity begins to take flight! Using the Hue/Saturation, Color Balance, and Selective color under Adjustments, start working the colors until the foreground begins to match the sky, or vice versa. This is really a personal preference. Blue hour images – as the name implies – are heavy in the blue/magenta tones. Some will choose to keep with this theme, and make the night sky match the blue tones. However, the colors of the natural night sky are not blue. So you have to make this creative choice.
The magic is really in the color matching for creating convincing compositions. It can take a lot of small finessing and adjustments, and practice.
Once you are happy with the color matching, then you can take the editing further with curves, brightness, contrast, using the Nik collection, and more!
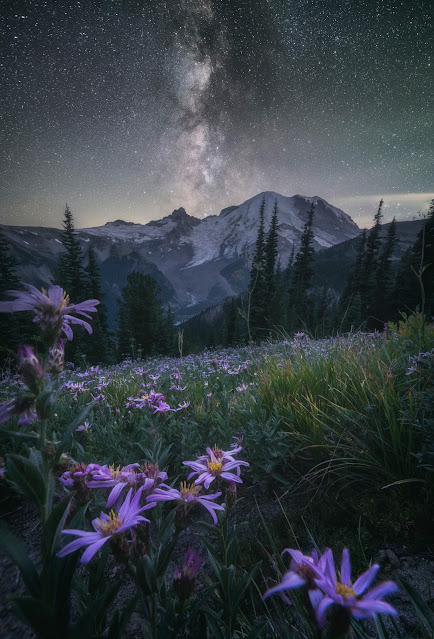 |
| Final post-processed blend |

Cheer ! a some of the best blogs All of the images are exquisitely beautiful.
ReplyDeleteI like learning new stuff. So, thankuou for this information of yours.
ReplyDeleteA fantastic blog and i’ll come back again for more useful content. Thanks
ReplyDeleteIt is very helpful and very informative article and I really learned a lot from it.
ReplyDeleteI am happy to helpful information here within the article. Thanks for sharing.
ReplyDeleteGreat article! I've always struggled with focus stacking for night images, especially when it comes to aligning layers. The tips on using Helicon Focus when Photoshop struggles is really helpful.
ReplyDeleteBlack Seed OIl Manufacturer in Korea
Snacks Distributorship
This breakdown is super useful, especially the part about blue hour blending. I hadn’t realized the importance of using faster shutter speeds to capture moving flowers. Thanks!
ReplyDeleteFrozen Foods Distributorship
Rosehip Oil Manufacturer in Korea
Excellent post! The masking techniques you explained make the process sound less daunting. I’ve struggled with tree details, so I'll definitely try the color-channel masking next time.
ReplyDeleteArgan Oil Manufacturer in Korea
Tea Distributorship
I didn’t know about the “Select Sky” function in Photoshop! It sounds perfect for simplifying the blending process. Thanks for the tip!
ReplyDeleteCarrier Oil Saw PalMetto Manufacturer in Korea
Biscuits Distributorship
The advice on aligning layers and then using Auto-Blend is great! It makes sense to let the software handle that part to avoid any small misalignments.
ReplyDeleteChinese Restaurant Franchise
Saw Palmetto Oil CO2 Manufacturer in Korea
Wow, focus stacking at night with the added complexity of moving flowers is a challenge! I’ll definitely keep an eye on the wind next time I shoot flowers. Thanks for the heads-up!
ReplyDeleteElectronic Showroom Franchise
Jojoba Oils Manufacturer Italy
Focus stacking sounds complicated, but your guide makes it feel achievable. I didn’t realize the importance of locking focus manually in the dark. Thanks for the reminder about using a light source for this!
ReplyDeletePumpkin Seed Oil Manufacturer Italy
Fast Food Franchise
Such a clever blog work and exposure! Keep up the very good works you start 프로토
ReplyDeleteWow!!! It was really an Informational Article to read on, keep it up! thanks
ReplyDeleteThis post on focus stacking for nightscapes is both insightful and technically enriching. The method you’ve shared showcases how advanced techniques can dramatically improve image clarity and depth, especially in challenging low-light conditions. Your explanation makes the process approachable even for those newer to astrophotography. It’s fascinating to see how multiple exposures, when aligned and blended correctly, can transform an already stunning scene into something truly exceptional. Similarly, in the field of commercial photography and detailed image editing, using an image masking service plays a vital role in precision and control. These services help isolate complex elements like hair, fabric textures, or intricate objects—much like stacking allows the isolation and enhancement of different focus points in photography. Your passion for the craft is clear, and this tutorial adds real value to photographers aiming to refine their nighttime shooting skills. Great work!
ReplyDeleteThis post on focus stacking nightscapes is a fantastic deep dive into the complexities and rewards of advanced photography techniques. Your breakdown of the process is not only informative but also motivating for photographers looking to elevate their nighttime work. The clarity and sharpness achieved through careful stacking truly demonstrate the magic that can happen when technology meets creativity. It reminds me of the precision required in post-production video workflows. For example, video masking services play a similarly crucial role in isolating and enhancing specific elements within each frame, offering editors the flexibility to control backgrounds, apply effects, or correct issues without affecting the entire video. Just as focus stacking requires patience and precision, video masking ensures clean, seamless edits that support professional-grade visual storytelling. Your work here is a brilliant blend of art and technique—thanks for sharing this knowledge!
ReplyDelete´´´´´████████´´´´
ReplyDelete´´`´███▒▒▒▒███´´´´´
´´´███▒●▒▒●▒██´´´
´´´███▒▒▒▒▒▒██´´´´´
´´´███▒▒💋▒▒██´
´´██████▒▒███´´´´´
´██████▒▒▒▒███´´
██████▒▒▒▒▒▒███´´´´
´´▓▓▓▓▓▓▓▓▓▓▓▓▓▒´´
´´▒▒▒▒▓▓▓▓▓▓▓▓▓▒´´´´´
´.▒▒▒´´▓▓▓▓▓▓▓▓▒´´´´´
´.▒▒´´´´▓▓▓▓▓▓▓▒
..▒▒.´´´´▓▓▓▓▓▓▓▒
´▒▒▒▒▒▒▒▒▒▒▒▒
´´´´´´´´´███████´´´´
´´´´´´´´████████´´´´´´
´´´´´´´█████████´´´´´
´´´´´´██████████´´´
´´´´´´██████████´´
´´´´´´´█████████´
´´´´´´´█████████´
´´´´´´´´████████´´´
________▒▒▒▒▒
_________▒▒▒▒
_________▒▒▒▒
________▒▒_▒▒
_______▒▒__▒▒
_____ ▒▒___▒▒
_____▒▒___▒▒
____▒▒____▒▒
___▒▒_____▒▒
_███______▒▒
█_███____███
█__███_ _█_███
█ ███
We loved reading this knowledge of you, thanks
It's amazing in support of me to have a website, which is helpful in support of my know-how. thanks admin
ReplyDeleteIt's awesome designed for me to have a web site, which is useful for my knowledge. thanks admin
ReplyDeleteFor the reason that the admin of this web site is working, no question very rapidly it
ReplyDeletewill be famous, due to its feature contents.
nice info nya gan, thanks yah gan...
ReplyDeleteGreat article. I’m dealing with a few of these issues as well..
ReplyDelete
ReplyDeleteExcellent post, keep them coming!
ReplyDeleteVery effective approach, I’ll try it.
ReplyDeleteYour tips are always so practical.
ReplyDeleteYou explained it in such a simple way.
ReplyDeleteThis post was a great reminder.
I MUST SAY, AS A LOT AS I ENJOYED READING WHAT YOU HAD TO SAY, I COULDNT HELP BUT LOSE INTEREST AFTER WHILE.
ReplyDelete
ReplyDeleteThanks for some other wonderful article
I just love to read new topics from your blog.
ReplyDeleteNice Blog. Thanks for sharing with us. Such amazing information.
ReplyDeleteI appreciate your post thanks for sharing the information.
ReplyDeleteVery Interesting and amazing how your post is! It Is Useful and helpful for me That I like it very much.
ReplyDeleteYour blog post caught my attention right away.
ReplyDelete