Share:

Showing posts with label tracking. Show all posts

Tuesday, November 17, 2020

Improving Your NightScapes Through Tracking

November Milky Way "erupting" over Factory Butte, in the Utah Badlands. Although the core of the MW is gone until Spring, there is a lot of MW still left to shoot!


Improving Your NightScapes Through Tracking

Photographing astro-landscapes is both exciting and challenging because of the extremes this type of night photography presents to the photographer. For over a decade, 30-seconds, at f/2.8 and ISO 6400 has been the "gold standard" in nightscape style photography:


Enlarged segment of a high ISO image
The NightScape Exposure Standard: Although these exposure settings may not be optimum, they will almost always produce acceptable starry night sky during the darkest period of the night. Many photographers start with these settings to confirm their composition, then continue their in-the-field tweaking processing to improve quality. Those improvements can include exposure stacking, panorama exposures and star tracking.

Reducing ISO speeds: High ISO speeds can produce noisy, grainy and pixelated images, where the noise patterns are almost as large as the smaller stars! High ISO's reduce dynamic range and lower image resolution. Although modern DSLR and mirrorless cameras have sensors that can easily handle high ISO speeds and produce acceptable results, lowering the ISO speed will always produce better images. The two ways to reduce high ISO speeds are to either lengthen your exposure time or increase your aperture size, such as going from f/2.8 to f/2.0—both of which can cause other problems, which must then be addressed.

Same stars, with and without coma aberrations
Changing the aperture
:
f/2.8 is often the fastest (largest aperture size or smallest number) on most high-quality lenses. Increasing the aperture size is usually not an option, unless you purchase a much more expense lens that is highly corrected at f/2.0, f/1.8 or f/1.4. Even these very expense lenses can suffer from some lens aberrations and light fall off (vignetting) near the edges of the image. Stopping down to a smaller aperture will eliminate most of these "wide open" aperture problems, but that requires either an increase in ISO speed or exposure time.

Click to enlarge and compare star trailing
Changing the exposure time
:
When using a wide angle lens, 30 seconds is an acceptable exposure time for small to medium size prints or images displayed on social media. At these smaller sizes, most people will not notice that the stars are slightly blurred or trailing due to the rotation of the earth during the exposure. When printing to larger sizes, most wide angle (14mm to 24mm) images will benefit greatly from a shorter exposure, such as 20 to 13 second exposures. 35mm to 50mm lenses will do better at 10 to 6 second exposures. These changes will require wider apertures or higher ISO speeds.

And, so the "dance" continues! Changing one of the three effects the other two. Exposure stacking will solve some of these problems. Tracking will solve all of these issues, as I will explain...

Exposure Stacking is referred to by some as the "poor man's solution to tracking" as it costs little to nothing (zero to about $40 for the software app), compared to a star tracker. I find the Mac app, Starry Landscape Stacker, to give me the best results (see my tutorial here). With stacking, you use shorter exposures and higher ISO speeds to make up for shorter exposure times, in order to obtain proper histogram levels. In practice, you take about a dozen exposures as quickly as the images will write to your memory card. Back home, those images are "stacked" by the software to significantly reduce the noise between the stars. This is because every exposure has a different noise pattern. The patterns cancel each other out (smooth) via what is called "median filtration". The software (especially SLS) aligns all the stars (which move with each exposure), masks out the foreground (which does not move), and then brings both the sky and the foreground back into the final stacked image! The previous image (8 seconds @ ISO 10,000) was a 12 exposure stack. Here's another example of stacking's magic, using only 8 exposure stacks:

Each image enlarged to 200% to show detail. Click to enlarge further.


Why is Tracking is Better Than Stacking? With stacking you control only one of the exposure variables: the exposure time. You are allowed to reduce the exposure time by increasing the ISO, which noise is partially eliminated by the stacking of additional images. While stacking reduces high ISO noise, it does not recover the loss of dynamic range and sharpness due to the higher ISO speeds.

Tracking allows you to control all the exposure variables. Instead of reducing the exposure times as you do with stacking, tracking allows to increase the exposure time as long as you want, enabling you to lower your ISO speeds or stop down to better quality apertures, or both.

Trackers are not that expensive anymore. Many of the ones for astro-landscape photography are under $500. The one I recommend is typically under $300. Many photographers are purchasing trackers instead of upgrading to more expensive lenses and cameras, because the end results are better!

New tracker designs are smaller, lighter, more portable and less intimidating to set up. Some use a laser pointer for quick alignment, rather than a polar scope — which is only necessary for use with telephoto lenses (or for use in the Southern Hemisphere).

My basic MSM 2-in-1 tracker is about one-half the size and weight (1.01 lb / 450 g) as the basic Sky-Watcher Star Adventure tracker (2.2 lb / 1.0 kg), with its built in polar scope.

Note how my Move Shoot Move 2-in-1 tracker/rotator increases the number of smaller visible stars in this 30-second exposure track, which allowed an ISO drop from 8000 to 4000. Even more noticeable is how much star movement is still in the 15-second image, which is even more apparent in the 200% enlargement below it:


Increasing the tracked exposure time from 30 seconds to 120 seconds (2 minutes) allowed me to reduce my ISO from 4000 to 1000, for even less noise and more definition:

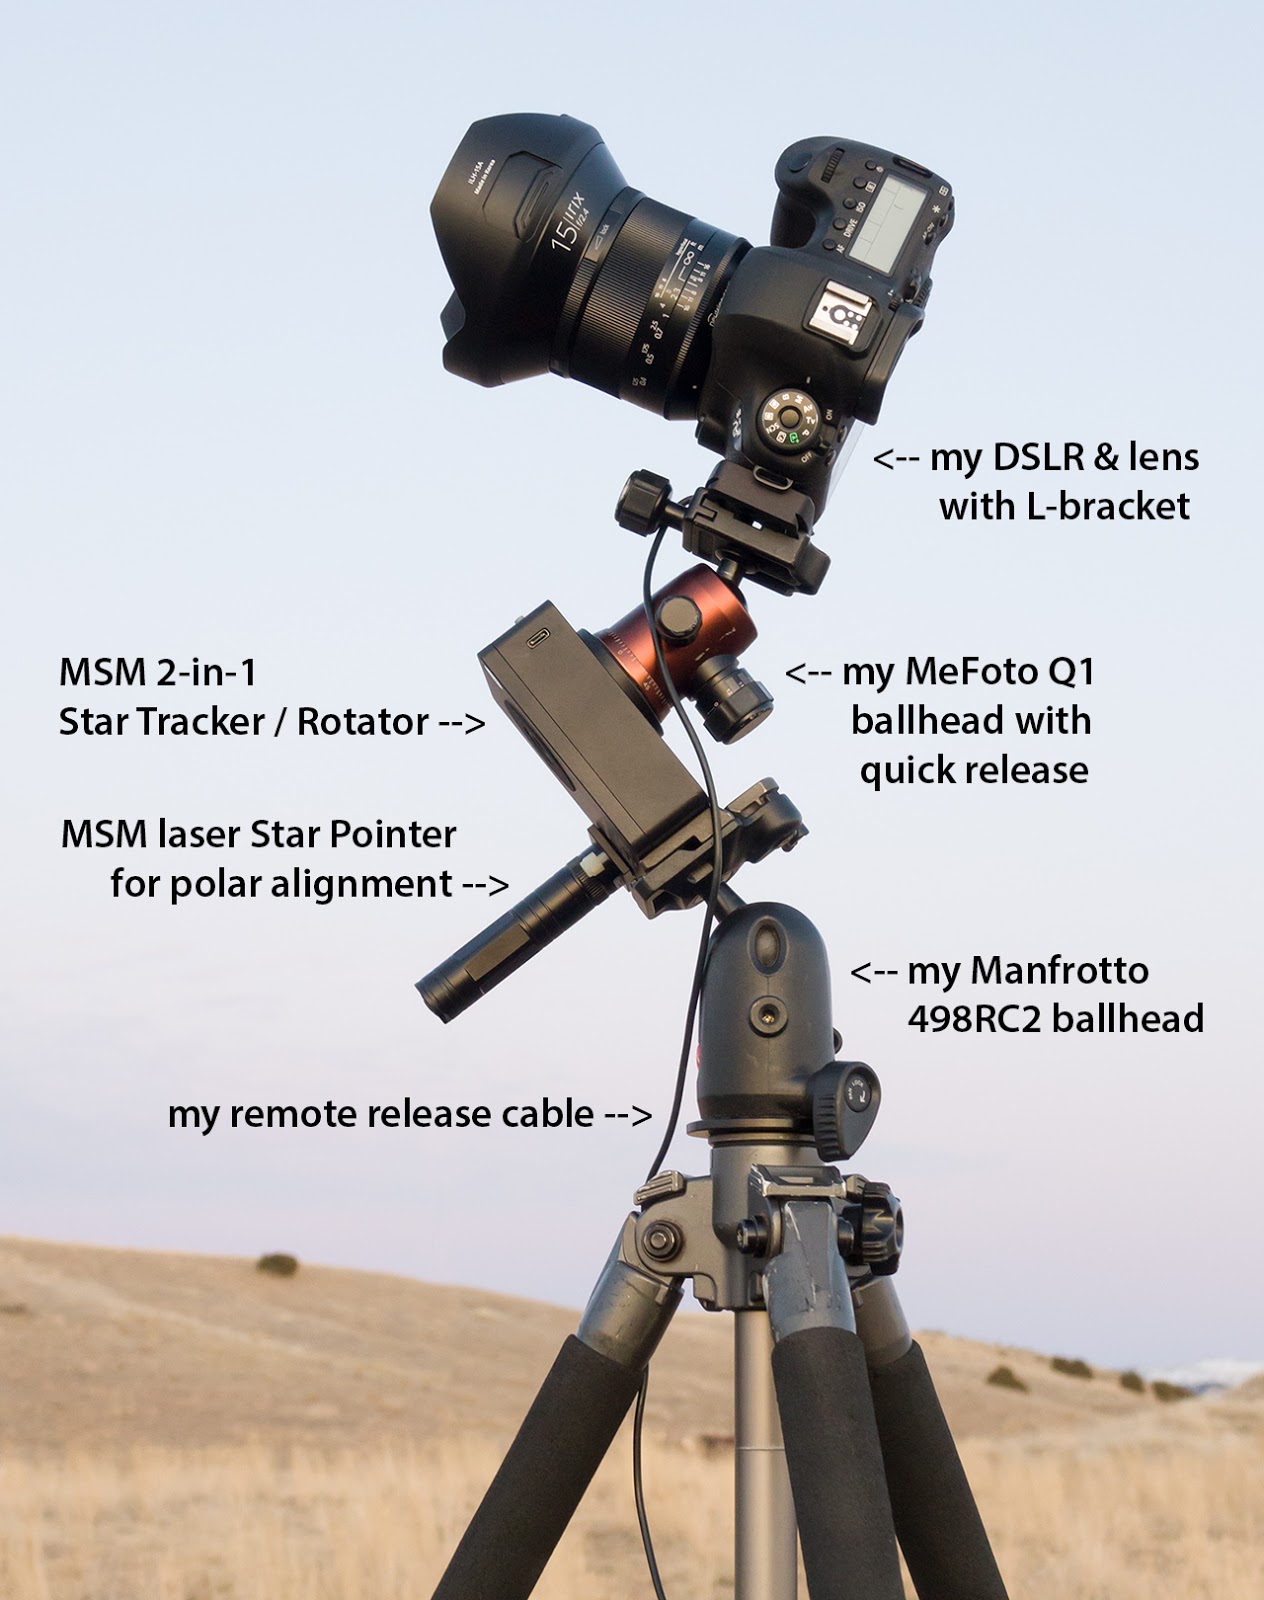


Here's my personal set-up, using the MSM 2-in1 Tracker/Rotator (see my review). I used my own MeFoto ballhead, but MSM's basic "Starter Kit" comes with a similar ballhead (actually better quality than my MeFoto Q1) and a laser Star Pointer for $310.00 (your special pricing is $259.00). Although you may already have a ballhead lying around like I did, I strongly recommend going with the "Starter Kit" option because these orders are shipped from a U.S. warehouse, and only take about 4 days to get to most continental U.S. locations. Other kit options ship directly from the factory in China and my first order took over two weeks to arrive to my Utah address.

Approaching deep space astro photography: The core of the Milky Way with the Dark Horse Nebula and the Rho Ophiuchi cloud complex in the top right. Taken with a 50mm lens. Tracked on a MSM 2-in-1.

The compact and light weight Move Shoot Move 2-in-1 Tracker/Rotator is designed for portable astro-landscape photography. It is perfect for backpacking! It's laser pointer allows to quick and easy alignment when using wide angle to 50mm lenses for nightscape photography. It can also be used for deep space photography; however, alignment accuracy is improved if the laser pointer is replaced with the Polar Scope, when using telephoto lenses like the 70mm to 200mm. Longer telephoto lenses may be too heavy for the MSM's 6.6 pound (3 kg) load capacity. If you need a tracker that can carry heavier loads and has more available counter balance accessories, I'd recommend the Sky-Watcher Star Adventurer, with its 11 pound payload capacity—however, be prepared for a more intimidating set up (my first experience took me over half an hour).

The MSM 2-in-1 Tracker/Rotator use a green laser pointer (left) for fast and simple alignment with the North Star. It is quite accurate for lenses up to 50mm. Telephoto lenses will benefit from the increased alignment accuracy of a polar scope, but alignment is a little more complicated to perform, usually taking a couple of minutes (the laser pointer detaches from the tracker and the scope attaches via a nylon thumbscrew). The polar scope is also necessary for those living in the Southern Hemisphere where Polaris is not visible.


My STEP-by-STEP procedure for taking tracked astro-landscape images with the MSM tracker:

  1. Take a few quick "NightScape Standard Exposures" to find the right position for your best composition with the foreground and sky. Do this without the tracker. I like to use two tripods—one for these quick set ups where I explore my composition, and another tripod that I can mount my tracker onto (one tripod for both is fine—it just takes a little more time for the setup).
  2. Once your best composition is found, move your other tripod (with the tracker) into the same position—replacing the tripod that has your camera on it (leave the camera on the tripod for now).
  3. Release the ballhead below the tracker and aim your laser pointer at Polaris (the North Star). Once the laser beam is on target, tighten your ballhead. (By the way, that pitch angle will be the same as your current latitude.) For best results, try to keep the tracker's "roll" as level as possible while pointing the laser up to Polaris.
  4. Your tracker is now aligned with the North Star! With practice, you can do this step in about 30 seconds. The MSM tracker with a polar scope, instead of a laser pointer, can take about 3 minutes for alignment. The first time I used the scope on a Sky-Watcher Star Adventurer, it took me over half an hour. One of my friends was so intimidated by his, he gave up (and he's a commercial airline pilot). He has never used his tracker since!
  5. The tracker should already have another ballhead (with a quick release) mounted to the rotator. Mount your camera's L-bracket to that quick release. The MSM's basic "Starter Kit" comes with a similar ballhead, if you don't already have one.
  6. Loosen the controls on this second ballhead and aim your camera to your predetermined composition.
  7. Tighten your ballhead controls and take a quick NightScape Standard Exposure. Make ballhead adjustments and repeat until you have duplicated your original composition.
  8. Before you take you first tracked exposure, you'll want to take an exposure for the foreground (with the tracker still off). Since the foreground does not move, you can make your exposure as long as you want (with a lower ISO). Do not turn on your tracker until you are satisfied with your foreground; however, don't take too long or your Milky Way may move out of position. Remember, the stars are rotating at 15 degrees per hour!
  9. You can now turn on your tracker and it will begin to rotate you camera in sync with the earth's rotation so that the stars stay perfectly still!
  10. Adjust your camera's exposure for optimum quality. For instance, if you decide to reduce your ISO from 6400 to 1600 (two stops), and your original exposure was 30 seconds, you'll now need to expose for 120 seconds. If your original aperture setting was f/2.8 and you wish to stop down to f/4.0, you'll need to go another 120 seconds, for a total of 240 seconds (4 minutes).
  11. Take your exposure! You are done, except for post processing. Total time for steps #3 thru #10 (not counting exposure time for the foreground and sky) will probably be less than three minutes. You can now shut off your tracker, so it doesn't run down the battery—which can typically run for about 5 hours of tracking.
  12. Combining the non-tracked foreground and the tracked exposures in post: When you review your last exposure, you'll notice that the foreground has moved (rotated) and blurred, especially where it meets with the sky. That's because the tracker was tracking and rotating for the sky. It's also why you should alway photograph the foreground first, before turning on your tracker! In post, you will take your sharp foreground exposure (#8) and layer it over your tracked exposure for the sky. Note: you sometimes have to slightly enlarge the foreground to cover up the blurred foreground portion on the tracked exposure. This post processing procedure is usually done in Photoshop layers. Kamil Pekala has a great YouTube tutorial for this. Another tutorial from Milky Way Mike shows how to combine a foreground with stacked image —but, the procedures are similar to combining with a tracked image. Mike's Photoshop techniques are just slightly different than Kamil's (you decide which works best for you).
Enjoy!

on the MSM 2-in-1 Tracker/Rotator
(Use the Discount Code ROYCE at check out
for an additional 5% off your order)


Tuesday, May 5, 2020

MSM 2-in-1 Star Tracker Review

"Head on Collision with the Milky Way" ~ a tracked and blended exposure, taken on a lonely road near Buhl, Idaho. The sky portion is a two-minute exposure, tracked with the MOVE-SHOOT-MOVE 2-in-1 Star Tracker. The highway was a separate, blended exposure taken during the morning twilight. The car headlights were one of three lucky occurrences that happened near 4:00 that morning!

MOVE-SHOOT-MOVE is a compact star tracker that also doubles as a time-lapse rotator. I have friends who have bought star trackers and have never used them to take a photo, because they were too complicated to set up! And these are intelligent people. The Move-Shoot-Move is the most compact and easy to set up star tracker I have ever used. From the time I placed it on my tripod to finished alignment was only about two minutes, and within a couple more minutes I was shooting tracked images of the stars. Now I discover it can do time-lapse movements as well! That will be my next outing—however this review will be mainly about its star tracking features.


The MSM Tracker/Rotator is only 3.875 x 3.125 x 1.375 inches (9.84 x 7.94 x 3.49 cm). Weight is only 1.01 pounds (450 g). It's simple 2-button design controls Northern and Southern Hemisphere rotations, full and 1/2 tracking speeds, and four choices of time-lapse movement speeds. Power is supplied by an internal lithium-ion battery that is non-interchangeable, but is rechargeable via a supplied USB cable. Although they claim over 5 hours of runtime, I was only able to get a little over of 2 hours of use during the colder winter months (before a blinking red light indicated the battery was getting low), which is quite typical of li-ion batteries under cold conditions. When I've need longer tracking (or rotator) time, I've plugged in a portable auxiliary USB power source (the MSM will operate while it is recharging or receiving auxiliary power). 

Limitations: The MSM has a maximum load capacity of 6.6 pounds (3 kg), which compares to the popular iOptron SkyTracker Pro and my first tracker, the Vixen Polarie Star Tracker. If you need a tracker that can carry heavier loads and has more available counter balance accessories, I'd recommend the Sky-Watcher Star Adventurer, with its 11 pound payload capacity—however, be prepared for a more intimidating set up (my first experience took me over half an hour).


Here's my personal set-up, using the MSM 2-in1 Tracker/Rotator. I used my own MeFoto ballhead, but MSM's basic "Starter Kit" comes with a similar ballhead (actually better quality than my MeFoto Q1) and a laser Star Pointer for $310.00 (current sale pricing is $259.00). Although you may already have a ballhead lying around like I did, I strongly recommend going with the "Starter Kit" option because these orders are shipped from a U.S. warehouse, and only take about 4 days to get to most continental U.S. locations. Other kit options ship directly from the factory in China and my first order took over two weeks to arrive to my Utah address.

Move-Shoot-Move special sale pricing
(Use the Discount Code ROYCE at check out
for an additional 5% off your order)


My same set-up viewed from a different angle. The green laser Star Pointer (included with the "Starter Kit") attaches to the MSM unit via a nylon thumb screw and the laser slides into the laser holder, which is secured by another nylon thumb screw. The tripod ballhead is released and the MSM, with the attached laser, are then pointed at Polaris (the North Star), which properly aligns the system (often in less than 30 seconds)! The camera is then attached to the MSM's ballhead via its quick release and pointed towards the Milky Way or a star constellation. The whole process only takes a few minutes.


The green laser Star Pointer makes alignment a quick and uncomplicated process. I found the alignment accuracy to be very good when using any wide angle lens, and even accurate for a normal 50mm lens. My 85mm started to show slight star movement on exposures over 3 minutes, so I'd recommend MSM's optional Polar Scope ($79.98) when using telephoto lenses.

Dim laser beam problem: The Star Pointer comes with a rechargeable li-ion battery and USB charger. I found the brightness of the green laser beam diminished significantly on cold nights. However, by removing the li-ion battery and warming it in my hand or pocket for just a few minutes brought the brightness back to normal strength.

If you live in Australia, I'd suggest you order with the Polar Scope option (Basic Kit A), because laser pointers are not allowed in your country. In fact, anyone living in the Southern Hemisphere might want to use this option. If you travel a lot, you may wish to get both the Star Pointer and the Polar Scope (Basic Kit C).


Comparing Quality: Here's an enlargement from the top image, showing the Rho Ophiuchi cloud complex area. I'm comparing the same area exposed with the tracker off, using a 30-second exposure (click to enlarge for detail). Note how the longer, tracked exposure allows for lower ISO settings, reducing noise and improving detail. Even longer tracked exposures will allow one to stop down the aperture to also reduce lens aberrations. (This 24mm f/1.4 lens gets about a 65% reduction in chromatic and coma aberration when stopped down to f/2.8. At f/4.0, it would lose about 85% of its coma and chromatic problems.)


In this 200% enlargement comparison, you can see that even at 15 seconds, there is some star movement, although it probably wouldn't be too noticeable until one made a print larger than 16x20 inches. What is very noticeable, even in smaller prints, is the huge increase in the number of stars that tracking picks up, and the increase in tonal range (bit-depth) due to the lower ISO's and the light gathering power that a tracker allows your sensor to capture.

How does tracking compare with stacking? I often refer to stacking as the "poor man's answer to tracking." Quickly shooting about 7 to 15 exposures to stack later (with Starry Landscape Stacker or Sequator) will significantly reduce your digital noise, but it won't increase the detail (including the number of smaller stars you'll pick up) and tonal range nearly as much as tracking will.

Orion's Belt and the Orion Nebula ~ a 2 minute exposure without and with tracking (using an 85mm lens).

Pros & Cons: I love the MSM's simple, modular design and its ability to add accessories when needed. I use the laser Star Pointer for most of my tracked shots, and I rarely need the accuracy of the Polar Scope—but it's nice to have it when needed. Ever since I got this tracker, I've been shooting a lot more tracked shot, because it's much easier to set up than any tracker I've ever used. I can't wait wait to start using the time-lapse movement features! My only con is its 6.6 pounds limitation on load capacity, which has never been a limitation for the equipment I use, but might be for some who would want to use a big telephoto lens.

In Conclusion: I think Chris Cook, a MSM owner from Sydney, Australia summed it up best: "The biggest difference I’ve found is the colours which are brought out with longer exposures. A stack of 10 or more photos at 3200 or 6400 [ISO] at 10-15 secs [each] looks great; but, when compared to a single shot at 640 [ISO] for 150 secs, there is no comparison. The star colours are amazing and the nebula are much more noticeable."


Time-lapse Movement Feature: The MSM is a 2-in-1 product that also has four movement speeds to its rotator. This allows for several time-lapse options. MSM offers several tutorials on this, including YouTube videos.

Move-Shoot-Move special sale pricing
(Use the Discount Code ROYCE at check out
for an additional 5% off your order)

Saturday, May 5, 2018

Podcast - Single Image Milky Way Photography vs. Star Tracking


PODCAST Episode 76: Single Image Milky Way Photography vs. Star Tracking. Listen to a podcast I did earlier this week with Aaron and Brendon at Photog Adventures.

Has Star Tracking made Single Image Milky Way Photography just a waste of time? The answer is NO! In this podcast I discuss pros and cons of both types of Milky Way Photography and how to best take advantage of your time out there under the stars —how to get the most out of our images whether or not you do any star tracking.

We share some post-processing techniques I use to reduce the noise in my single image photography, using special DFine tool methods within the Nik Collections, as well as going for the small effort of a mini stack to reduce noise.

I also talk about why I sometimes use an astro-modified camera and the benefits that come from that, as well as the rule of thumb I like to follow for what determines whether an image becomes a Single, Stacked, Blend or Tracked mage. Along with this, I give my thoughts on the ethics of composite nightscape photography.

- - -


Wednesday, March 23, 2016

Tracking the Stars with Rick Parchen

"Mt. Shuksan Reflection" - Click image to enlarge and see the low-noise quality due to tracking ~ © Rick Parchen

Rick Parchen is one of several astro-landscape photographers who are using star trackers or equatorial tracking mounts to improve the quality of their night sky exposures. Tracking allows one to use longer exposures without producing star trails. Instead of using ultra high ISOs and large apertures to reduce their exposure time, photographers can use a tracker to lengthen the exposure time and use smaller apertures. With a tracker, a photographer is able to align his camera to Polaris, the North Star; and a built in servo motor keeps the camera tracking the stars at the same speed the earth rotates. Editor's Note: Rick was one of the early pioneers in astro-landscape "tracking" photography. This post originally appeared in October 2013. 

The old way: Astro-photographers have been using equatorial mounts for decades to photograph the stars through their telescopes, but early astro-landscape photographers who included a landscape feature in the foreground didn't use these mounts because tracking the stars cause the landscape to blur! The standard solution has been to keep exposures at 30 seconds or less, following the "600 Rule" —requiring very high ISO settings that produced noisy images. (Additionally, equatorial mounts for telescopes were expensive and too bulky to carry into remote areas.)

A new approach: Because of the recent popularity of nightscape photography, newer mount designs, just for cameras, have appeared that are smaller and less expensive. Using these smaller and cheaper trackers, a new breed of astro-landscape photographers are taking a tracked exposure for the sky (referred to as "wide-field astrophotography"), a second exposure for the landscape (without tracking), and then blending the two in post-processing.

SkyTracker
In "Mt. Shuksan Reflection", Rick used a SkyTracker camera mount for his sky exposure, then turned it off for the ground exposure. The photo is actually a 3-image composite panorama (three for the sky and three for the ground). Each sky exposure was 3 minutes @ f/4, ISO 800, using a Samyang 14mm f/2.8 lens on a Canon 6D, mounted to a SkyTracker. Each ground exposure was 3 minutes @ f/5.6, ISO 400, with the SkyTracker turned off. Lighting of the ground came from a little moonlight (about to set) and supplemented in the foreground with LED's from multiple headlamps, coming from different positions. Initial processing was in Lightroom 5. Sky and ground pano exposures were stitched together in PTGUI, with final processing and the alignment of the sky and ground in Photoshop CS6.

Editor's Note: Another inexpensive and compact tracker is the Polarie Star Tracker from Vixen Optics. And, if you're handy with tools, you can build your own "barn door" tracking platform. (I believe all of these trackers are accurate enough for tracking stars with a normal to wide angle lens, without the need of a spotting scope attachment —which is only necessary if you are using a telephoto lens on your camera.) Both the SkyTracker and the Polarie come with Polar sight holes. The SkyTrack includes a Polar scope for greater alignment accuracy, whereas the Polarie's Polar Axis Scope is a $129 add-on accessory. The instruction manuals for the SkyTracker and the Polarie should help you decide which unit is best for you. The Orion Telescope people produce two inexpensive equatorial mounts that are adaptable for astro-landscape photography. Their manual tabletop model is under $70, and their motorized unit is under $180. (You may wish to throw away their low-quality tripods and attach the units to your regular camera tripod.)

Another view: "Path to Mt. Shuksan" ~ © Rick Pachen

Rick Parchen is a Seattle-based landscape photographer who has an appetite to travel to the world and share the extraordinary view with others. "I started this adventure seven years ago and only find myself more enveloped in chasing light and setting my work apart from others. I'll travel for weeks at a time, research for months, drive thousands of miles, and walk to near exhaustion all for the potential of a perfect image. But my passion goes far beyond just seeking the sights; the real pleasure comes when viewing the art in print and putting it on display for others to enjoy." More of Rick's photography can be seen on his Facebook page, and at his website.