 |
| November Milky Way "erupting" over Factory Butte, in the Utah Badlands. Although the core of the MW is gone until Spring, there is a lot of MW still left to shoot! |
Improving Your NightScapes Through Tracking
Photographing astro-landscapes is both exciting and challenging because of the extremes this type of night photography presents to the photographer. For over a decade, 30-seconds, at f/2.8 and ISO 6400 has been the "gold standard" in nightscape style photography:

 |
| Enlarged segment of a high ISO image |
Reducing ISO speeds: High ISO speeds can produce noisy, grainy and pixelated images, where the noise patterns are almost as large as the smaller stars! High ISO's reduce dynamic range and lower image resolution. Although modern DSLR and mirrorless cameras have sensors that can easily handle high ISO speeds and produce acceptable results, lowering the ISO speed will always produce better images. The two ways to reduce high ISO speeds are to either lengthen your exposure time or increase your aperture size, such as going from f/2.8 to f/2.0—both of which can cause other problems, which must then be addressed.
 |
| Same stars, with and without coma aberrations |
 |
| Click to enlarge and compare star trailing |
And, so the "dance" continues! Changing one of the three effects the other two. Exposure stacking will solve some of these problems. Tracking will solve all of these issues, as I will explain...
Exposure Stacking is referred to by some as the "poor man's solution to tracking" as it costs little to nothing (zero to about $40 for the software app), compared to a star tracker. I find the Mac app, Starry Landscape Stacker, to give me the best results (see my tutorial here). With stacking, you use shorter exposures and higher ISO speeds to make up for shorter exposure times, in order to obtain proper histogram levels. In practice, you take about a dozen exposures as quickly as the images will write to your memory card. Back home, those images are "stacked" by the software to significantly reduce the noise between the stars. This is because every exposure has a different noise pattern. The patterns cancel each other out (smooth) via what is called "median filtration". The software (especially SLS) aligns all the stars (which move with each exposure), masks out the foreground (which does not move), and then brings both the sky and the foreground back into the final stacked image! The previous image (8 seconds @ ISO 10,000) was a 12 exposure stack. Here's another example of stacking's magic, using only 8 exposure stacks:
 |
| Each image enlarged to 200% to show detail. Click to enlarge further. |
Why is Tracking is Better Than Stacking? With stacking you control only one of the exposure variables: the exposure time. You are allowed to reduce the exposure time by increasing the ISO, which noise is partially eliminated by the stacking of additional images. While stacking reduces high ISO noise, it does not recover the loss of dynamic range and sharpness due to the higher ISO speeds.
Tracking allows you to control all the exposure variables. Instead of reducing the exposure times as you do with stacking, tracking allows to increase the exposure time as long as you want, enabling you to lower your ISO speeds or stop down to better quality apertures, or both.
Trackers are not that expensive anymore. Many of the ones for astro-landscape photography are under $500. The one I recommend is typically under $300. Many photographers are purchasing trackers instead of upgrading to more expensive lenses and cameras, because the end results are better!
New tracker designs are smaller, lighter, more portable and less intimidating to set up. Some use a laser pointer for quick alignment, rather than a polar scope — which is only necessary for use with telephoto lenses (or for use in the Southern Hemisphere).
| My basic MSM 2-in-1 tracker is about one-half the size and weight (1.01 lb / 450 g) as the basic Sky-Watcher Star Adventure tracker (2.2 lb / 1.0 kg), with its built in polar scope. |
Note how my Move Shoot Move 2-in-1 tracker/rotator increases the number of smaller visible stars in this 30-second exposure track, which allowed an ISO drop from 8000 to 4000. Even more noticeable is how much star movement is still in the 15-second image, which is even more apparent in the 200% enlargement below it:


Increasing the tracked exposure time from 30 seconds to 120 seconds (2 minutes) allowed me to reduce my ISO from 4000 to 1000, for even less noise and more definition:

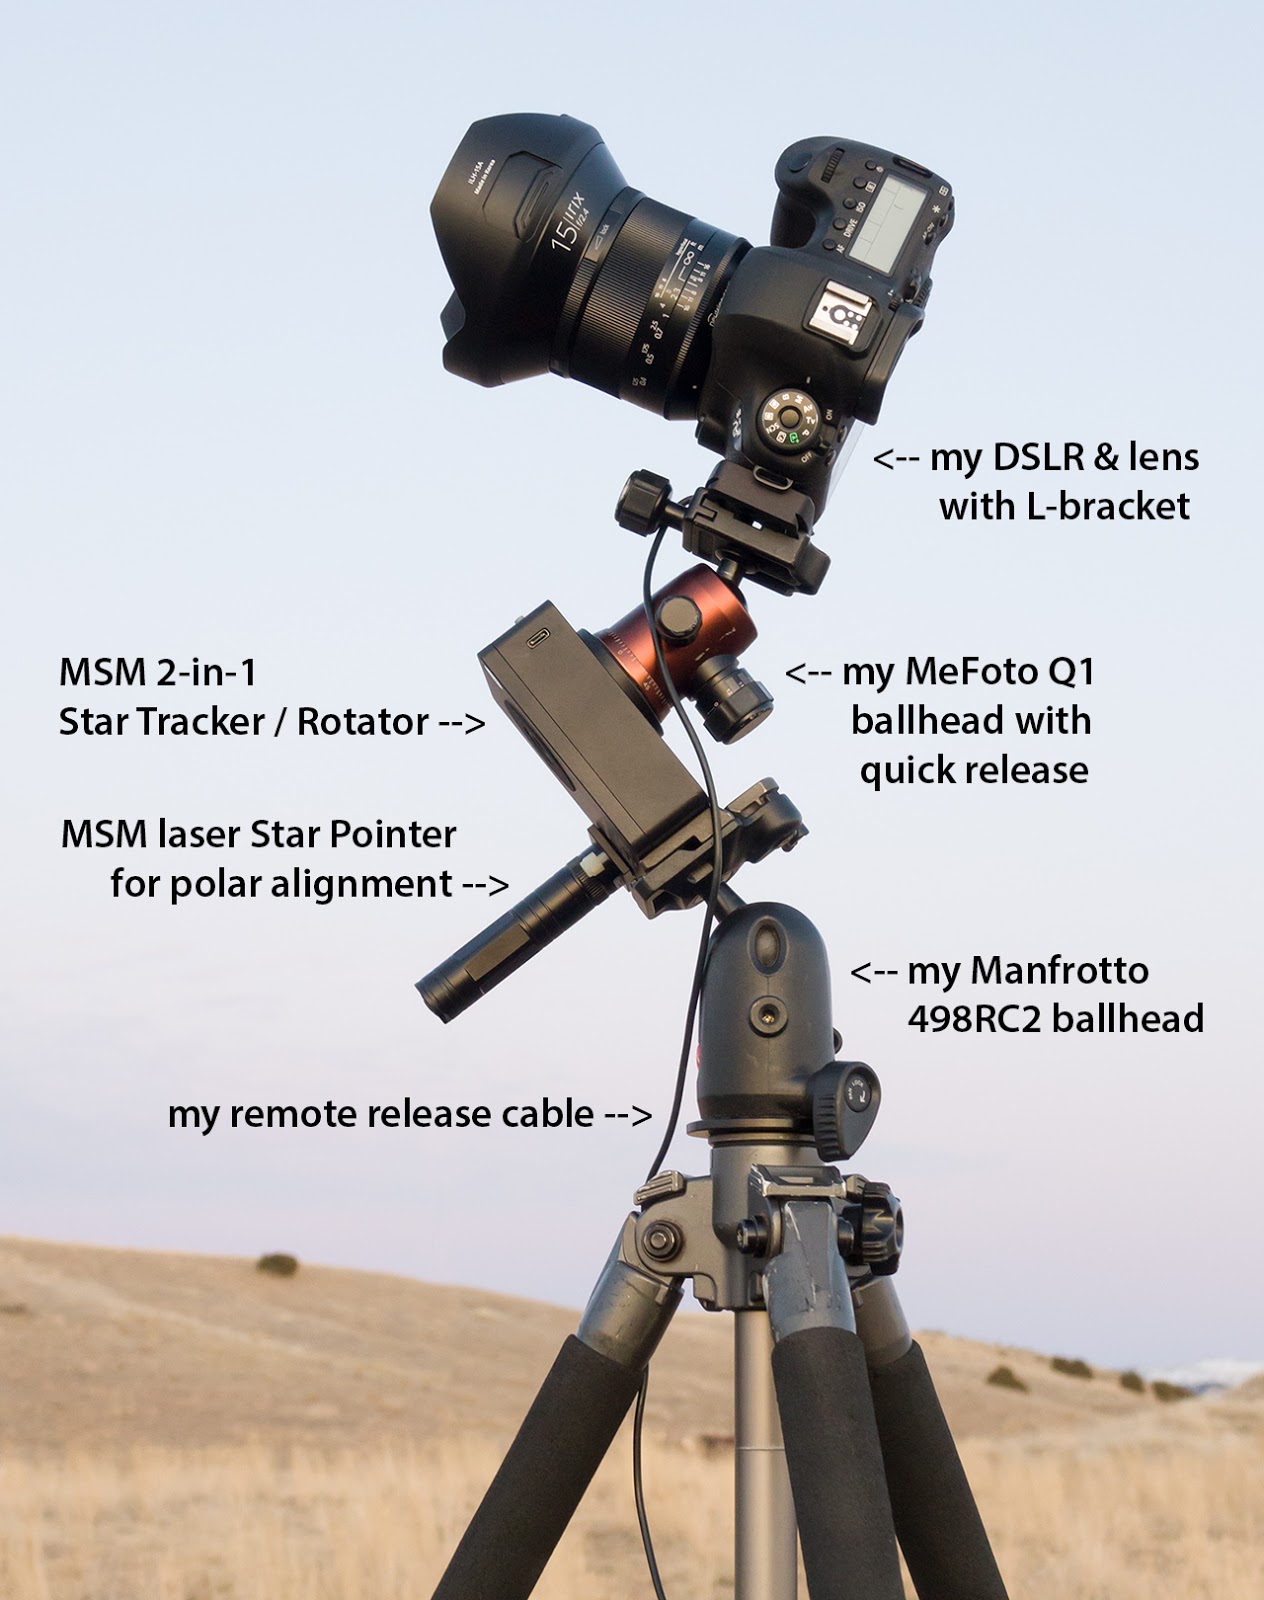
Here's my personal set-up, using the MSM 2-in1 Tracker/Rotator (see my review). I used my own MeFoto ballhead, but MSM's basic "Starter Kit" comes with a similar ballhead (actually better quality than my MeFoto Q1) and a laser Star Pointer for $310.00 (your special pricing is $259.00). Although you may already have a ballhead lying around like I did, I strongly recommend going with the "Starter Kit" option because these orders are shipped from a U.S. warehouse, and only take about 4 days to get to most continental U.S. locations. Other kit options ship directly from the factory in China and my first order took over two weeks to arrive to my Utah address.
| Approaching deep space astro photography: The core of the Milky Way with the Dark Horse Nebula and the Rho Ophiuchi cloud complex in the top right. Taken with a 50mm lens. Tracked on a MSM 2-in-1. |
The compact and light weight Move Shoot Move 2-in-1 Tracker/Rotator is designed for portable astro-landscape photography. It is perfect for backpacking! It's laser pointer allows to quick and easy alignment when using wide angle to 50mm lenses for nightscape photography. It can also be used for deep space photography; however, alignment accuracy is improved if the laser pointer is replaced with the Polar Scope, when using telephoto lenses like the 70mm to 200mm. Longer telephoto lenses may be too heavy for the MSM's 6.6 pound (3 kg) load capacity. If you need a tracker that can carry heavier loads and has more available counter balance accessories, I'd recommend the Sky-Watcher Star Adventurer, with its 11 pound payload capacity—however, be prepared for a more intimidating set up (my first experience took me over half an hour).
 |
| The MSM 2-in-1 Tracker/Rotator use a green laser pointer (left) for fast and simple alignment with the North Star. It is quite accurate for lenses up to 50mm. Telephoto lenses will benefit from the increased alignment accuracy of a polar scope, but alignment is a little more complicated to perform, usually taking a couple of minutes (the laser pointer detaches from the tracker and the scope attaches via a nylon thumbscrew). The polar scope is also necessary for those living in the Southern Hemisphere where Polaris is not visible. |
My STEP-by-STEP procedure for taking tracked astro-landscape images with the MSM tracker:
- Take a few quick "NightScape Standard Exposures" to find the right position for your best composition with the foreground and sky. Do this without the tracker. I like to use two tripods—one for these quick set ups where I explore my composition, and another tripod that I can mount my tracker onto (one tripod for both is fine—it just takes a little more time for the setup).
- Once your best composition is found, move your other tripod (with the tracker) into the same position—replacing the tripod that has your camera on it (leave the camera on the tripod for now).
- Release the ballhead below the tracker and aim your laser pointer at Polaris (the North Star). Once the laser beam is on target, tighten your ballhead. (By the way, that pitch angle will be the same as your current latitude.) For best results, try to keep the tracker's "roll" as level as possible while pointing the laser up to Polaris.
- Your tracker is now aligned with the North Star! With practice, you can do this step in about 30 seconds. The MSM tracker with a polar scope, instead of a laser pointer, can take about 3 minutes for alignment. The first time I used the scope on a Sky-Watcher Star Adventurer, it took me over half an hour. One of my friends was so intimidated by his, he gave up (and he's a commercial airline pilot). He has never used his tracker since!
- The tracker should already have another ballhead (with a quick release) mounted to the rotator. Mount your camera's L-bracket to that quick release. The MSM's basic "Starter Kit" comes with a similar ballhead, if you don't already have one.
- Loosen the controls on this second ballhead and aim your camera to your predetermined composition.
- Tighten your ballhead controls and take a quick NightScape Standard Exposure. Make ballhead adjustments and repeat until you have duplicated your original composition.
- Before you take you first tracked exposure, you'll want to take an exposure for the foreground (with the tracker still off). Since the foreground does not move, you can make your exposure as long as you want (with a lower ISO). Do not turn on your tracker until you are satisfied with your foreground; however, don't take too long or your Milky Way may move out of position. Remember, the stars are rotating at 15 degrees per hour!
- You can now turn on your tracker and it will begin to rotate you camera in sync with the earth's rotation so that the stars stay perfectly still!
- Adjust your camera's exposure for optimum quality. For instance, if you decide to reduce your ISO from 6400 to 1600 (two stops), and your original exposure was 30 seconds, you'll now need to expose for 120 seconds. If your original aperture setting was f/2.8 and you wish to stop down to f/4.0, you'll need to go another 120 seconds, for a total of 240 seconds (4 minutes).
- Take your exposure! You are done, except for post processing. Total time for steps #3 thru #10 (not counting exposure time for the foreground and sky) will probably be less than three minutes. You can now shut off your tracker, so it doesn't run down the battery—which can typically run for about 5 hours of tracking.
- Combining the non-tracked foreground and the tracked exposures in post: When you review your last exposure, you'll notice that the foreground has moved (rotated) and blurred, especially where it meets with the sky. That's because the tracker was tracking and rotating for the sky. It's also why you should alway photograph the foreground first, before turning on your tracker! In post, you will take your sharp foreground exposure (#8) and layer it over your tracked exposure for the sky. Note: you sometimes have to slightly enlarge the foreground to cover up the blurred foreground portion on the tracked exposure. This post processing procedure is usually done in Photoshop layers. Kamil Pekala has a great YouTube tutorial for this. Another tutorial from Milky Way Mike shows how to combine a foreground with stacked image —but, the procedures are similar to combining with a tracked image. Mike's Photoshop techniques are just slightly different than Kamil's (you decide which works best for you).
Enjoy!
on the MSM 2-in-1 Tracker/Rotator
(Use the Discount Code ROYCE at check out
for an additional 5% off your order)
ReplyDeleteContinue the good work!
Looking for expert Thesis Help? Our professional academic writers offer complete guidance — from topic selection and proposal writing to research, data analysis, and final submission. We deliver 100% original, well-researched, and properly formatted theses that meet your university’s academic standards. Whether you’re pursuing a master’s or PhD, we ensure timely delivery and top-quality results. Contact us today at +61 48900136 for trusted and affordable thesis help services!
ReplyDelete