The Bahtinov mask focusing aid: The
Bahtinov mask is a device used to accurately focus small astronomical telescopes. This distinctive pattern was invented by Russian amateur astrophotographer, Pavel Bahtinov, in 2005. The telescope is pointed at a bright star, and a mask is placed in front of the telescope's objective. The mask's three separate grids are positioned in such a way that they produce three angled diffraction spikes at the focal plane. As the telescope focus is changed, the central spike appears to move from one side of the star to the other. Optimal focus is achieved when the middle spike is centered between the other two spikes. If you like DIY projects, you can even
make your own Bahtinov mask.
Bahtinov mask limitations and new product solutions: The problem with most Bahtinov masks is that they work well for small telescopes and medium to long telephoto lenses on cameras, but their use with wide angle lenses that are often used in astro-landscape photography is not as decisive.
Improvements on the Bahtinov mask design: These two commercially available Bahtinov mask "filters" attempt to provide a more accurate and easier-to-use focusing tool for nightscape photographers. Unlike the typical Bahtinov grid or mask, these are more like true photographic filters. In the case of the SharpStar2 filter, the Bahtinov mask pattern is finely etched by laser into the clear plastic filter. The Focus on Stars filter goes even further with multiple Bahtinov mask patterns contained in a film that is sandwiched between tempered glass sheets.
Is a star focusing filter really necessary? Some may think there is no need for gadgets like this to aid photographers in getting a sharp focus on their stars, considering the available focusing tools I've already mentioned. I admit, that I was one of these people (I don't need more stuff cluttering my camera bag). However, as I've helped hundreds of students in my nightscape workshops over the years and seen them struggle to get a correct focus on the stars, even with these other tools, I'm beginning to think there is a need for a better focusing tool, and one or both filters of these might be it—especially as we get older and we struggle reading the small print (the stars on your LCD screen are even smaller, even at 10X!
Consider this: Many professional photographers resisted auto focus when it first appeared on pro SLR cameras back in the 80's—now, few of us would think of being without it! When articulating LCD camera screens first appeared a few years ago on low-end digital cameras, many scoffed at these as this gimmick. Now, they are fast becoming a "necessary"' feature in professional cameras.
PRODUCT PREVIEWS...
SharpStar is a simple tool created by Lonely Speck to help astrophotographers achieve critical focus on the stars with their camera lens and filter holder. SharpStar claims to help astrophotographers achieve perfect focus on the stars, every time.
SharpStar uses the properties of optical diffraction to create a set of three fine spike lines around a bright star. These diffraction spikes will shift position as you focus your camera. Adjusting focus so the central diffraction spike sits evenly between the other two diffraction spikes will ensure perfect focus. Once you’ve verified the focus pattern on your test shot, you can simply remove the SharpStar and shoot like normal — knowing that you have perfect focus. The diffraction spike pattern that SharpStar creates is a precise visual reference of focus success. If the central spike is off to the left, focus is too far, if it’s off to the right, focus is too near. If it’s in the center, it’s just right.
Here's a 3-minute video tutorial.
Lonely Speck’s SharpStar2 is made of precision laser etched optical plastic and comes in a square filter shape, made to fit into the most popular square filter systems. SharpStar2 requires a square filter holder and the appropriately-sized system adapter ring to fit your lens (both items sold separately). The SharpStar2 works with the Lee, Cokin, Formatt-Hitech and other similar filter holders that come in 85mm, 100mm and 150mm sizes. If you don’t already have a filter system, Lonely Speck personally recommends the Formatt Hitech system because of its price and its modular design that works well with wide angle lenses. October 9 update from Lonely Speck: "The SharpStar2 is made in the USA. We offer a 100% satisfaction guarantee (refund or replacement if the customer isn't satisfied for any reason). All they need to do is email us." ~ Ian and Diana
PRICING (filter only - filter holder not included):
- 85mm $64.00
- 100mm $69.00
- 150mm $94.00
Filter Pouches are optional (soft-lined semi-rigid pouch with magnetic closure)
~ 85mm $12.00 • 100mm $14.00 • 150mm $20.00 ~
The Focus On Stars high precision device fits into standard size square filter holders available on the market. At first glance, it looks like a filter.
In fact, it has a grid structure based on the Bahtinov mask known in astronomy, but it is much more complex. A multitude of Bahtinov masks in a special mosaic layout ensures that all three diffraction spikes are obtained quickly and easily with a maximum of two small movements (horizontal rotation, vertical slide). You only need to place it in front of the lens to fine-tune the focus, and you can remove it before the final exposure. According to the rules of diffraction, 3 pairs of bright spots appear on the LCD live image around the brighter stars.
Focus On Stars developer, Gabor Takacs, claims that his filter works better with the wide angle lenses most commonly used in astro landscape photography: "During my research, I found a promising device that the manufacturer recommended also for lenses with shorter focal length. It is a plastic sheet in which the grid lines of the Bahtinov mask known from astronomy were densely etched with laser. I have tested it. Using wide-angle lenses common in astro landscape photography, I have found that this device gives me a diffraction pattern that is too faint and too small to ensure a sharp focus. ...After more than a year of research and development, I develop a device that works well even with ultra-wide-angle lenses."
The Focus On Stars diffraction pattern has some similarities to the typical Bahtinov mask, but is also has some unique differences that help the user determine focus with more precision. When focusing, the center spot around the targeted star moves between the lateral spots. When the center spot is just equidistant from the lateral ones, i.e., the resulting pattern is symmetrical, the focus adjustment is perfect. The position of the intermediate spots also shows the direction of the required correction: If the spot is shifted to the left, the focus is in front of the target, if it is shifted to the right, it is behind the target.
October 12 update: "Focus On Stars is made in Hungary (EU) and we also offer a 100% satisfaction guarantee (refund or replacement if the customer is not satisfied for any reason)." ~ Gabor Takacs.
PRICING (filter only - filter holder not included):
- 100mm $113.00
- 150mm $154.00
Each filter comes with a protective, hand-sewn pouch with velcro closure :
My OUT OF THE BOX Experience
SharpStar2
I ordered the 100mm SharpStar2 for $69.00, with economy shipping from California (U.S.A.) to Utah (U.S.A.) for a cost of $3. I received a notification the next day that the product was out of stock. Two days later, the product was available and I received another notification that it was shipping. The package arrived three days later, and included a filter pouch (a $14 value) that I didn't order. When I questioned (via email) the inclusion of the pouch I didn't order, they said it was free because my order had been delayed due to stocking problems (nice gesture!). Total cost for filter with shipping to the U.S.A. was $72. However, if I lived in Australia, my USPS Priority Mail Express International shipping cost would be $82.75, for a total cost of $151.75.
All-in-all, the products were just as described, and nicely packaged. The filter was enclosed in a clear plastic envelope (blue product description printed on the outside), which could be used a storage pouch for a while, but the real filter pouch (made of suede leatherette material), with its magnetic enclosure, was much nicer and more substantial. The filter seems to be finely etched with the Bahtinov mask pattern into a sheet of clear plastic.

Focus On Stars
I ordered the 100mm Focus On Stars for $113.00, with DHL Express shipping from Hungary to Utah (U.S.A.) for a cost of $32. The FOS filter comes with its own padded pouch. I received a notification the next day that the product was shipping. The package arrived four days later. Total cost for filter with pouch and shipping to the U.S.A. was $145 — about twice as much as the SharpStar2 (however, you do get a pouch include). I noticed that high international shipping cost outside of the United States for the SharpStar2 tend to raise its total costs closer to that of the FOS filter. For instance, if I lived in Australia, my DHL Express shipping cost for the FOS filter would be $42, for a total cost of $155 (making it only about $2 more in total cost than the SharpStar2).
All-in-all, the FOS filter and pouch were just as described, and nicely packaged. Unlike the SharpStar2, the Focus On Stars filter is made of tempered Gorilla 3 Glass, not plastic, and claims to be very scratch resistant. It was also much easier to clean off my fingerprints and dust, due to a special coating that is applied to the glass.
150mm versions of SharpStar2 and Focus On Stars
I was also able to obtain the larger 150mm versions of these two filters, which I've hung on a clothes line for a visual comparison so you can quickly see the density differences of these two filters. Because of its complex mosaic pattern, the FOS filter is about one to two stops darker than the SharpStar2 (about 0.3 to 0.6 optical density). Will this extra density hinder in your ability to see its star focusing pattern at night, when compared to the more transparent SharpStar2 filter? It didn't seem to be a problem in my field tests (see below).

Actual Field Tests
Preparation
In order to use the SharpStar2 or the Focus On Stars filters, you need to have a filter holder. There are filter holder systems for 85mm, 100mm and 150mm square filters. The most common square filter size is the 100mm. I use the popular
LEE100 Filter Holder. You'll also need a lens adapter ring. Many of my Canon and Rokinon astro lens take a 77mm filter size, so I use
LEE's 77mm Wide-Angle Lens Adapter Ring for the 100mm System Holder (here are links for
82mm,
72mm,
67mm,
62mm,
58mm and
55mm filter sizes). The
Formatt Hitech 100mm Aluminum Modular Filter Holder is also a good system, and is slightly less expensive than the LEE system.
Unless you already have a Cokin P or Formatt-Hitech filter holder system for 85mm square filters, I would avoid this system size, since it has limitations for the more serious amateur or professional photographer; and the Focus On Stars filter is also not available in this size.
Ultra wide-angle lenses in the 14mm, 15mm and 16mm focal lengths typically do not have filter threads because of their huge front elements. These lenses usually need 150mm square filters and special square filter holder systems like the
LEE Filters SW150 Mark II Filter System Holder. Another popular solution for super-wide lenses is the Haida 150mm Filter Holder (which is often backordered). Here are Haida holders for the
Tamron 15-30mm,
Nikon 14-24mm and the
Samyang-Rokinon 14mm.
Focusing Procedures with the Filters
The following steps were used in the field with both the SharpStar2 and Focus On Stars filters:
- Turned off the autofocus and rotated the lens focusing ring to the infinity mark.
- With the camera on a tripod, pointed it at the brightest star in the sky, so that it was in the center of the camera's field of view. The brightest "star" was often the planet Jupiter.
- Turn on the camera's "live view" image and magnify the star to the maximum.
- Insert the focusing filter into the filter holder.
- Manually adjust the focus to cause the middle diffraction spike or diffraction spots (in the case of the Focus on Stars filter) to center between the outer spikes or spots. The symmetry of the pattern ensures perfect focus.
- Take a "confirmation" test shot and review the image under magnification.
- Make focus adjustments until perfect pattern symmetry is achieved.
- When the center spikes or spots are evenly centered, remove the focusing filter and point the camera optics at the scene you want to capture.
These steps worked fine with my 70mm, 50mm, 35mm and 24mm lenses; however, with the 15mm and 14mm ultra wide-angle lenses, even the brightest stars were so small, I had to take these additional steps to get the best pattern symmetry:
- I often had to rotate the camera a few degrees horizontally on the tripod head until I saw at least two pair of spikes or two rows of dots.
- I then had to arbitrarily slide the focusing filter, in the holder, up and down until all three pairs of spikes or spots became visible.
Using these additional steps, with the 14mm and 15mm lenses, gave me beautiful diffraction pattern symmetry and perfect focus with the Focus On Stars filter. Seeing and achieving a good diffraction symmetry pattern with the SharpStar2 filter was much more difficult when using ultra wide-angle lenses, as you'll see in the following images.
Field Test Comparisons
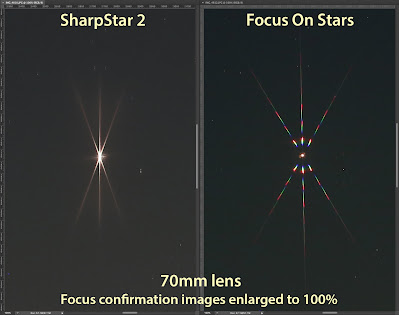
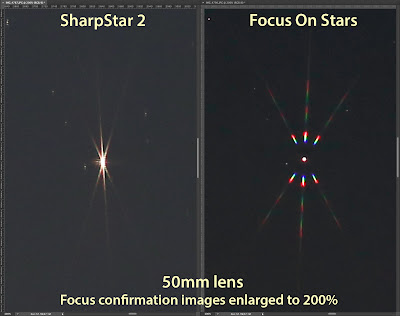
Both the SharpStar2 and the Focus On Stars filters produced excellent symmetrical diffraction focusing patterns when using a 70mm lens (a 24-70mm zoom @ 70mm). They both produced good patterns using a 50mm lens (a Samyang/Rokinon 50mm f/1.4). The colorful Focus On Stars pattern is more distinct to my eyes, and easier to judge when it has reached symmetry (perfect focus). However, both products performed well in the 35mm through 70mm range.
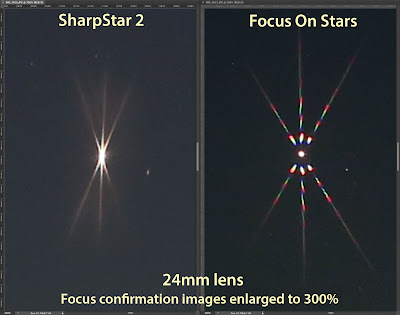
Using a 24mm lens (Samyang/Rokinon 24mm f/1.4), symmetry was much easier to see with the Focus on Stars filter than the SharpStar2; however, the SharpStar2 was acceptable as long as you used a very bright star, i.e. the planet Jupiter, and you used a loupe to help you magnify the camera's LCD screen.
The Focus On Stars easily out performed the SharpStar2 when using an ultra wide-angle 14mm lens (Samyang/Rokinon 14mm f/2.8). Even with a 10-power loupe to magnify the back of the camera's LCD screen (already magnified to 10X), it was difficult to see when there was spike pattern symmetry using the SharpStar2. Several image confirmations and slight focus adjustments had to be made in order to get the best pattern. I had virtually the same frustrating results using a 15mm ultra wide-angle lens (Irix 15mm f/2.5).
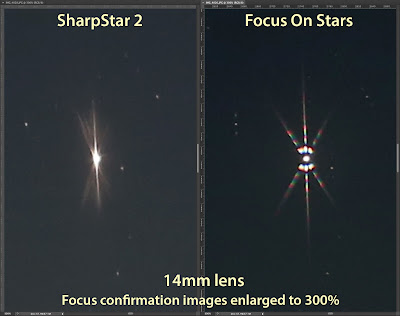
You'll notice that with the same confirmation exposure, the Focus On Stars image is about a stop darker than the SharpStar2 image. As I mentioned earlier, the Focus On Stars filter is darker due to its complex mosaic pattern. I didn't find that this extra density hindered being able to see or obtain a good symmetrical focusing pattern. Besides, the filter is removed before starting your creative astro photography.
A Work-Around Method to Improve Your Results
The brighter the star (or planet) you use for your Live View focus, the better will be your results with both filters, especially when using the SharpStar2. Even though the SharpStar2 performed poorly with ultra wide-angle lenses like the 14mm, I discovered that using a brighter, man-made "star," such as a
Lume Cube 2.0 light, allowed me to produce more acceptable results with the SharpStar2.
My procedure was to place the Lume Cube light about 100 paces from the camera (and aim the light back towards the camera). You can place the light on a rock or use a light stand. This creates a distance of at least 200 feet (61 meters) from the lens—more than enough for any wide angle lenses to optically be at an "infinity" distance. I use a diffuser filter over the light, so that it is no longer a focused light, and I reduce its intensity down to about 10% (go higher, if you still have trouble getting a good focusing pattern).
Because this artificial, man-made "star" is such a higher "magnitude" than real stars, your exposure will only need to be a few seconds, using a low ISO of about 200. This exposure will typically give you greater contrast (a darker background) than real stars in the sky, which should also produce a larger and crisper focusing pattern, even with the Focus On Stars filter—albeit this extra effort is something I find is rarely needed with the FOS filter.
My Conclusions
It may seem ridiculous to spend an average of $108 for a focusing aid (and even more if you don't already have a square filter holder system), but missing one great Milky Way shot due to inaccurate focus will cure you of this opinion, especially when you consider the travel costs you spent to get to a great location.
SharpStar2
PROS: Less expensive than the Focus On Stars filter. A good focusing aid for all lenses up through as wide as 24mm (or 16mm when using an APS-C cropped sensor).
CONS: It is difficult to achieve good results with ultra wide-angle lenses i.e. the 14mm and 15mm lenses (I suspect that 20mm and 18mm lens users will also have some difficulties). Plastic construction makes the filter more susceptible to scratches, and is harder to keep clean. A protective filter pouch will cost you an additional $12 to $20.
Focus On Stars
PROS: It is easy to obtain a decisive symmetrical focusing pattern with this focusing filter (apparently due to its more complex mosaic mask), especially with ultra wide-angle lenses in the 14-16mm range. Construction quality is excellent. The filter pattern is sandwiched and sealed between tempered Gorilla 3 glass, making it easier to resist scratches and to clean. A protective filter pouch is included.
CONS: More expensive than the SharpStar2 filter (U.S.A. purchasers will spend almost twice as much for the FOS, with shipping costs, than buyers of the SS2); however, pricing becomes closer for many international purchasers due to less expensive shipping costs (Australian FOS purchasers will pay almost the same total price as SS2 purchasers and European FOS buyers will actually spend less). The inclusion of filter pouch also helps to even out the price difference.
Disclosure: I am NOT receiving any income from the sales of the SharpStar2 or Focus On Stars filters. The links to the LEE filter holder systems are being monetized through B&H. Other than that, this blog post is purely for educational purposes.


Excellent thorough review - many thanks!
ReplyDeletesuperbe reportage,j'attendais cet article pour choisir mon filtre,votre examen approfondi me donne une idée plus juste et votre connaissance de ce type de prise de vue me rassure
ReplyDeleteMerci
The quick response time of this monitor is crucial for real-time monitoring and immediate action.
ReplyDeletebest cctv monitor
In today’s fast-paced digital landscape, businesses need robust, reliable, and high-performance IT solutions to stay ahead. As an authorized Dell Partner in Dubai UAE TierOne provides cutting-edge Dell technologies, including servers, storage, networking, and enterprise solutions to support business growth and innovation.
ReplyDelete
ReplyDeleteThe first time you touched me, I knew I was born to be yours.
Looking for professional french assignment help? Our expert tutors and writers specialize in French grammar, translation, literature, and cultural studies. We provide plagiarism-free, well-structured assignments tailored to your academic level and university requirements. Whether you need help with essays, comprehension, or written tasks, we deliver top-quality work on time. Contact us today at +61 48900136 for reliable and affordable French assignment help from language experts!
ReplyDeleteGreat insights! In the B2B space, having the right solutions can make a big difference in data accuracy and long-term planning. Your points clearly show how better visibility leads to better decisions. Thanks for sharing!
ReplyDelete