Share:

Wednesday, March 27, 2013

Hangout with Starry Night Landscape Photographers

A Google+ Hangout w/8 "Starry Night Landscape Photographers" (click to see YouTube video)

Last night I hosted and moderated a Google+ video "Hangout" with seven other starry night landscape photographers. There was some great information shared during this hour-long broadcast, which was recorded and saved on YouTube. We discussed and reviewed 21 of our night photos. And because video quality can sometimes be lacking, you can also follow along with higher resolution views at this website.


Our eight "star" panelist were Ben Canales, Brad Goldpaint, David Kingham, Greg Gibbs, Jack Fusco, Mike Berenson, Mitchell Prout, and myself, Royce Bair.

Learning curve: There are some production errors in my first attempt at hosting this many people—such as not moving the "camera" screen to the person who is talking (I eventually get better, so bear with me).  In future broadcasts, I may bring in a full time producer, so I can concentrate on hosting my guests.

Behind the scenes: After we ended the broadcast, we all stayed online for another hour, talking, sharing stories, information, and experiences (too bad this wasn't recorded, as these off-the-record chats were the best part of the evening).

In future hangouts: I plan to do some one-on-one interviews and bring in more public discussion and interaction. Your suggestions would help me plan these future events.

Links mentioned in the broadcast. Here are some of the items mentioned in last night's hangout:

International Dark Sky Association
RegiStar by Auriga Imaging (Mike uses for stacking sky exposures)
Rigel Systems Starlite 2-RED LED Flashlight (preserving your night vision)
...Starlite Mini 2-RED LED Flashlight
Brinkmann MaxFire Marine Dual Xenon Spotlight (used by David and Mike)

Night photography forums and tutorials:
...via Mike Berenson
...via David Kingham
...via this blog (there are dozens of tutorials and how-to articles here)

Night photography workshops:
...by David Kingham
...by Mike Berenson
...by Brad Goldpaint
...by Royce Bair

Featured Post: Shooting Stars eBook Review — How to Photograph the Stars and the Moon
Advertisement: Hot Weekly Photography Deals - Amazing discounts (updated twice a week).

Thursday, March 21, 2013

The Twilight / Moon Photography of Jim Crotty

"November Moon" - Hocking Hills, Ohio ~ © Jim Crotty (click for a larger view)
This image is a double exposure, combining the Moon captured with the 500mm, and the foreground captured with a 70-200mm (however, Jim never places the Moon away from its original location in the scene). This photo was captured on a Thanksgiving evening at one of his favorite locations for landscape photography, Hocking Hills State Park in Southeastern Ohio. This particular hill was behind The Inn at Cedar Falls, where Jim now returns twice each year to teach weekend workshops. For Jim, this image captures the spirit of the area of Hocking Hills. "There is something deeply personal for me as an artist that I connect with in this place. Perhaps it's because Hocking Hills is where I first discovered my love for nature photography when I was about 13 years old."

"It's all about the light," says Jim Crotty. "I'm really more of a twilight/pre-dawn type of photographer... Although I admire the work of deep and dark sky photographers, I tend to limit myself to lunar, particularly when I can include a landscape as foreground."

Philosophically Speaking: Jim likes the challenges of night and lunar photography. "Obtaining detail and proper exposure for night sky subjects isn't exactly something anyone can do simply by picking up a point-n-shoot camera and putting it on auto. It takes skill and experience. When everything comes together it can be extremely rewarding. Nightfall and dawn are those in-between spaces where capturing images is part art and part spiritual journey. The Moon and moonlight has a way of speaking to the poet that resides in all of us. Night sky subjects reveal the enormity and wonder of the universe, in space and within us."

"The Rising" - Dawn and crescent moon from Dayton, Ohio ~ © Jim Crotty (click for a larger view)
This photo was captured at dawn from behind Jim's home, which at that time  was in Centerville, Ohio, just south of Dayton. This is a double exposure; the foreground captured with a Canon 70-200mm f4 L IS lens and the Moon with a 300mm f4 L IS and 1.4 teleconverter. Most of Jim's Moon images are captured just after sunset but this is one of the few taken just before sunrise. The clarity of that morning provided an amazing hue to the pre-dawn sky. "I [am] frequently up early to photograph sunrise scenes, especially during summer. It [is] in the quietness of those moments when I truly [feel] at peace."

The Challenges: Light pollution. Jim is often amazed at how much of an impact a few street lights can have on clarity in the sky. Finding a good evening location to shoot from can also be challenging from the standpoint of not being interrupted, and of safety. The public access points to the beach on Hilton Head (South Carolina) are not as safe as daytime (when you are carrying expensive photographic equipment), which is a shame, because the darkest sky is found over the ocean.

Bugs and sand. Just after sunset and right before sunrise the bugs can be horrible too, especially in sub-tropical coastal areas like Hilton Head. He has been eaten-up pretty bad by sand fleas. Shooting on the beach can also be very rough on gear. Jim has already had a Canon 28-70mm f2.8 L lens trashed due to sand.

"Moonflowers" - Sunflower field and August Moonrise in Greene County, Ohio ~ © Jim Crotty
This single exposure image was completely unplanned. "I had captured a series of images on the other side of the road, ...with the sun setting behind the sunflowers," says Jim. "As I was putting my gear back in my truck, I looked to the other side and there was the August full Moon rising. With the light of dusk still falling on the flowers I was able to capture several exposures before the Moon rose too high and the last light of dusk was gone."

Favorite equipment: His tripod and the Kirk ballhead Jim purchased over 12 years ago. The ballhead still works like new—it is one of the best gear investments he has made, next to camera bodies and lenses. It has outlasted two tripods! His favorite lens for Moon photography is his Canon 500mm f4.5 telephoto, although it's a heavy piece of glass. Jim bought it used about eight years ago, and it's been flawless.

Software: Jim relies on the Sun n Moon iPad app for helping to plan his shots. For initial post editing and file management, he uses Aperture. He's also a big fan of the Nik plug-ins, particularly, Color Efex 4 and Viveza 2.

"On the Tides of Easter" - full Moon rising over Hilton Head Island, South Carolina ~ © Jim Crotty
Both the Moon and the foreground of this image were captured using a Canon 1D Mark III camera. The foreground was captured with a Canon 70-200mm EF L lens at 70mm, RAW capture, aperture priority mode, one stop under exposed at 2000 ISO f/5.6, 0.5 seconds. The Moon was captured with a Canon 500mm f4.5 EF L lens at ISO 800, f/4.5, 1/50 second, aperture priority mode, -3.0 EV. The Moon and foreground images were combined in post.

The images were captured at high tide on the evening of Good Friday, April 6, 2012. This photo works because the waves were at high tide. "It's an entirely different dynamic than low tide," says Jim. "There is something so magical about a moonrise over the ocean. It's mystical and primordial at the same time. Although I try not to make it obvious, there is always a subtle nod to my own spirituality and reverence for God's creation in my images. Where I am at now with my photography is in large part a spiritual journey, which became more prevalent in all that I do following a few life changing events, including divorce in 2008 and then a heart attack in 2010. There is a deep desire within me to share my photography as proof of a divine connection between artist and subject and audience. I'm convinced that with nature's beauty we are provided signs and hints of something so much more than what is immediately before us. The photographer can serve as witness in helping others to stop and take notice."

Early History: "Astrophotography was the door that opened the world of photography for me at a very young age," says Jim. "I loved astronomy growing up in Ohio. I had telescopes early on and was always out observing. I think my first scope was a four and half inch reflector, when I was about 10 or 11, back in the 70's."

It was also about that time that Jim started exploring nature subjects with a Pentax Spotmatic F 35mm SLR camera. For him, there was nothing more exciting than shooting time exposures of the night sky on Kodak Tri-X black and white film and then developing and making prints in his darkroom. He is very thankful for the adult mentors back then who helped him learn and encouraged his interest in both astronomy and photography. Jim tries his best to "play it forward" when he teaches young photographers in his workshops.

Jim Crotty
Currently: Jim teaches photography workshops, provides commercial photography services and sells fine art prints of his award-winning work with nature and landscape subjects. His images have been published in Nature's Best, National Wildlife, Smithsonian, USAToday, and most recently, the Professional Photographer Magazine. In 2009 he earned the professional designation of Certified Professional Photographer through the Professional Photographers of America. Today he works from a home office and studio located in Frisco, Texas having recently relocated from Hilton Head Island, South Carolina.

More of Jim's work can be found at his website: Fine Art Photography and Photography Services by Jim Crotty, and at his Facebook page.

Advertisement: Hot Weekly Photography Deals - Amazing discounts (updated twice a week).

Monday, March 18, 2013

POTW: "The Coyote Calls" by Ted Gore

"The Coyote Calls" - Alabama Hills, California Eastern Sierra ~ © Ted Gore (click for a larger view)
"I was shooting this and heard... THIS!" says Ted. "...Scared the bajeezus outta me!

Our Photo of the Week (POTW) was taken by Ted Gore in the Alabama Hills of California's Eastern Sierra. This was taken just around 4:00 AM to catch the rising of the Milky Way just above the rocky mounds. It's this time of year when one can catch the summer constellations low on the horizon, in the early morning. Ted had also planned to be able to catch the rising moon as well. The sunrise came from the same direction, about an hour after that.

"It was quite the party!" says Ted. If you look closely, the moon is actually a crescent moon, but in clear, less light polluted skies, the dark side reflects it's share of light as well. A little bit of glow on the horizon is a combination of the town of Lone Pine, the moon and the soon to rise sun.

Ted photographed this with a Nikon D600 and a 17mm lens. He took three shots, which were blended together in post: one for sky @ ISO 5000, f/2.8, 20 seconds; a second, longer exposure for the foreground; and a third, shorter exposure for the moon, so it wasn't a bright blobby mess.

Ted Gore lives and works in Los Angeles, California as a motion graphic designer, which pays his bills and funds his passion of landscape photography. He takes a slight artistic and fanciful approach to his images, as he likes to present the image in a way that evokes the grandeur and beauty of the moment. More of Ted's work can be seen at his 500px and Facebook pages.

Advertisement: Hot Weekly Photography Deals - Amazing discounts (updated twice a week).

Monday, March 11, 2013

Stargazing the winter night sky

"Stargazer" - photographed near The Watchman mountain, Zion National Park ~ © Royce Bair
As we approach Winter in the Northern Hemisphere, the brightest portions of the Milk Way, the central bulge, disappear below the horizon for several months (and appear in the Southern Hemisphere). However, other stars take their place on the night stage, i.e. Sirus, the brightest star in the sky, and the Orion Constellation — arising only in the winter months.

At the top of this photo is the planet Jupiter. Between the man's legs (my son, Chris) is Sirus. Above his outstretched arms is the Orion Constellation, the Hunter of Greek Mythology, known mostly as the domain of the reddish star Betelgeuse (the star above his left hand, pronounced "beetlejuice") and Orion's Belt: Alnitak, Alnilam and Mintaka, the three blue stars arcing upward (above his head). The three stars between his head and right hand are the hunter's sword, the center not actually being a star, but it is the Orion Nebula—the closest star formation to the earth, with a mass that is 2,000 greater than our Sun. And, the star above his right hand is Rigel, the brightest star in the constellation. The cloud of stars to his left is part of the Milky Way.

Technical info: Photographed with a Canon EOS 5D Mark III, using a Canon EF24mm f/1.4L II lens @ f/2.5 • 13 seconds • ISO 6400.

Help from light pollution: Some have asked, "How are the peaks illuminated behind the man?" There is a valley between the hill my son is standing on and the mountain behind him. In that valley is the small town of Springdale, Utah. The light pollution from the town (mainly, from the orange-ish sodium vapor street lamps) is illuminating the peaks. Because it is such a small town, its light pollution does not over power the stars. Here is another photo, taken from virtually the location. It was taken with a fisheye lens and captured in May, when the Milky Way is higher in the sky, and the earth is at a different seasonal orbit and angle:

A similar photo, taken in late Spring (May) with a fisheye lens ~ © Royce Bair
 By August, the Milky Way will be in a near vertical position, and further to the right (south). About one-half of the central bulge will also have disappeared below the horizon.

Royce Bair is the editor of this blog and the photographer of the above images. Here is my gallery of NightScape images. My schedule of workshops, tutorials, and other events is available here.

Advertisement: Hot Weekly Photography Deals - Amazing discounts (updated twice a week).

Wednesday, March 6, 2013

Stevenstone Library at Night by Roger Moffatt

Milky Way sky over The Library at Stevenstone in Devon, England ~ © Roger Moffatt
Our Photo of the Week (POTW) was taken by British photographer, Roger Moffatt. Roger used a Nikon D90 and a 10.5mm fisheye lens. This photo is make from two images joined together. His exposure time was 47 seconds for the top image and 54 seconds for the bottom. Both were at ISO 800 and f/2.8. The building was painted briefly by a torchlight (Lenser T7 tactical).

Roger Moffatt
Yes, there was light pollution. This photo flies against an argument I often hear: "I can't do 'starscapes' in my area because of all the light pollution." While that is somewhat true, there is usually some distant corner of of your countryside that is less populated with people and lights. Roger found that in this corner of England. (England's population density of 395/km2 [1,023/sq mi] is about 12 times greater than the United States, and 30 times greater than my home state of Utah!)

Astronomers turn away now! Roger did not originally intend to join the two images together, and he admits that they technically don't match due to the fisheye distortion. He had to do a lot of post work to pull them together. Even though the disparities become more obvious the longer one looks at it, he likes the final artistic impact, and so do I.

Step-by-step post process: On Roger's blog, he shares how he exposed, processed and combined the two photos to make this final image.

More about Roger: You can learn more about Roger Moffatt at his website, and see more of his photography on his Flickr photostream. Roger is also the creator of The Golden Hour Calculator (used to find the "Magic Hour" for photography at any given location).

Advertisement: Hot Weekly Photography Deals - Amazing discounts (updated twice a week).

Tuesday, March 5, 2013

New See-in-the-Dark Camera

Yesterday, Canon announced in a news release that it had developed a prototype sensor and camera that records video in very low light—almost total darkness. The 16:9 aspect ratio CMOS sensor allows the HD video camera to focus with as little as 0.03 lux of illumination!

The pixels in this new video-only, 35mm CMOS sensor are about 7.5 times larger than in the already light-sensitive DSLRs like the EOS-1D X and the Canon 5D Mark III. The prototype is so sensitive it can record faint stars in the Milky Way and a live Geminid meteor shower.

A starry night sky with current CCD technology (on left) compared to new HD (16:9) CMOS sensor (on right).
 Currently, this high-sensitive imaging technology has only been announced for video use. Canon has not revealed when it might ship a video camera with this new imaging technology, but it's planning to show the sensor at a security expo in Japan, starting today. According to a statement in the video demonstration (linked below), this technology is likely to carry over to other imaging sensors, such as those used in high-end DSLR cameras.

Video Demo: Here is an English version of Canon's official news release, and a video demonstration of the new camera's amazing sensitivity.

Advertisement: Hot Weekly Photography Deals - Amazing discounts (updated twice a week).

Friday, March 1, 2013

Painting with Light by Tim Cooper

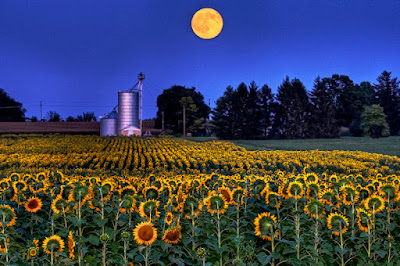
Light painting photography by Tim Cooper © (click image to enlarge)
A light painting tutorial by Tim Cooper (reprinted by permission):

I first learned about painting with light over 20 years ago in one of my early photo classes.  Surprisingly, not much has changed since this time. A fascinating mix of painting and photography, illuminating your subject with a flashlight is an extraordinary amount of fun. 

The glowing results of Light Painting might suggest a complicated and time consuming process, but with a few hints and little practice, you will be making masterpieces in no time!  Due to modern digital cameras, this type of photography is easier than ever.  

By definition, Light Painting is the process of photographing at night while illuminating your subject with a handheld device such as a flashlight or camera flash.  The use of a moving hand held light creates a look that is nearly impossible to replicate during daylight hours. 

You can also mix in the ambient light of the scene for a more layered affect.  Your scenes can be partially lit by moonlight, street lights, house lights or entirely lit by your own flashlight!  You can use different flashlights for a slight change in color or place colored gels over them for striking changes.  Rotating the front bezel of your flashlight spreads or focuses the beam light creating a variety looks to your image.  The possibilities are endless! 

Unlike many forms of photography, there are very few hard and fast rules that apply to this discipline.  Proper exposure is largely based on a trial and error approach.  Subject reflectivity, ambient light, flashlight power and  distance from flashlight to the subject all influence the resulting exposure. 

Begin by taking some test exposures.  In many cases, the longest shutter of 30 seconds on your camera will not provide enough time to paint.  This means you will need a camera that goes to a shutter speed of “B”, which stands for bulb.  To use the B setting you must have a cable release with a lock.  Plug in your cable release, set your camera to B and press and lock the cable release.  The shutter will now stay open until you unlock the cable release.  Exposures can range from 1 second to hours.  Typically most cameras will start to exhibit too much noise after the 3 minute mark, however. 

I usually start with my aperture at about f8.  This is typically the sharpest part of any lens and also allows more time to paint.  Keep your ISO at a lower setting such as 100, 200 or 400. 

If the scene is completely dark with no ambient light, then only your flash light will illuminate the scene.  In cases like this, you can leave your shutter open for a very long time.  1 minute, two minutes or even three minutes.

If you are mixing ambient light, such as the full moon or street lights, you shutter time may anywhere from 30 seconds to a couple of minutes.  My recommendation here is to take some test shots with out painting. Get your ambient light to a brightness that doesn’t overwhelm your scene.  Perhaps something a little darker than you might normally use.  Set your shutter speed for this exposure and then begin to experiment with different amounts of light painting.

10 Helpful Hints:
  1. Wear dark clothes so as you walk through the scene you will appear invisible to the camera
  2. Keep your body in between the flashlight and camera to alleviate recording the flashlight in the scene.
  3. Don’t keep your body in between what you are painting and the camera.  This will negate the painting.
  4. Paint your subjects from the side rather than from the camera.  Painting directly from the camera will flatten out the scene while painting from the side adds texture.
  5. Spend more time painting the areas you want to highlight. 
  6. Use a broad beam for illuminating a general area, a focused beam to highlight.
  7. Use the cardboard core of a paper towel roll over the front of your flashlight to achieve a very narrow beam.
  8. Move the position of the flashlight to create a softer light.  Try to refrain from painting from one position.  
  9. Before going out to make masterpieces, test your camera at home.  Set up your camera in your home at night and make a series of exposures at 30 seconds, 1 minute, 2 minutes, 3 minutes and 4 minutes.  Check your images out on your computer and see where the noise starts to become a problem.  Most cameras will look OK up to the 2 or 3 minute mark.
  10. The hotter it is, the more noise you will see over long exposures.  Below 60 degrees is optimal!
  11. Practice, experiment and have fun!
About Tim Cooper: For more tutorials, workshops, and learning go to Tim Cooper's website. I also suggest you join Tim's Photo Circle for future updates on equipment reviews, tips, and training videos.

Editor's Note: Items #4, 7, and 8 are important "advanced" techniques that can really separate your work from the crowd. Similar techniques are used in the light painted foregrounds of my NightScapes. When working with starscapes, that require the stars to remain as points of light, your period of light painting time will be limited to 30 seconds or less. (This time can be extended by taking two exposures, a shorter one for the sky, and a longer one for the light painted foreground, then combining the two in post production.)

Advertisement: Hot Weekly Photography Deals - Amazing discounts (updated twice a week).